
Connect SourCherry workflows with ClickUp to create tasks, build spaces/folders/lists, and store AI‑generated docs—without third‑party tools. This guide explains what the integration is, key benefits, setup, and best practices, so your CRM and project delivery stay perfectly in sync.
TABLE OF CONTENTS
- What is ClickUp Actions & Triggers in Workflows?
- Key Benefits of ClickUp Actions & Triggers
- Prerequisites & Permissions
- Connecting Your ClickUp Account
- Available Triggers (ClickUp → SourCherry)
- Available Actions (SourCherry → ClickUp)
- How To Setup ClickUp Actions & Triggers
- Common Use Cases
- Frequently Asked Questions
- Related Articles
What is ClickUp Actions & Triggers in Workflows?
ClickUp actions and triggers link SourCherry automation to ClickUp’s task and document platform. Triggers listen for events in ClickUp (like a new task or status change) and can start SourCherry workflows. Actions push data from SourCherry into ClickUp (like creating a task, space, or document). This two‑way connection reduces manual work and keeps client projects updated in real time.
Key Benefits of ClickUp Actions & Triggers
Understanding outcomes helps you decide where to apply the integration first. The benefits below focus on typical agency and service workflows where project delivery must mirror CRM stages.
No double entry: Client and project details flow automatically between SourCherry and ClickUp, cutting manual updates.
Faster onboarding: Spaces, folders, lists, and tasks spin up the moment a deal hits a key stage.
AI to docs: Generate content with SourCherry’s AI steps and save it straight to ClickUp Docs for review.
Cleaner handoffs: Comments and status updates live where your team executes work, reducing miscommunication.
Fewer tools to manage: Replace many webhook/Zap automations with native, auditable workflow steps.
Cost control (premium): Premium executions are usage‑based and can be rebilled to clients when enabled.
Prerequisites & Permissions
A few account‑level settings influence whether you can add ClickUp steps and how you’ll be billed. Confirm these before building.
SourCherry access to Workflows and Integrations at the sub‑account where the automation will run.
A ClickUp user with permission to create/update items in the target workspace (actions respect ClickUp permissions).
Premium Features for Workflows may need to be enabled by the Agency to run premium actions/triggers and to optionally rebill usage to clients.
Connecting Your ClickUp Account
Authorization uses ClickUp’s official OAuth so events can be received via webhooks and actions can read/write with your permissions.
In SourCherry, open Automation → Workflows and add any ClickUp action or trigger.
→ If not connected, click Connect Now and sign in to ClickUp to approve access.
→ If already connected, fields load instantly in the step.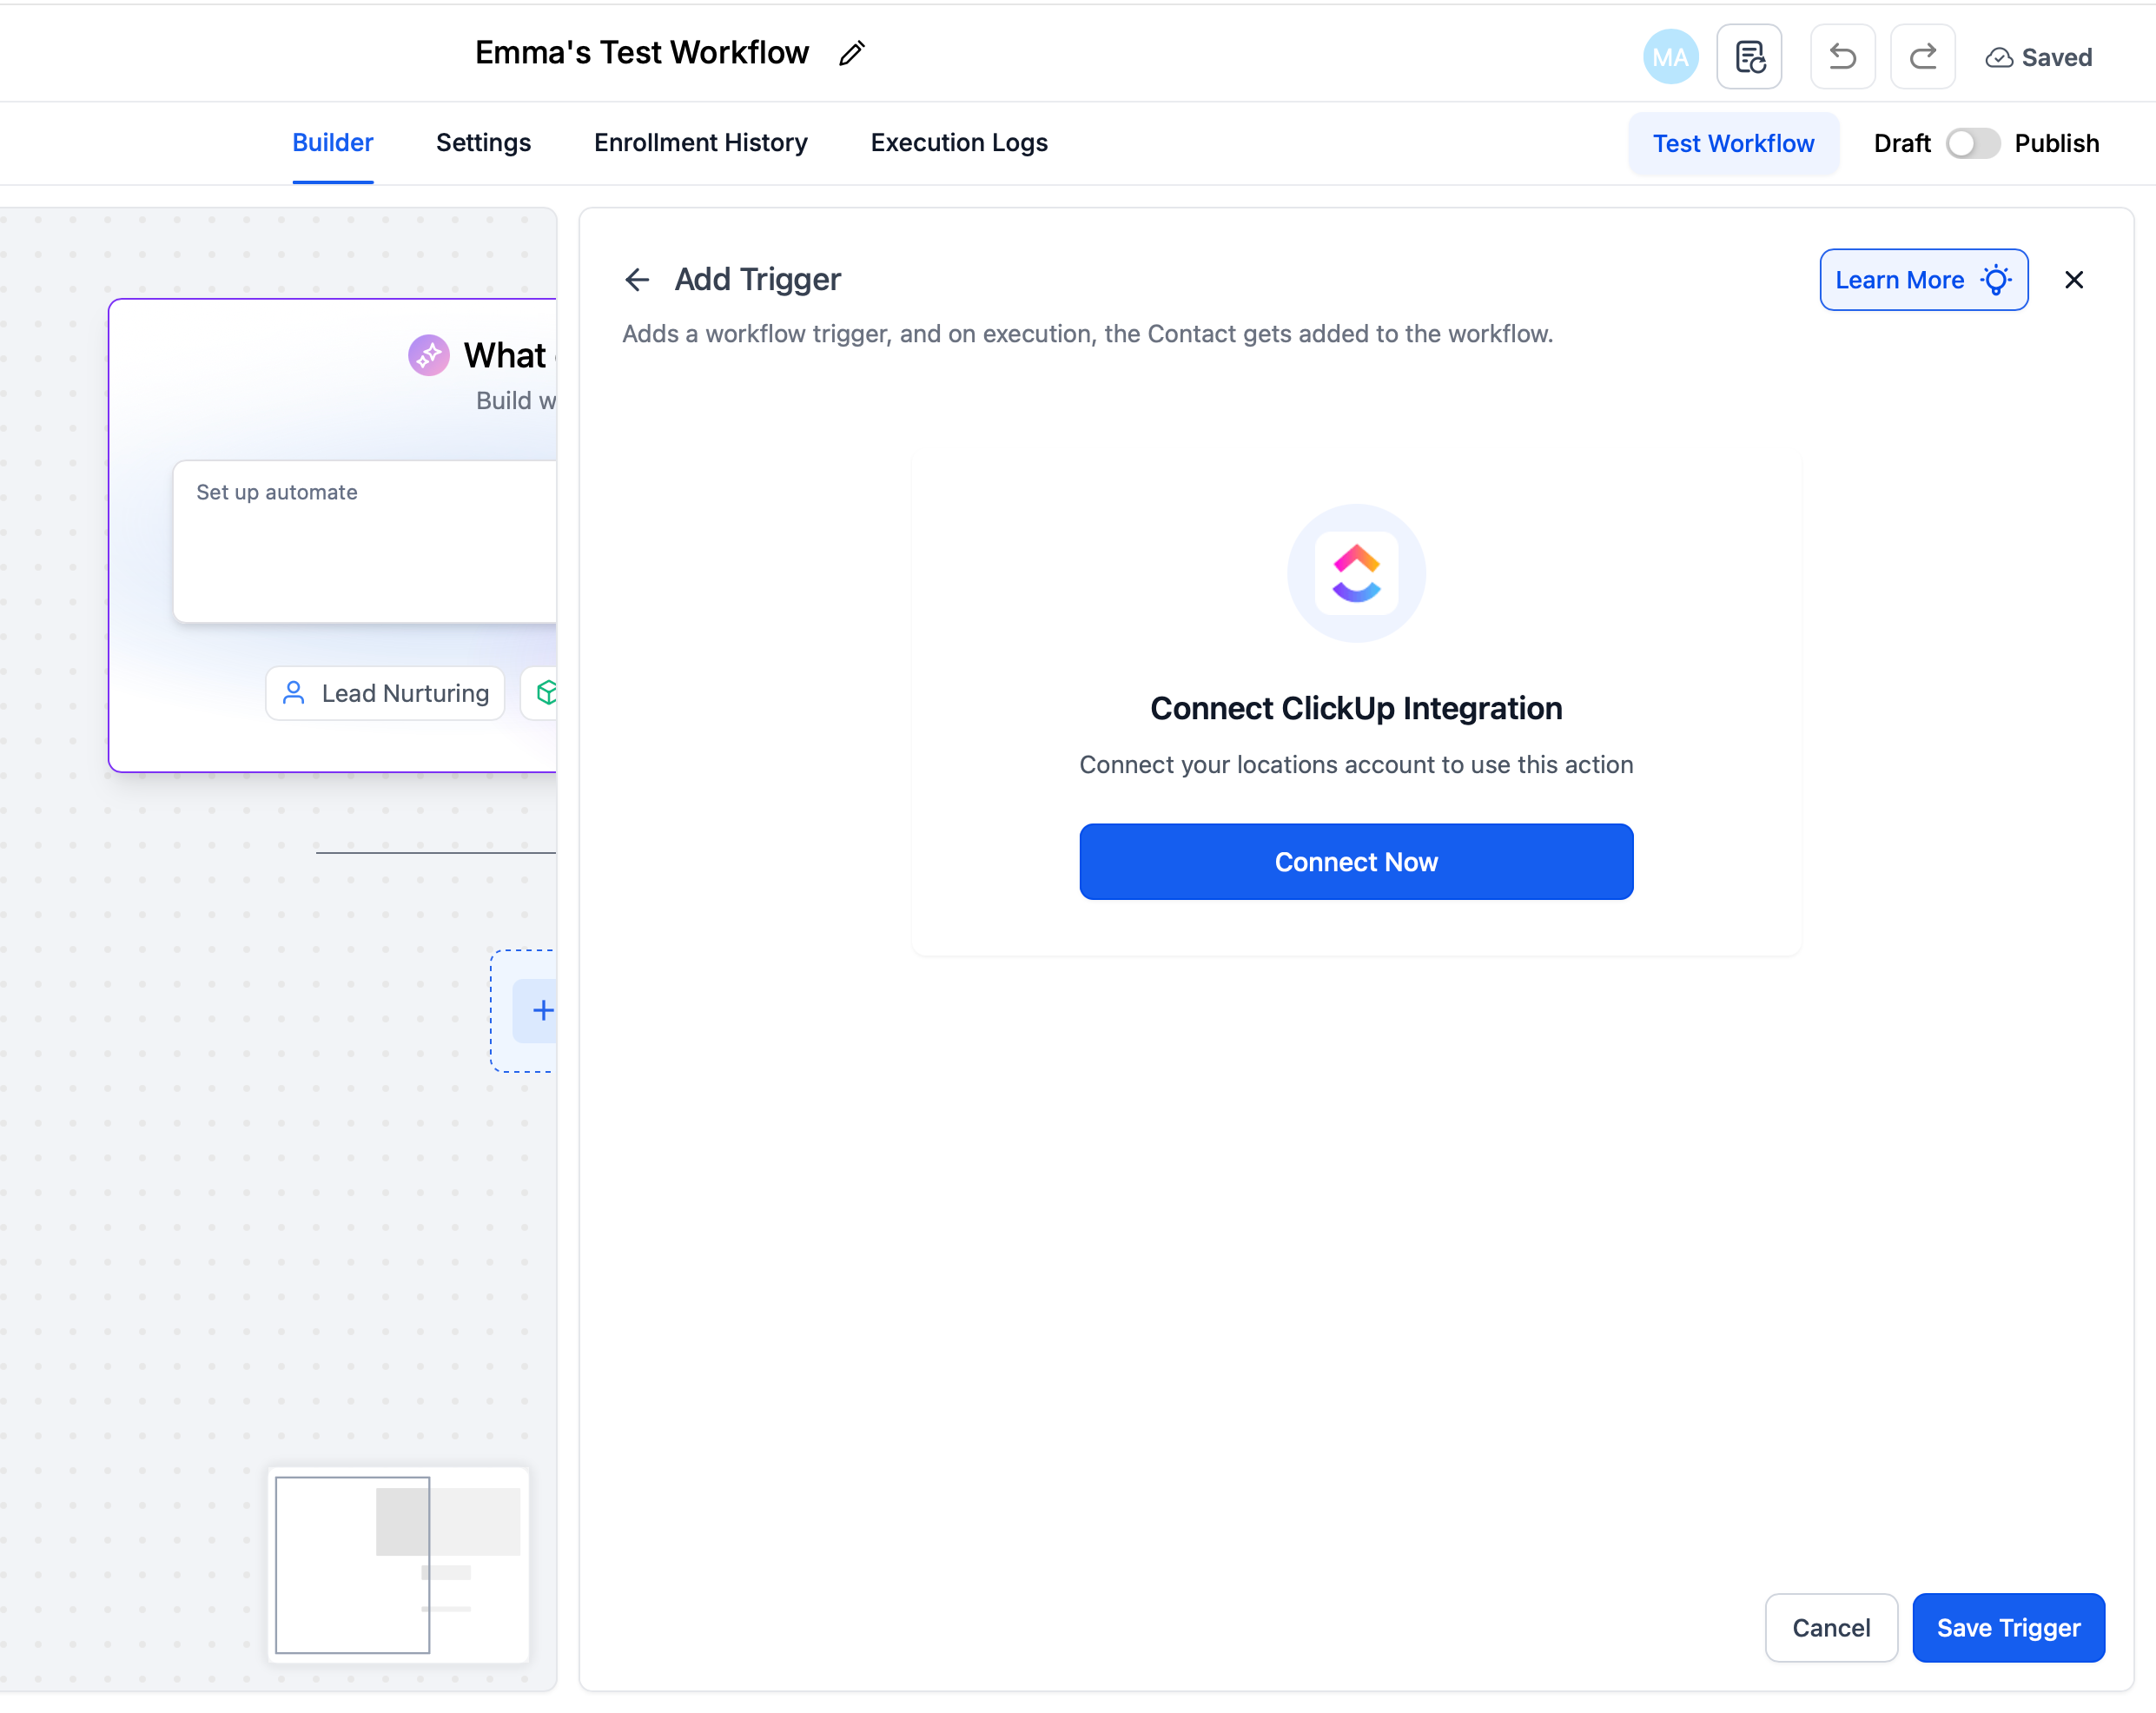
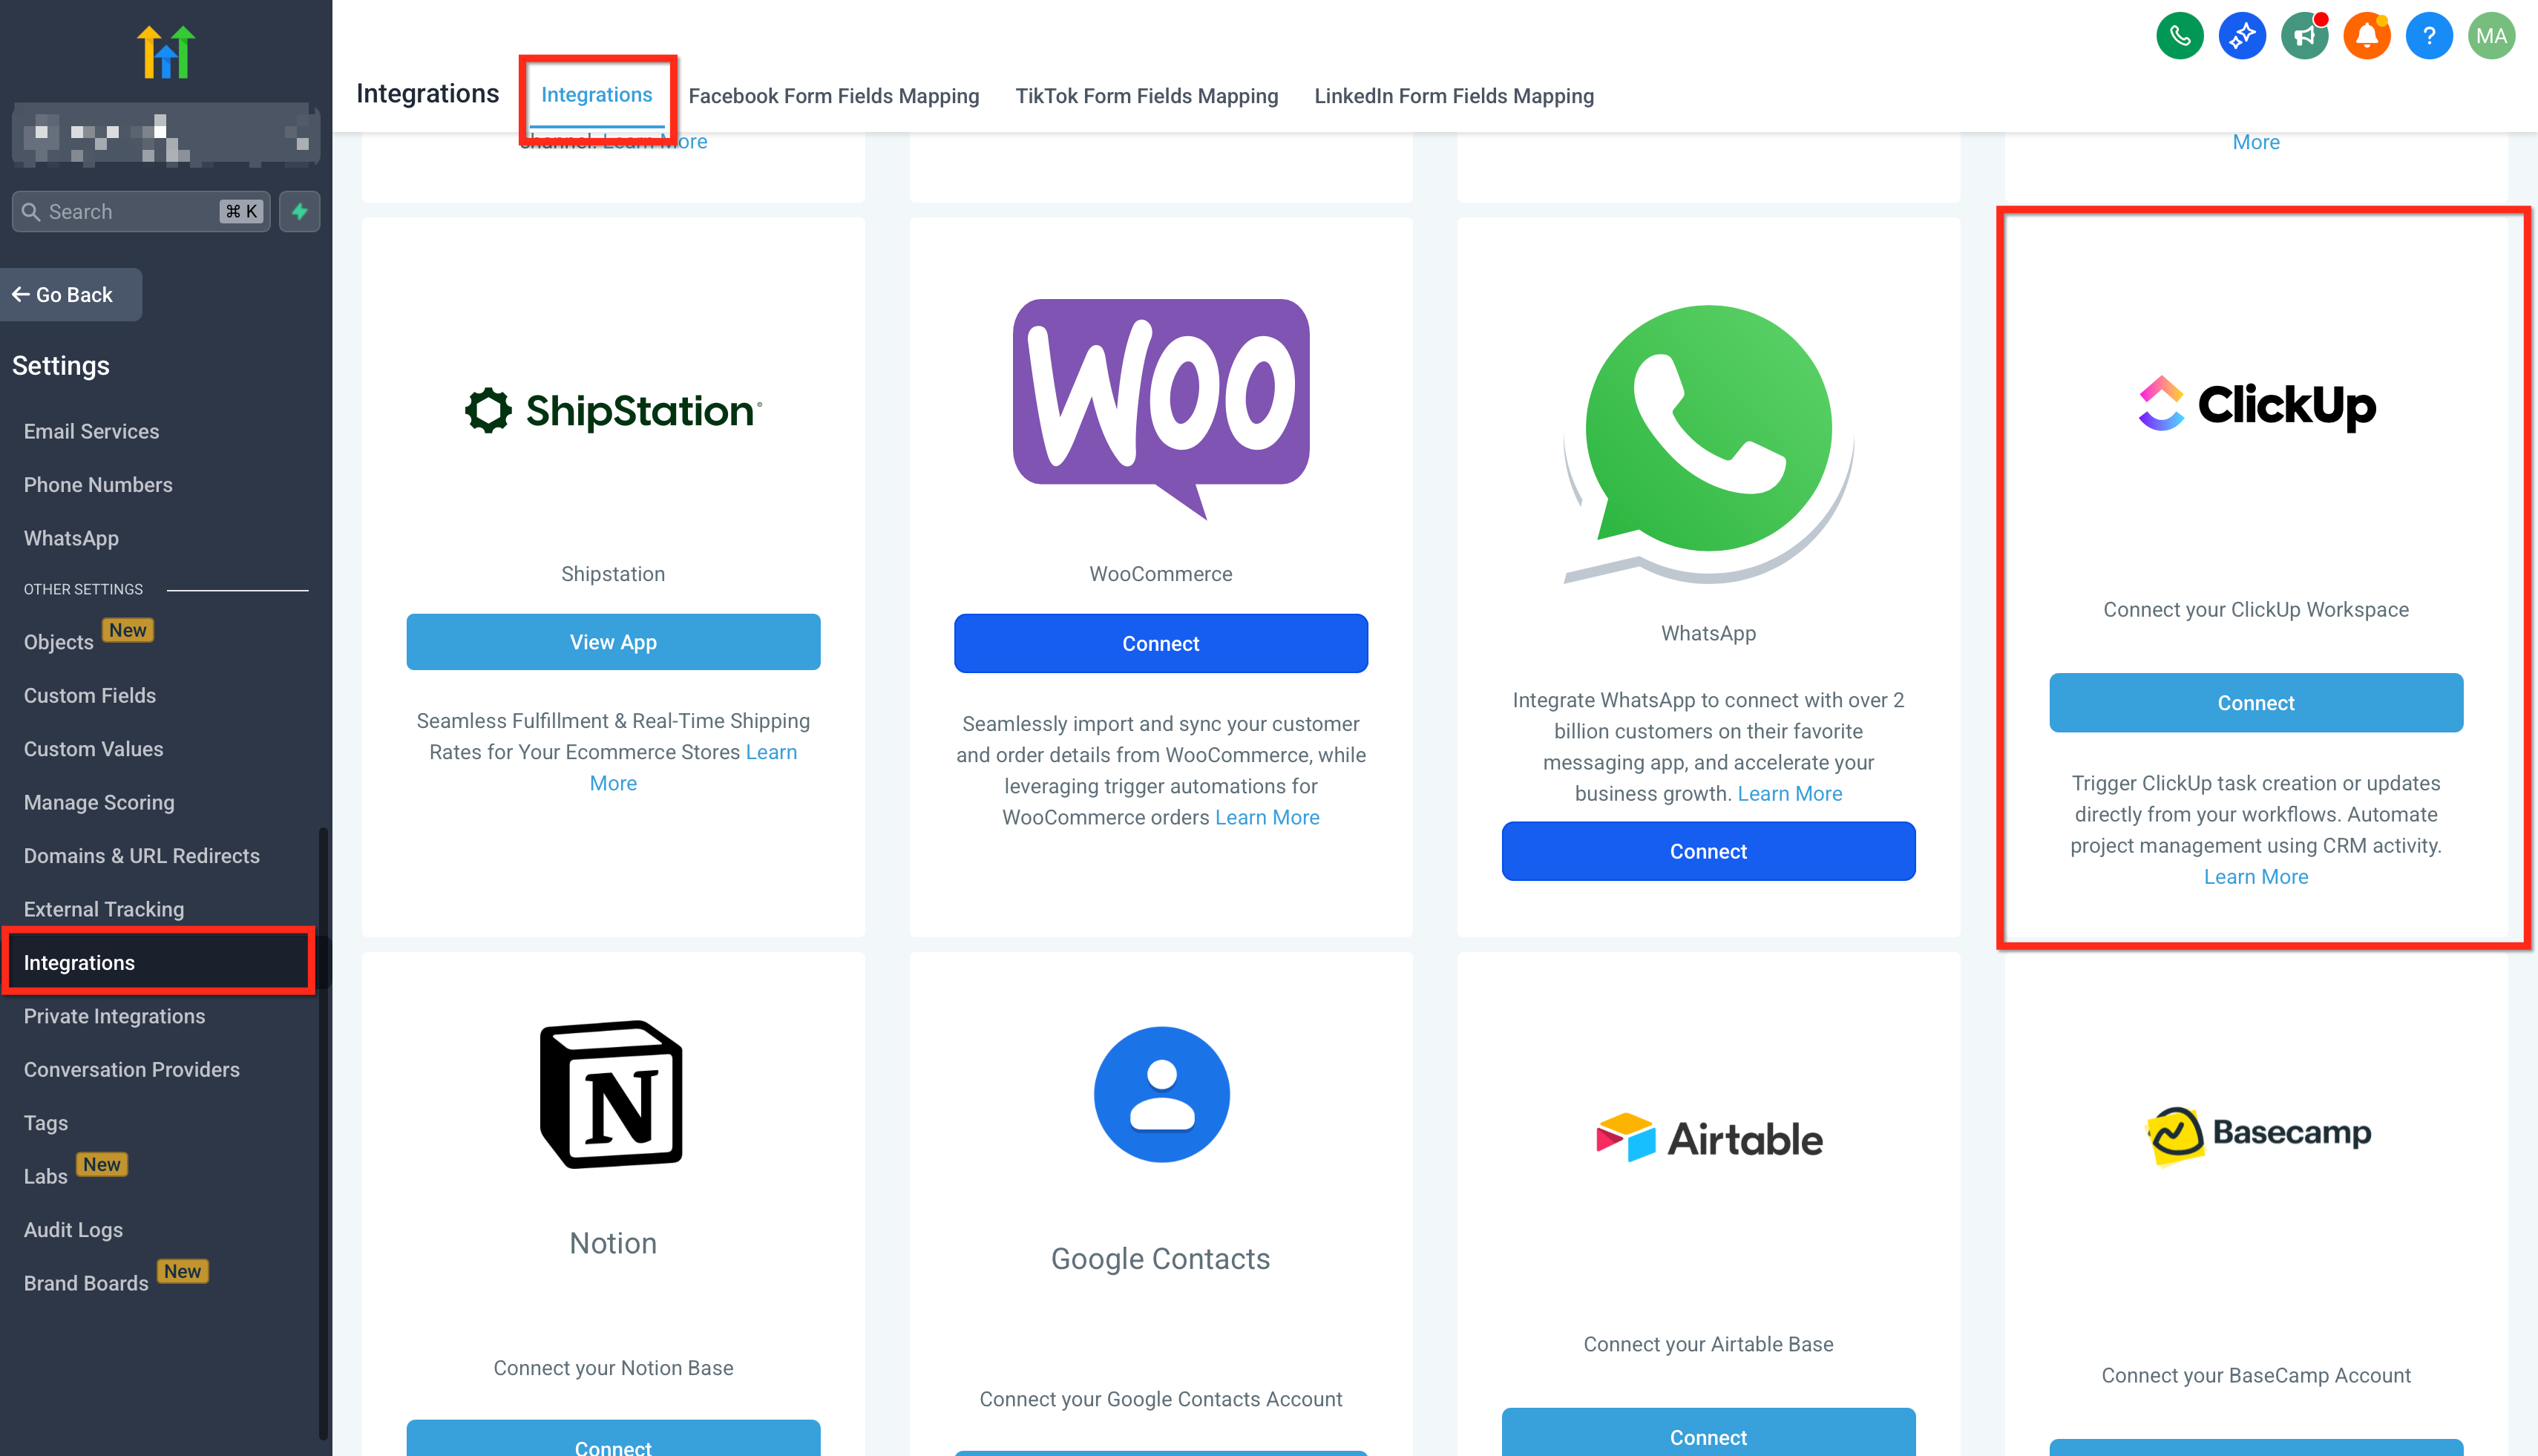
Alternate path: Sub-Account settings → Integrations → ClickUp → Connect.
Available Triggers (ClickUp → SourCherry)
Triggers fire whenever ClickUp sends a webhook event; use filters to scope by workspace/list and prevent noise.
| Trigger | What it does |
|---|---|
| New Task | Fires when a new task is created. |
| Task Changes | Fires when a task is updated (status, due date, etc.). |
| New List | Fires when a new list is created. |
| New Folder | Fires when a new folder is created. |
| New Comment on a Task | Fires when someone comments on a task. |
| New Attachment Added to Task | Fires when an attachment is added to a task. |
| New Reaction on Chat Message | Fires when someone reacts in a public channel message. |
| New Reaction on Task Comment | Fires when someone reacts to a task comment. |
| New Time Entry | Fires when time is logged on a task. |
Available Actions (SourCherry → ClickUp)
Actions run inside your workflow to create or update items in ClickUp. Names below match the builder for consistency.
| Action | Purpose |
|---|---|
| Create Task | Create a task with name, due date, assignee, etc. |
| Update Task | Modify existing task details (status, due date, priority). |
| Archive or Delete Task | Archive the item or permanently delete it. |
| Create Space | Create a workspace/team space. |
| Create Folder | Add a folder to organize lists. |
| Create List | Create a new list of tasks. |
| Post Task Comment | Add a comment to a task. |
| Post Attachment | Upload files to a task. |
| Create New Document | Create a document in ClickUp. |
| Edit Document Page | Update an existing document page. |
| Create New Document Page | Add a new page to an existing document. |
| Create Custom Field [Coming Soon] | Add a custom field to space/folder/task. |
| Update Custom Field Value [Coming Soon] | Set the value for an existing custom field. |
| Find Task by ID | Look up a task by ID. |
| Find Documents | Search for documents. |
| Find Custom Fields | Locate a custom field. |
| Find a List of All Tasks | Return all tasks from a workspace/list. |
| Find User by Name or Email | Look up a user. |
How To Setup ClickUp Actions & Triggers
Use this generic setup to connect accounts, pick the correct direction (trigger vs. action), map fields safely, and validate everything before you publish. Adapt these steps to any pipeline stage or project template.
Open a workflow
Go to Automation → Workflows and click + New Workflow (or open an existing one).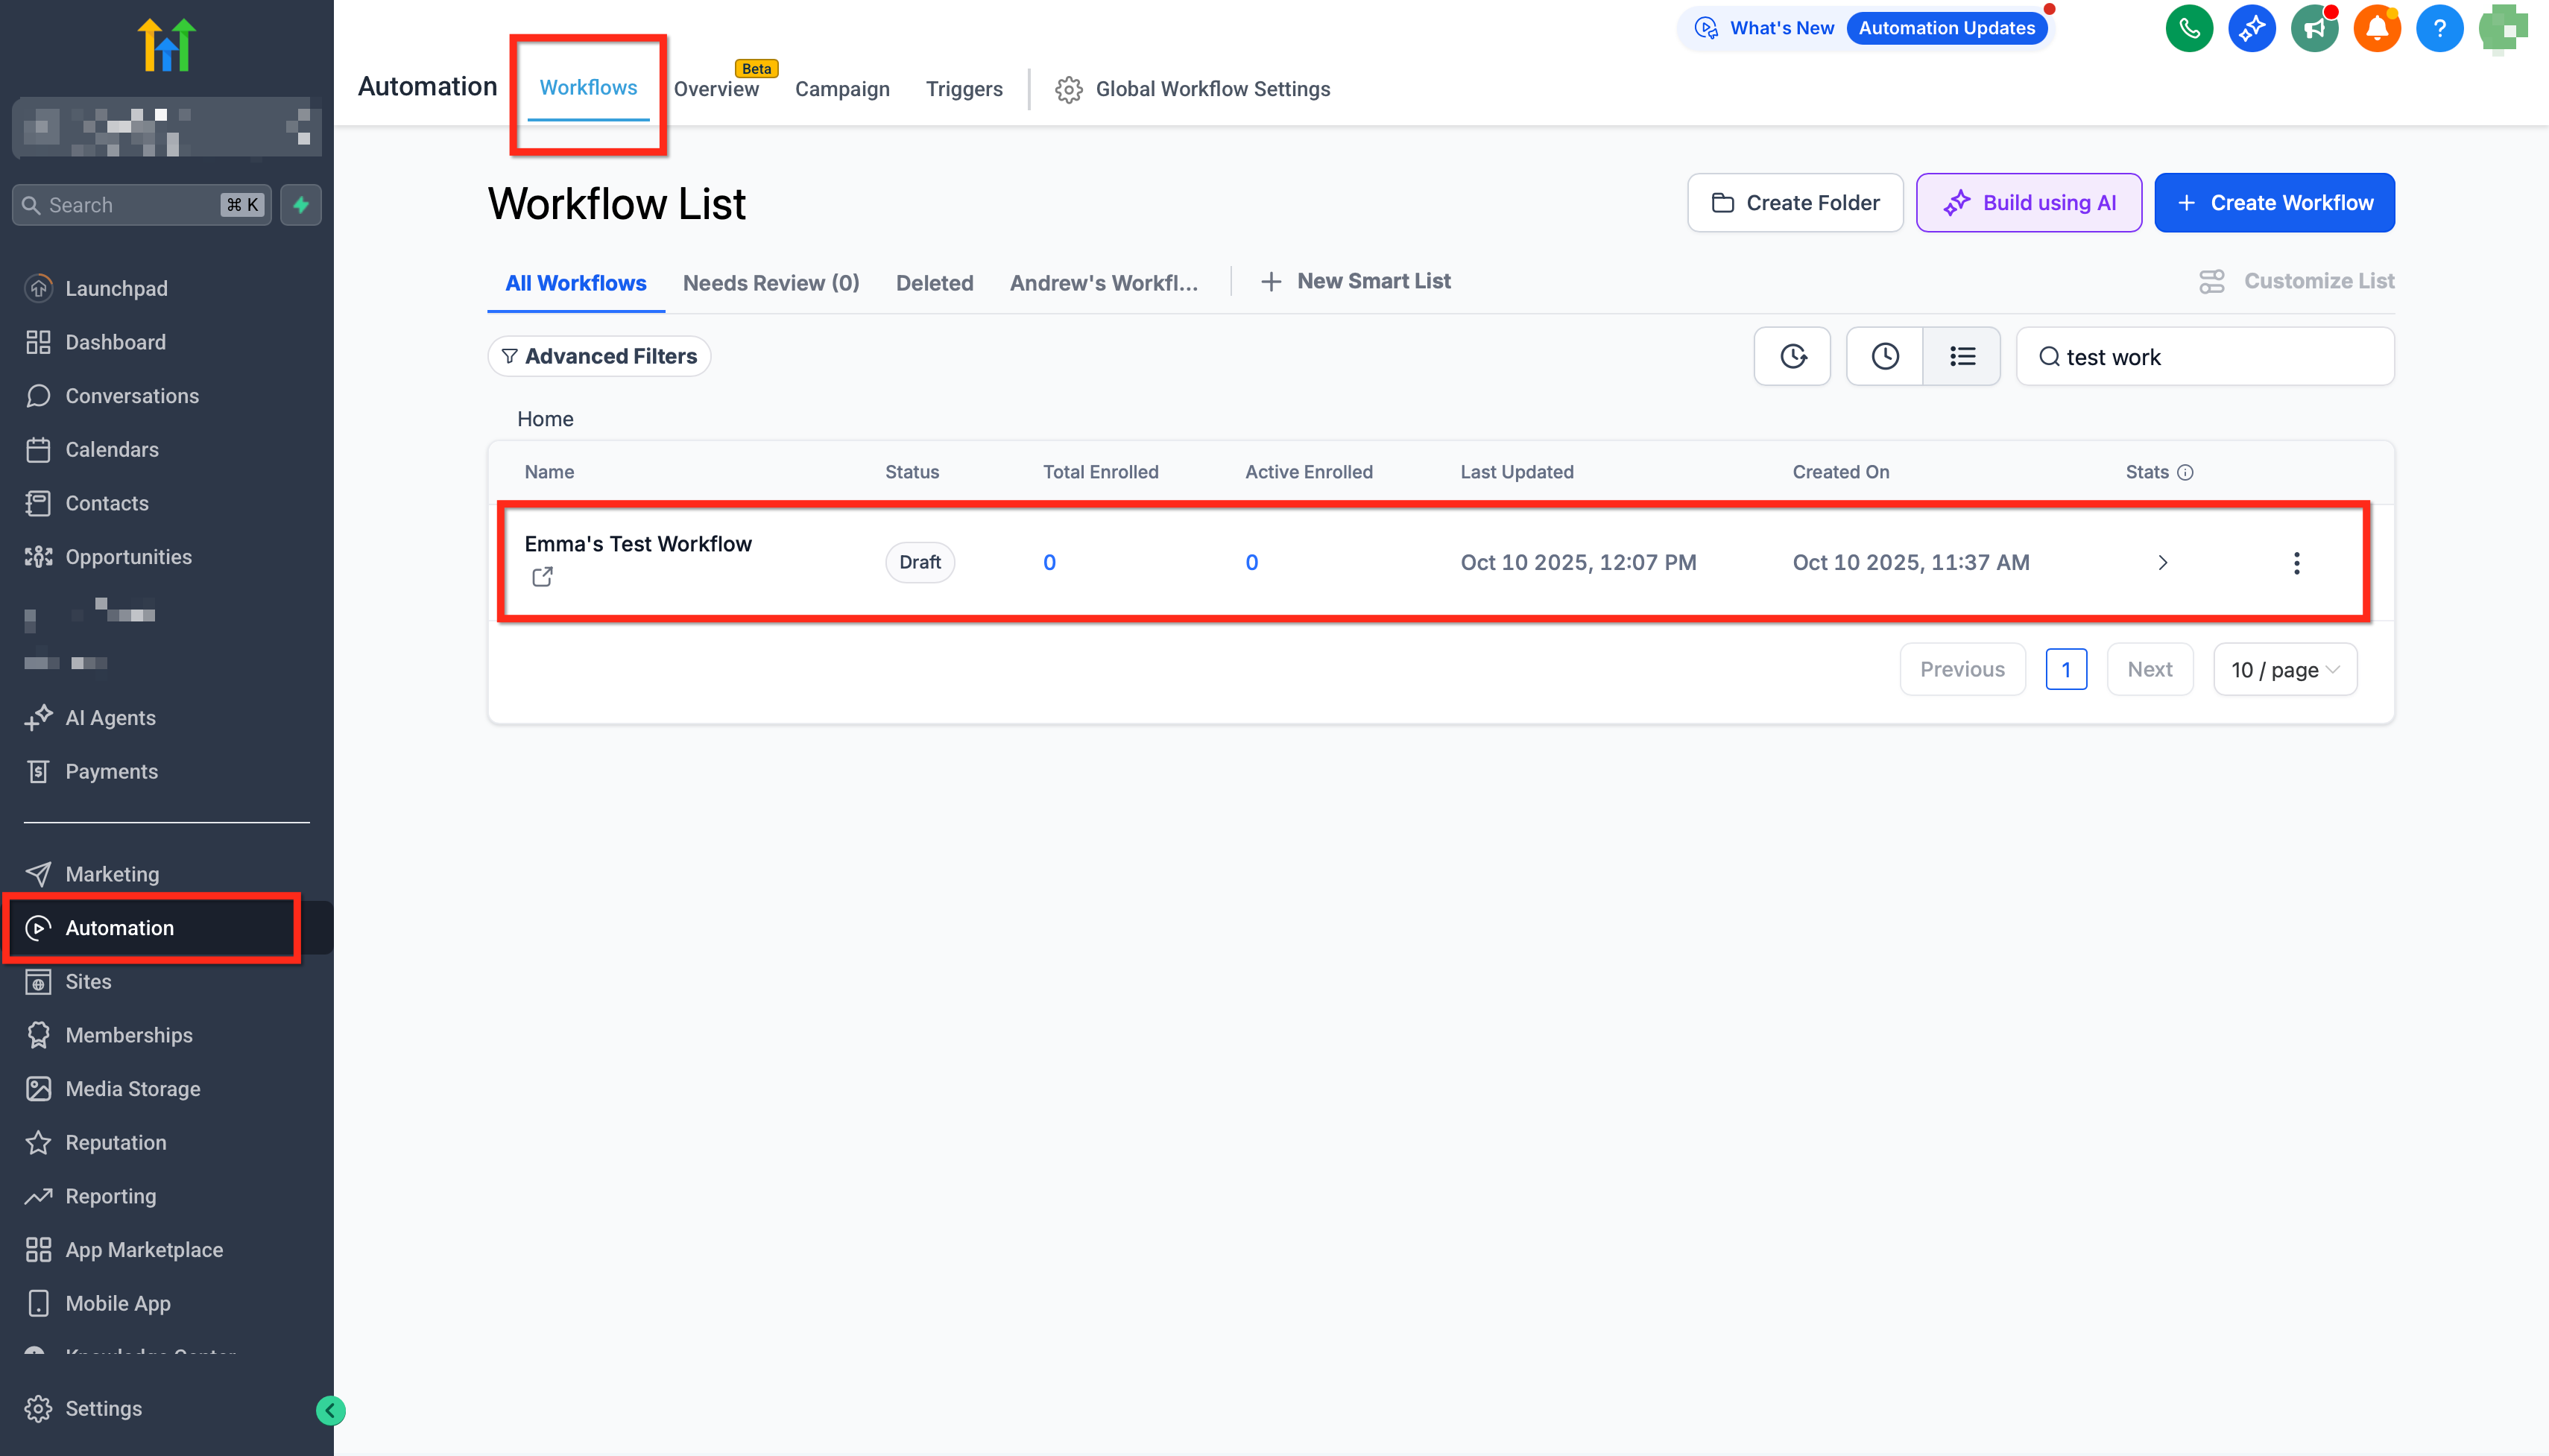
Connect ClickUp
Add any ClickUp step in a workflow and click Connect Now, or go to Settings → Integrations → ClickUp → Connect to authorize via OAuth.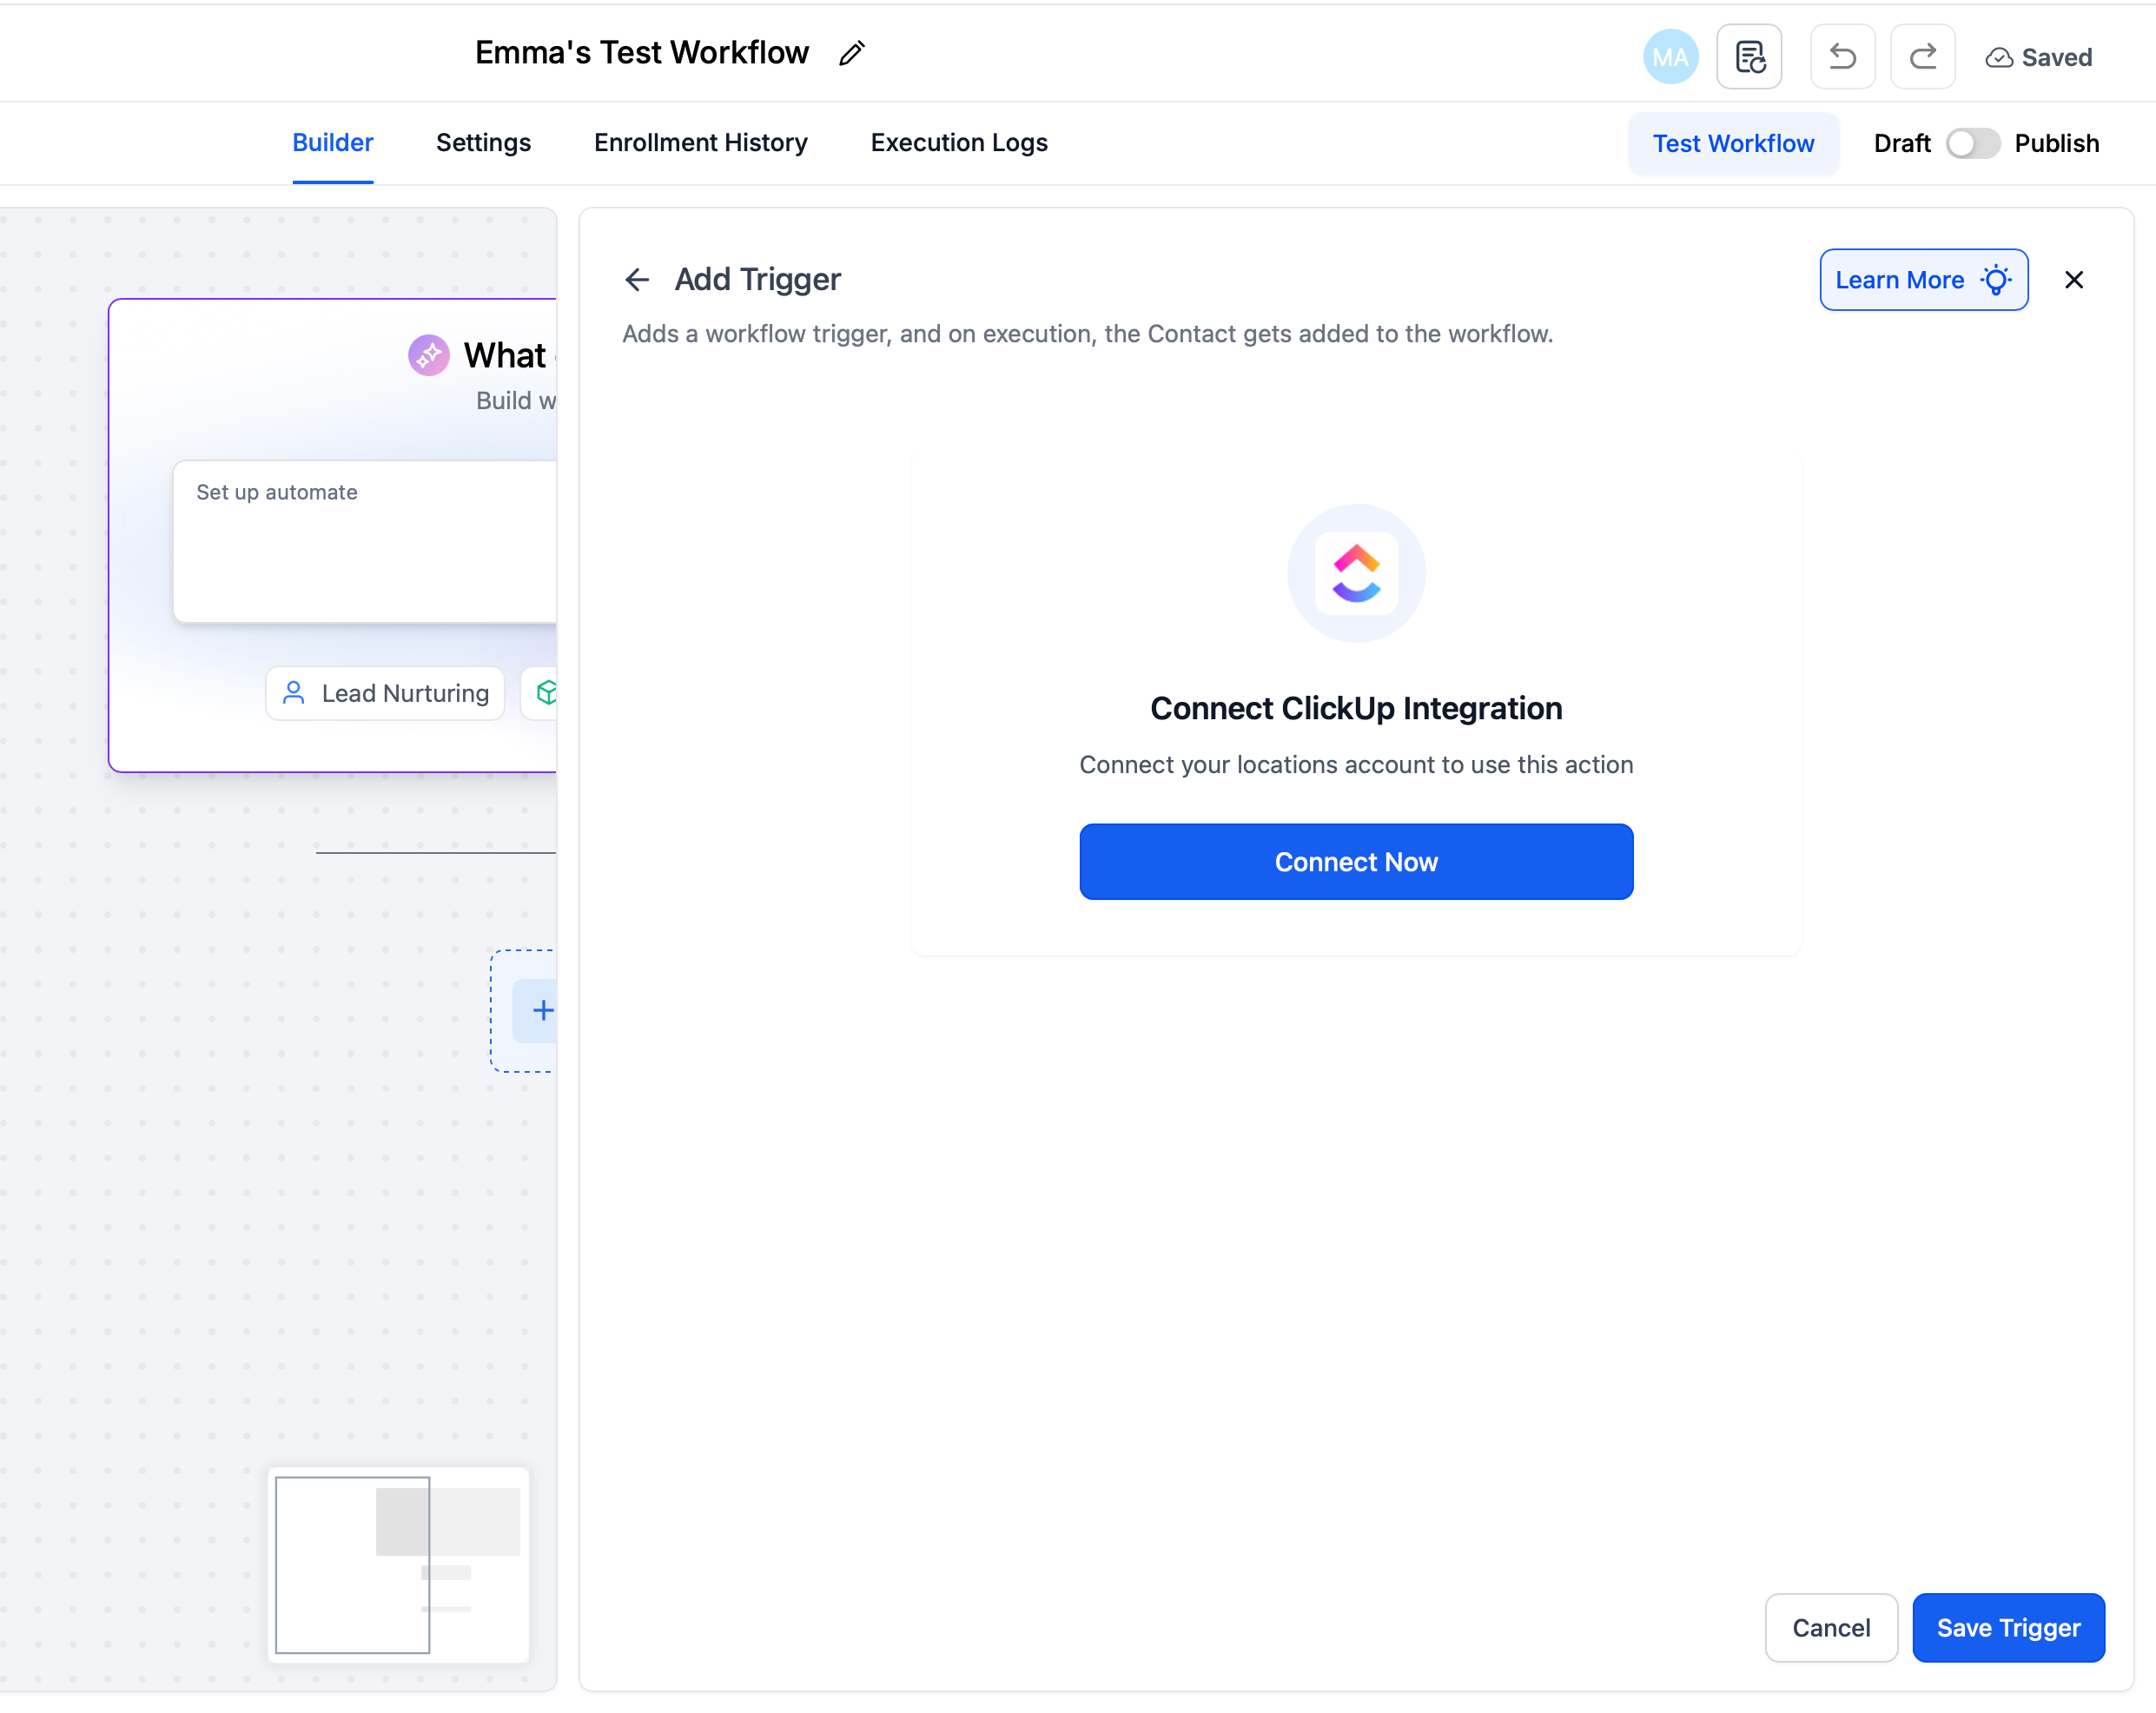
Choose the direction
ClickUp → SourCherry (Triggers): Start a SourCherry workflow when something happens in ClickUp by adding a ClickUp trigger (e.g., New Task, Task Changes)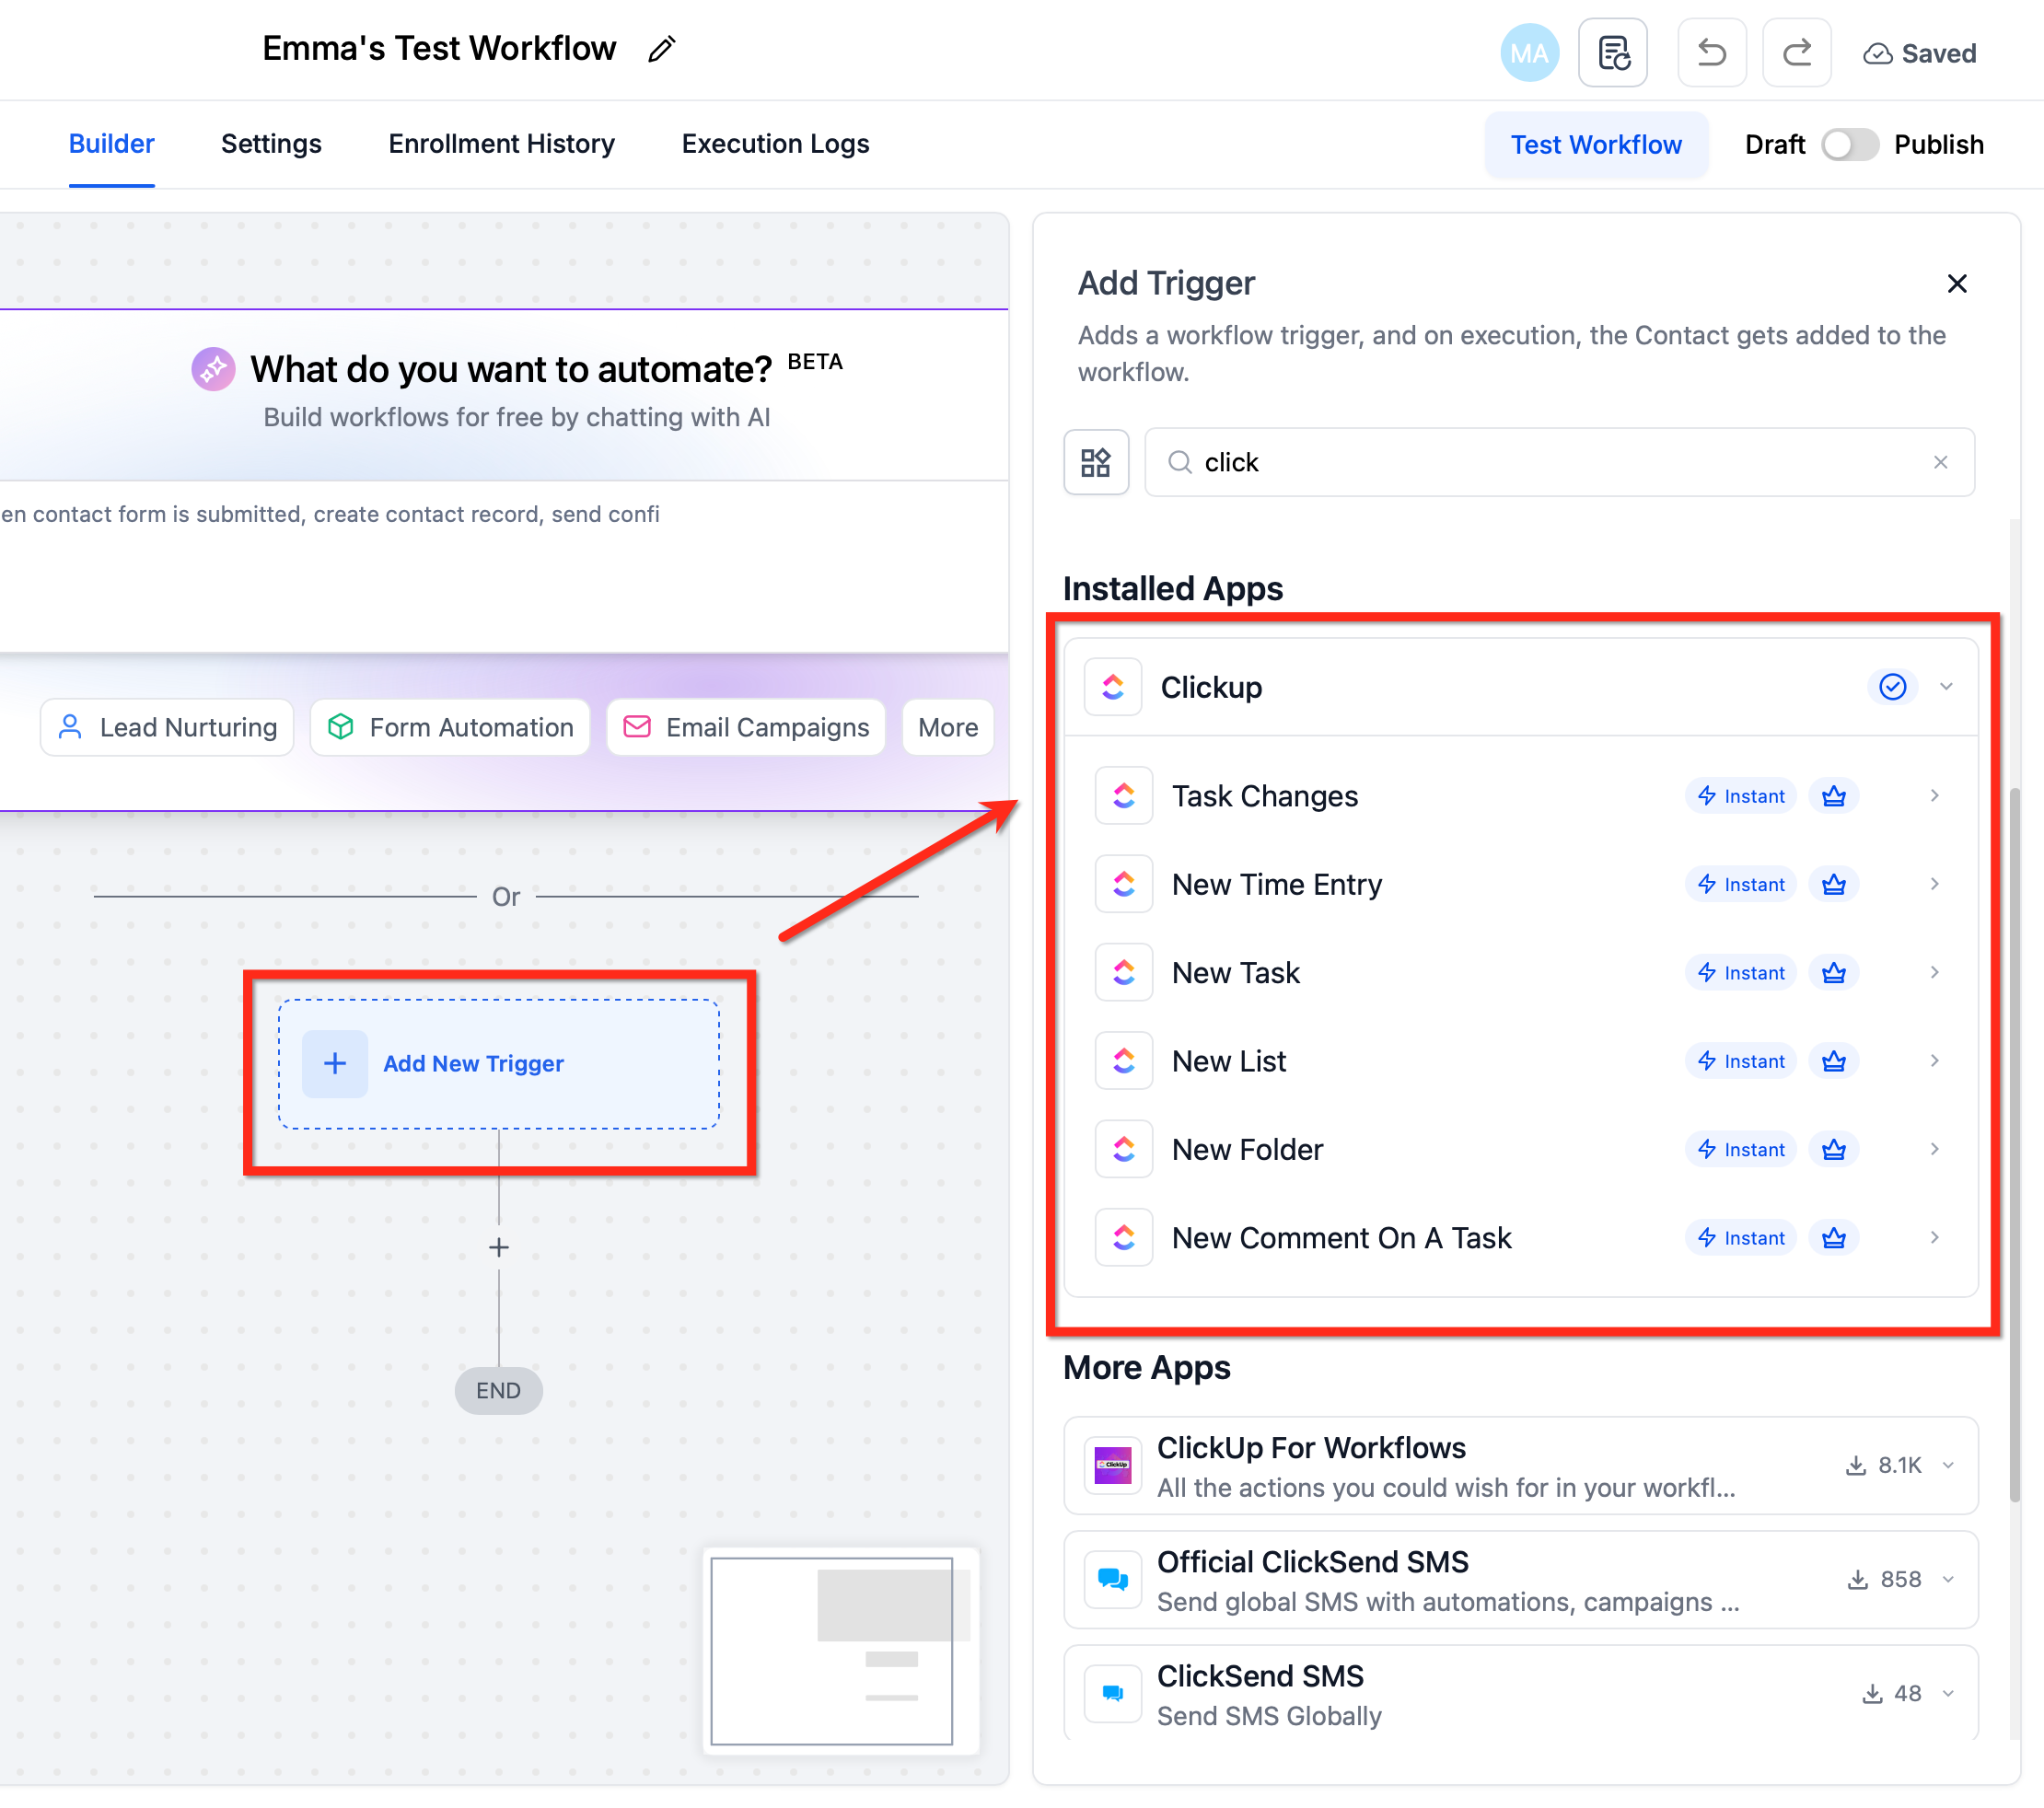
SourCherry → ClickUp (Actions): Perform work in ClickUp from a SourCherry workflow.
Add a ClickUp action (e.g., Create Task, Create List, Create New Document). Select the target Workspace/List (as applicable) and map fields from SourCherry (contact, opportunity, or form values).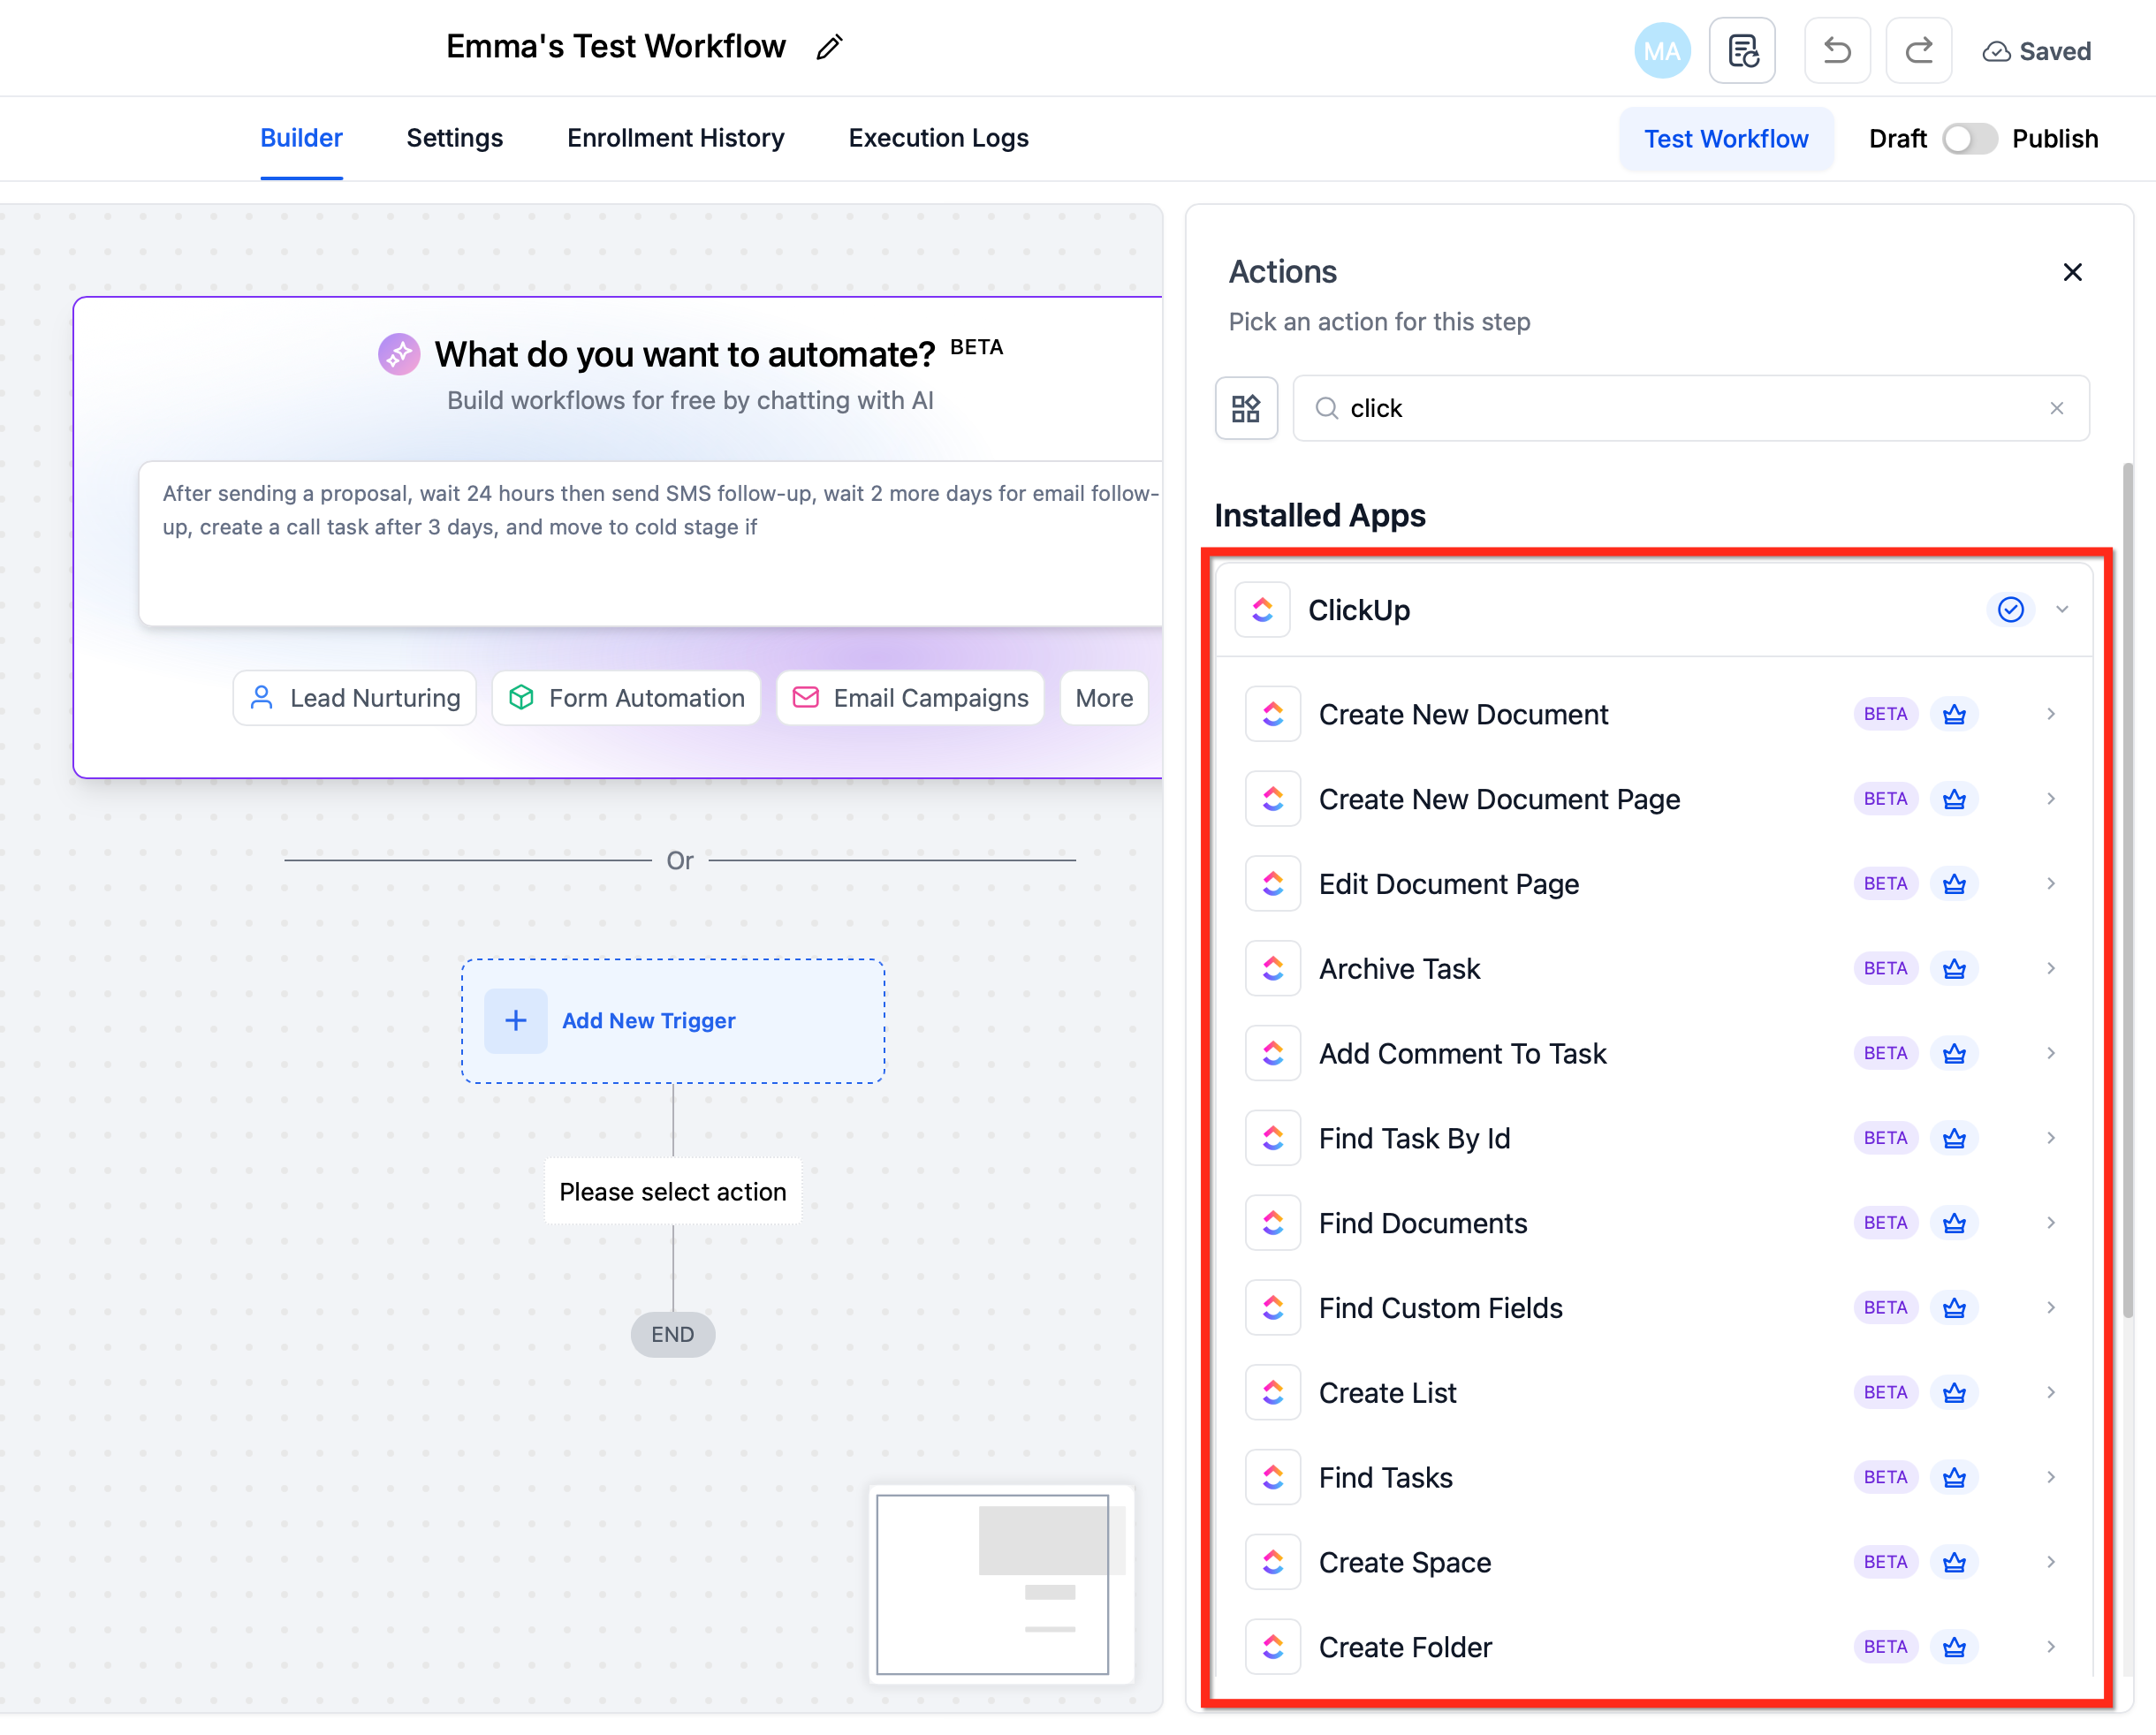
Order, conditions, and safety
Use If/Else filters to segment by pipeline stage, service type, or tag.
Insert Wait steps where ClickUp objects must exist before the next action (e.g., wait after Create List before creating tasks).
For bulk creation, space actions to avoid rate‑limit bursts.
Test & validate
Trigger path: create a small test event in the scoped ClickUp area.
Action path: run the workflow on a test record.
Review Run Logs / Enrollment History for inputs, outputs, and returned IDs; fix mapping/permissions issues.
Publish & monitor
Click Publish in the workflow.
Common Use Cases
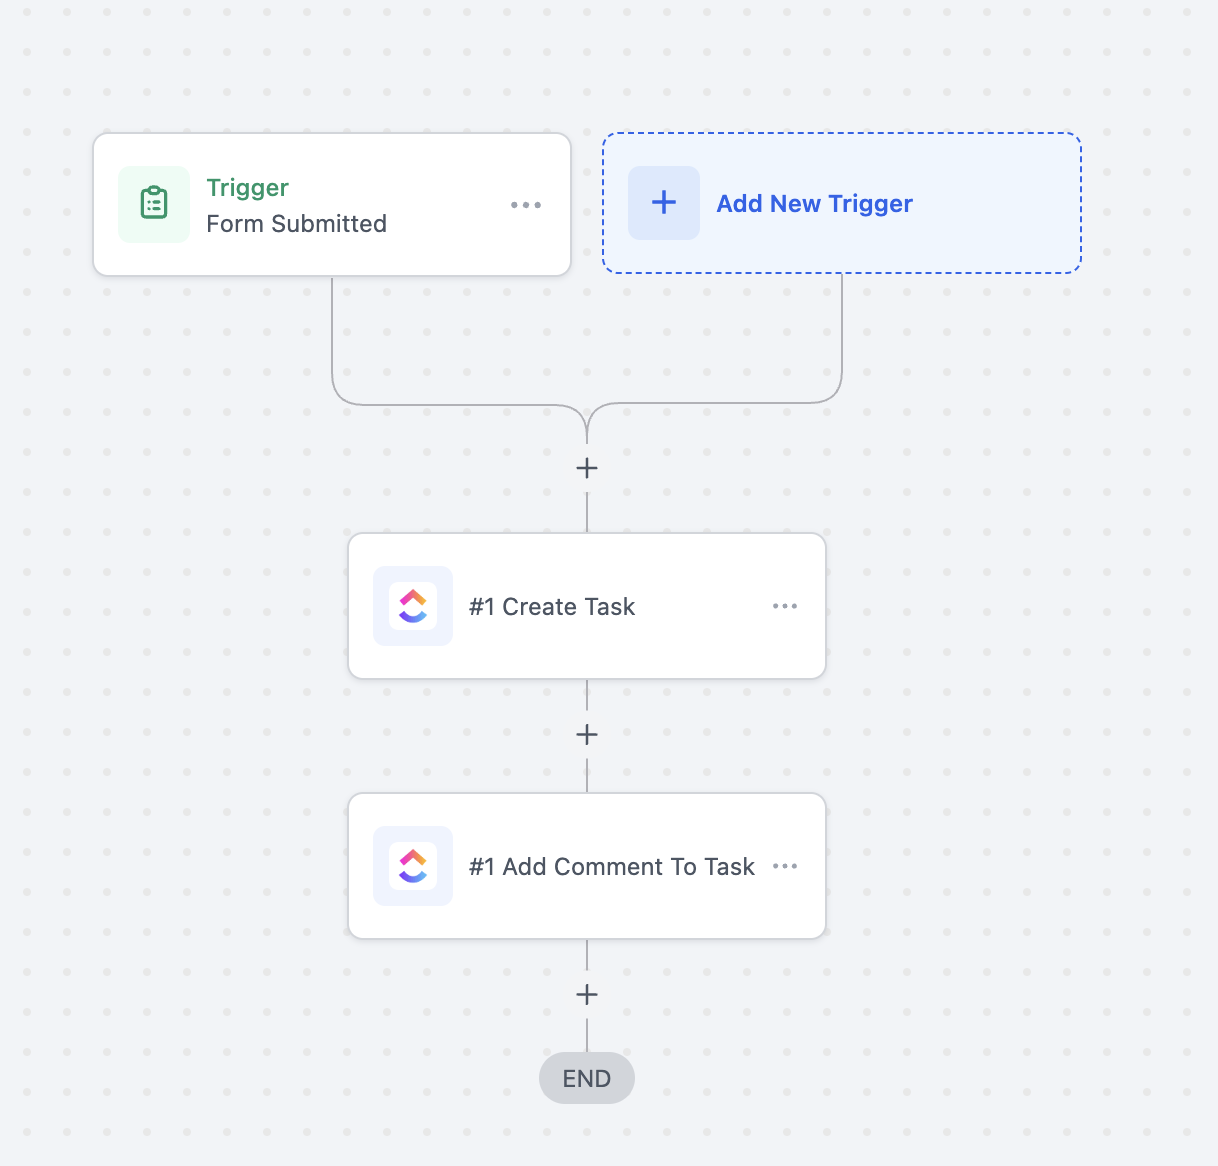
Use Case 1: Create ClickUp Tasks from SourCherry Form Submissions
Goal: Convert SourCherry form submissions into actionable ClickUp tasks.
Workflow Setup:
Trigger: Form Submitted
Filter: Form Name = “Client Onboarding Form”
Actions: Create Task (ClickUp), Add Task Comment (ClickUp)
Example:
A client submits the onboarding form with their requirement details → A task is created in the “Client Setup” list in ClickUp → A comment is added with the client’s expectations.
Use Case 2: Auto-Generate AI-Powered Proposal Documents
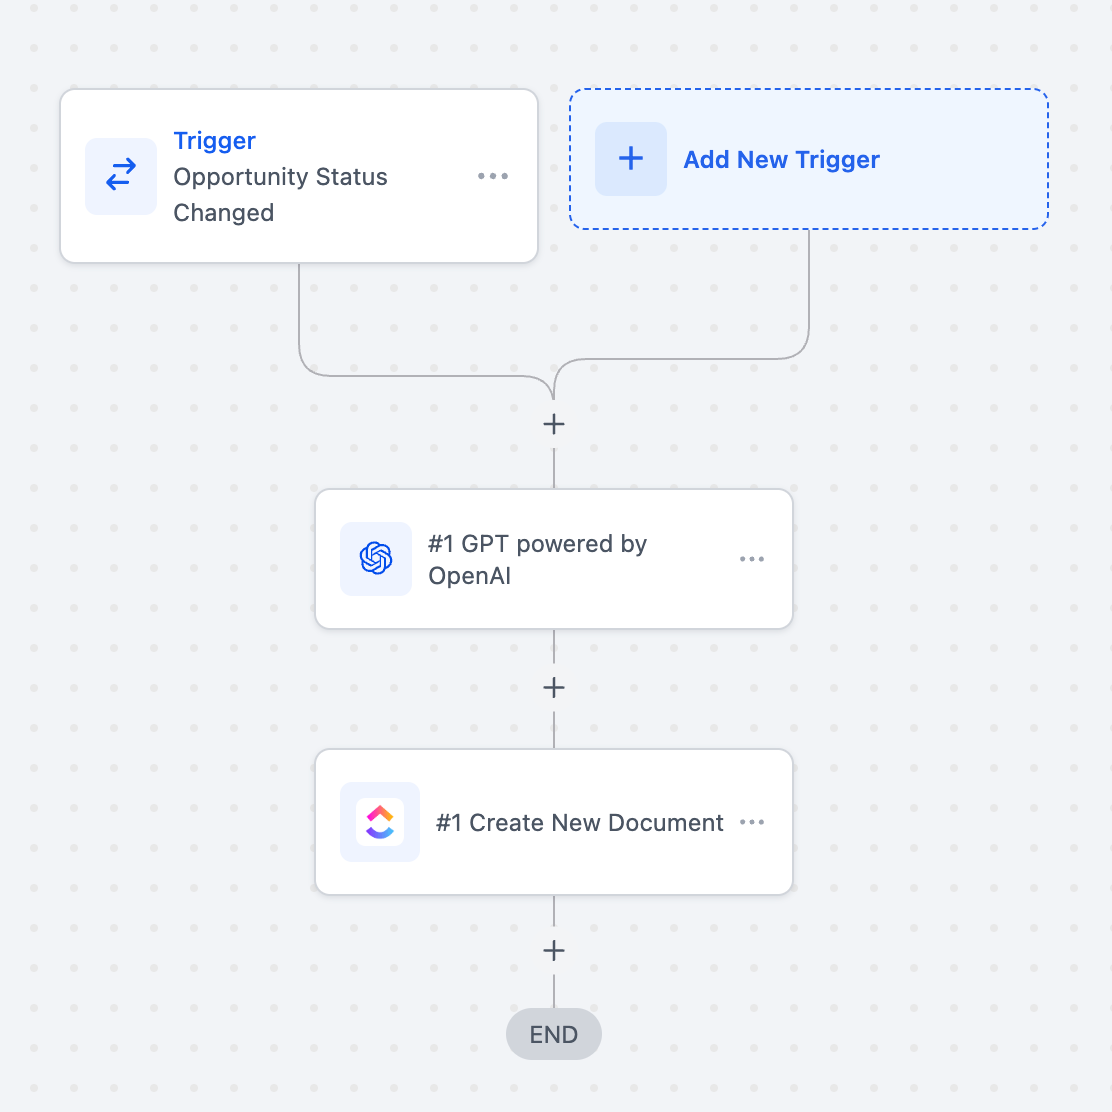
Goal: Automatically generate personalized proposals, briefs, or summaries when an opportunity changes stage, using AI to draft content and ClickUp to store the document.
Workflow Setup:
Trigger: Opportunity Status Changed
Filter: Stage = “Proposal request” (or any relevant pipeline stage)
Actions:
GPT powered by OpenAI → Generate proposal content (e.g., client-specific summary, deliverables, pricing outline).
Create New Document (ClickUp) → Save the AI-generated proposal in ClickUp under the “Sales Docs” folder.
Example:
A deal advances to the “Proposal Sent” stage → GPT generates a tailored proposal titled “Proposal for {{contact.name}}” with scope, deliverables, and pricing → A new ClickUp document is automatically created and shared with the sales team for review.
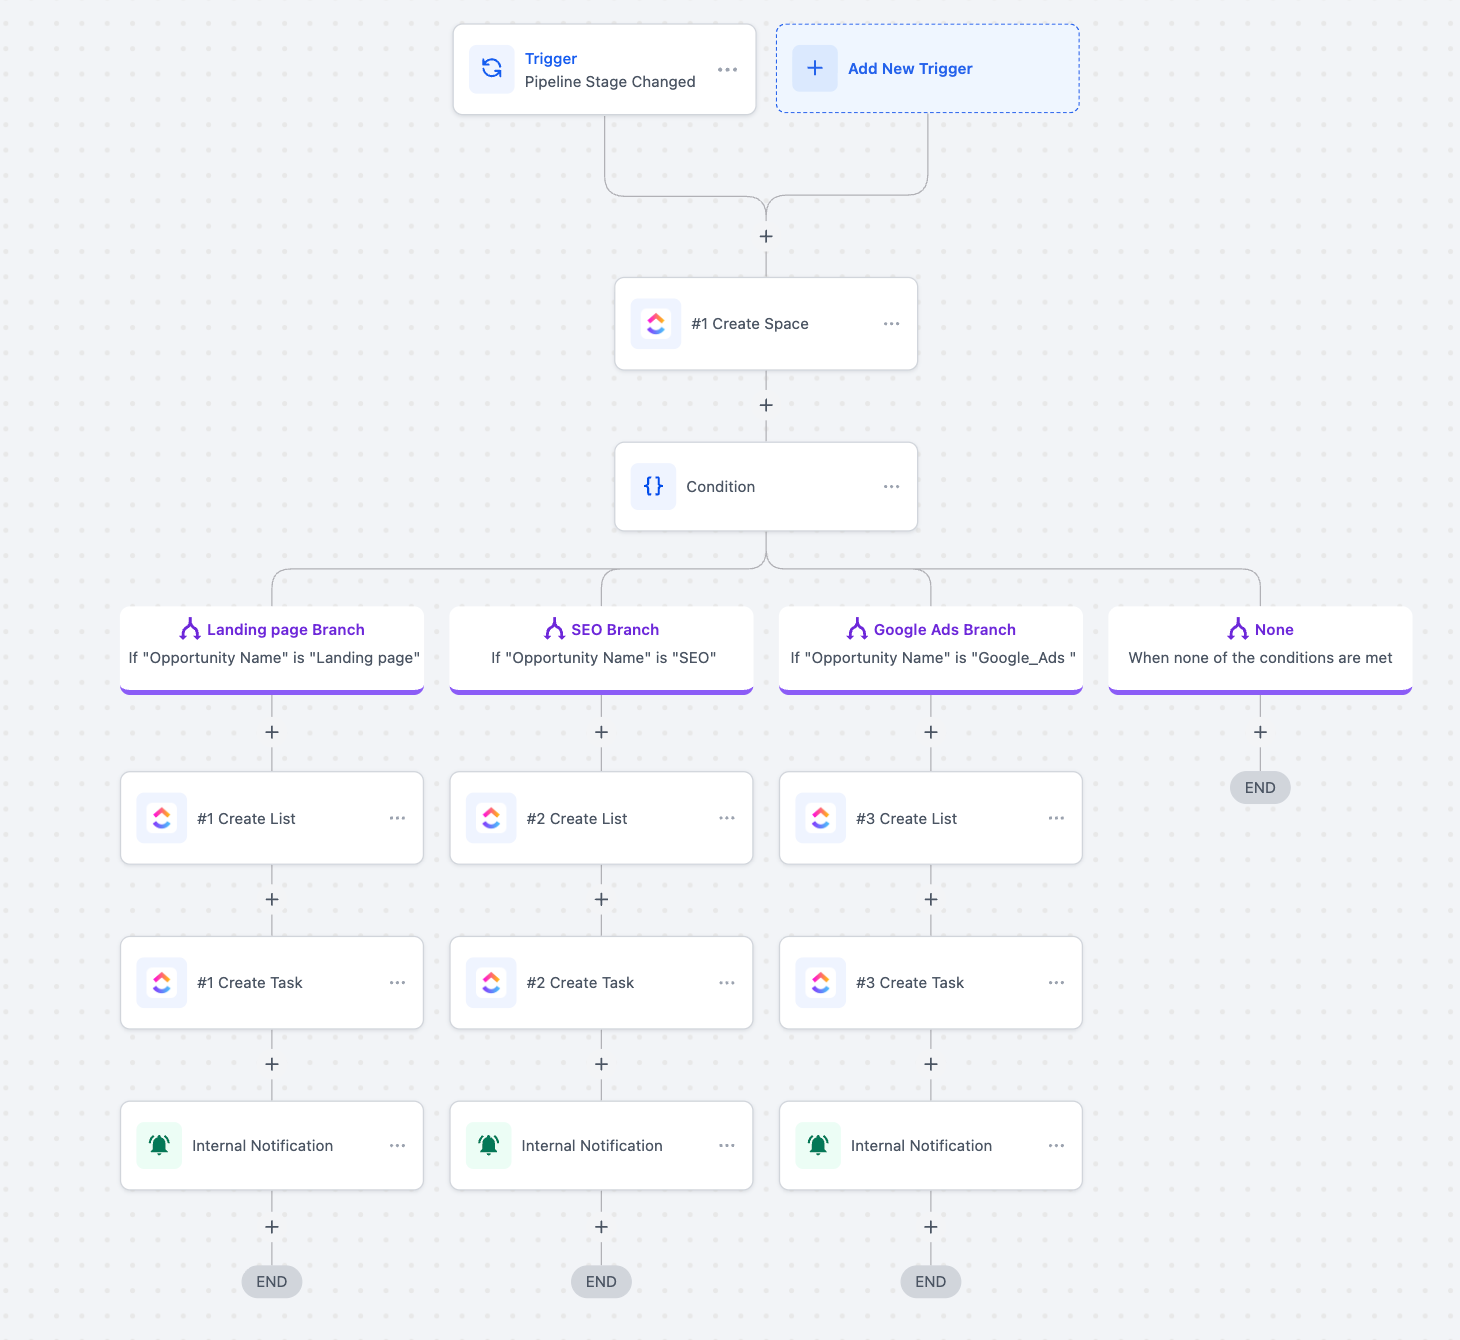
Use Case 3: Auto-Build Project Spaces Based on Opportunity Type
Goal: Automatically set up structured project workspaces in ClickUp whenever a deal moves to a new stage, with tasks and notifications tailored to the service type (Landing Page, SEO, or Google Ads).
Workflow Setup:
Trigger: Pipeline Stage Changed
Action: Create Space in ClickUp (named after the client/opportunity)
Condition Branching:
Landing Page Branch → If Opportunity Name = “Landing Page”
Create List: Landing Page Project
Create Task: “Design Landing Page”
Internal Notification to assigned team
SEO Branch → If Opportunity Name = “SEO”
Create List: SEO Setup
Create Task: “Keyword Research & Site Audit”
Internal Notification to SEO team
Google Ads Branch → If Opportunity Name = “Google_Ads”
Create List: Google Ads Campaign
Create Task: “Campaign Setup & Tracking”
Internal Notification to Ads team
None Branch → Ends workflow if conditions are not met
Example:
A deal moves to the “Contract Signed” stage. If the opportunity is for SEO, a new ClickUp space named “[Client Name] - SEO Project” is created. Inside it, an SEO Setup list is generated with a first task: Keyword Research & Site Audit. An internal notification is sent to the SEO manager, ensuring immediate project kickoff.
Frequently Asked Questions
Q: Which ClickUp plan do I need?
The integration works on free and paid plans; certain capabilities (like time tracking or some custom‑field features) may require a paid ClickUp plan.
Q: How many ClickUp workspaces can I connect?
Connect the ClickUp workspace relevant to the sub‑account; actions/permissions follow that workspace’s authorization.
Q: Can I use dynamic due dates?
Yes. Use relative math like +7 days in the Due Date input.
Q: Where do I find errors?
Check Execution Logs & Enrollment History for each run’s inputs/outputs and any error messages.
Q: Is this integration available to all SourCherry users?
Yes, it’s available to all accounts with access to workflows and integrations.
Q: How many workflows can I build with ClickUp?
There no workflow limits from SourCherry and ClickUp integration itself doesn’t impose limits beyond ClickUp’s API rate caps.
Q: Are these actions and triggers paid?
Yes. These are premium actions and will be billed at the standard rates. If you’re on a Pro plan , usage will be billed at the plan’s default rates.
How do I associate a workflow with a contact when using triggers?
Triggers are contactless by default, meaning they do not automatically associate the workflow with a specific contact.
If you need to link the workflow to a contact, you can use the Find Contact action within the workflow. Pass the email address from the trigger response (if an email is available) into the Find Contact action to locate and associate the correct contact. Or using create contact if a new contact has to be created.