
Easily import dozens of blog posts in minutes with SourCherry’s new CSV Blog Importer. This guide walks you through how to drag and drop a spreadsheet, preview each post, and choose which ones to publish, schedule, or save as drafts. Perfect for agencies migrating from Blogger, Wix, WordPress, or any platform that supports CSV exports.
TABLE OF CONTENTS
- What is CSV Blog Importer?
- Key Benefits of CSV Blog Importer
- Important Notes
- How to Use CSV Blog Importer
- Frequently Asked Questions
- Related Articles
What is CSV Blog Importer?
The CSV Blog Importer is a bulk-upload tool inside SourCherry Blogs that converts properly-formatted CSV or Excel files into publish-ready blog posts. By validating headers, auto-matching authors and categories, and walking you through a three-stage review flow, it removes almost all manual copy-and-paste work.
Key Benefits of CSV Blog Importer
- Seamless Migration: Eliminate the hassle of copying content manually from external platforms.
- Bulk Importing: Upload up to 60 posts in a single file to speed up onboarding.
- Smart Organization: Automatically create or match authors and categories to minimize manual cleanup.
- Flexible Scheduling: SourCherry interprets the Publish Date automatically from the uploaded file.
- Built-in SEO Preview: View titles, meta descriptions, and social images before publishing.
- Error Free Setup: Use the downloadable sample CSV to prevent header or format mistakes.
- Instant Validation: Inline error messages highlight missing or incorrect data right away.
Important Notes
- Automatic Validation: SourCherry scans your CSV headers on upload and flags missing or misspelled fields for quick correction.
- Required Fields: All required headers must be present, though individual cell values can remain blank.
- Error Detection: Inline error chips highlight issues such as missing images, invalid dates, or long meta descriptions.
- Smart Scheduling: Past dates = Published/Future dates = Scheduled/Blank dates = Draft.
- File Size: Keep your file under 25MB to avoid browser time-outs; split larger files into smaller batches.
- CSV Formatting: Incorrectly formatted files display inline error messages until corrected.
- Time Zone Handling: The importer respects each sub-account’s time zone to ensure posts publish at the correct local time.
How to Use CSV Blog Importer
Step 1: Access Blogs & Choose the Target Blog
- Log in to your sub-account.
- In the left menu, click Sites → Blogs.
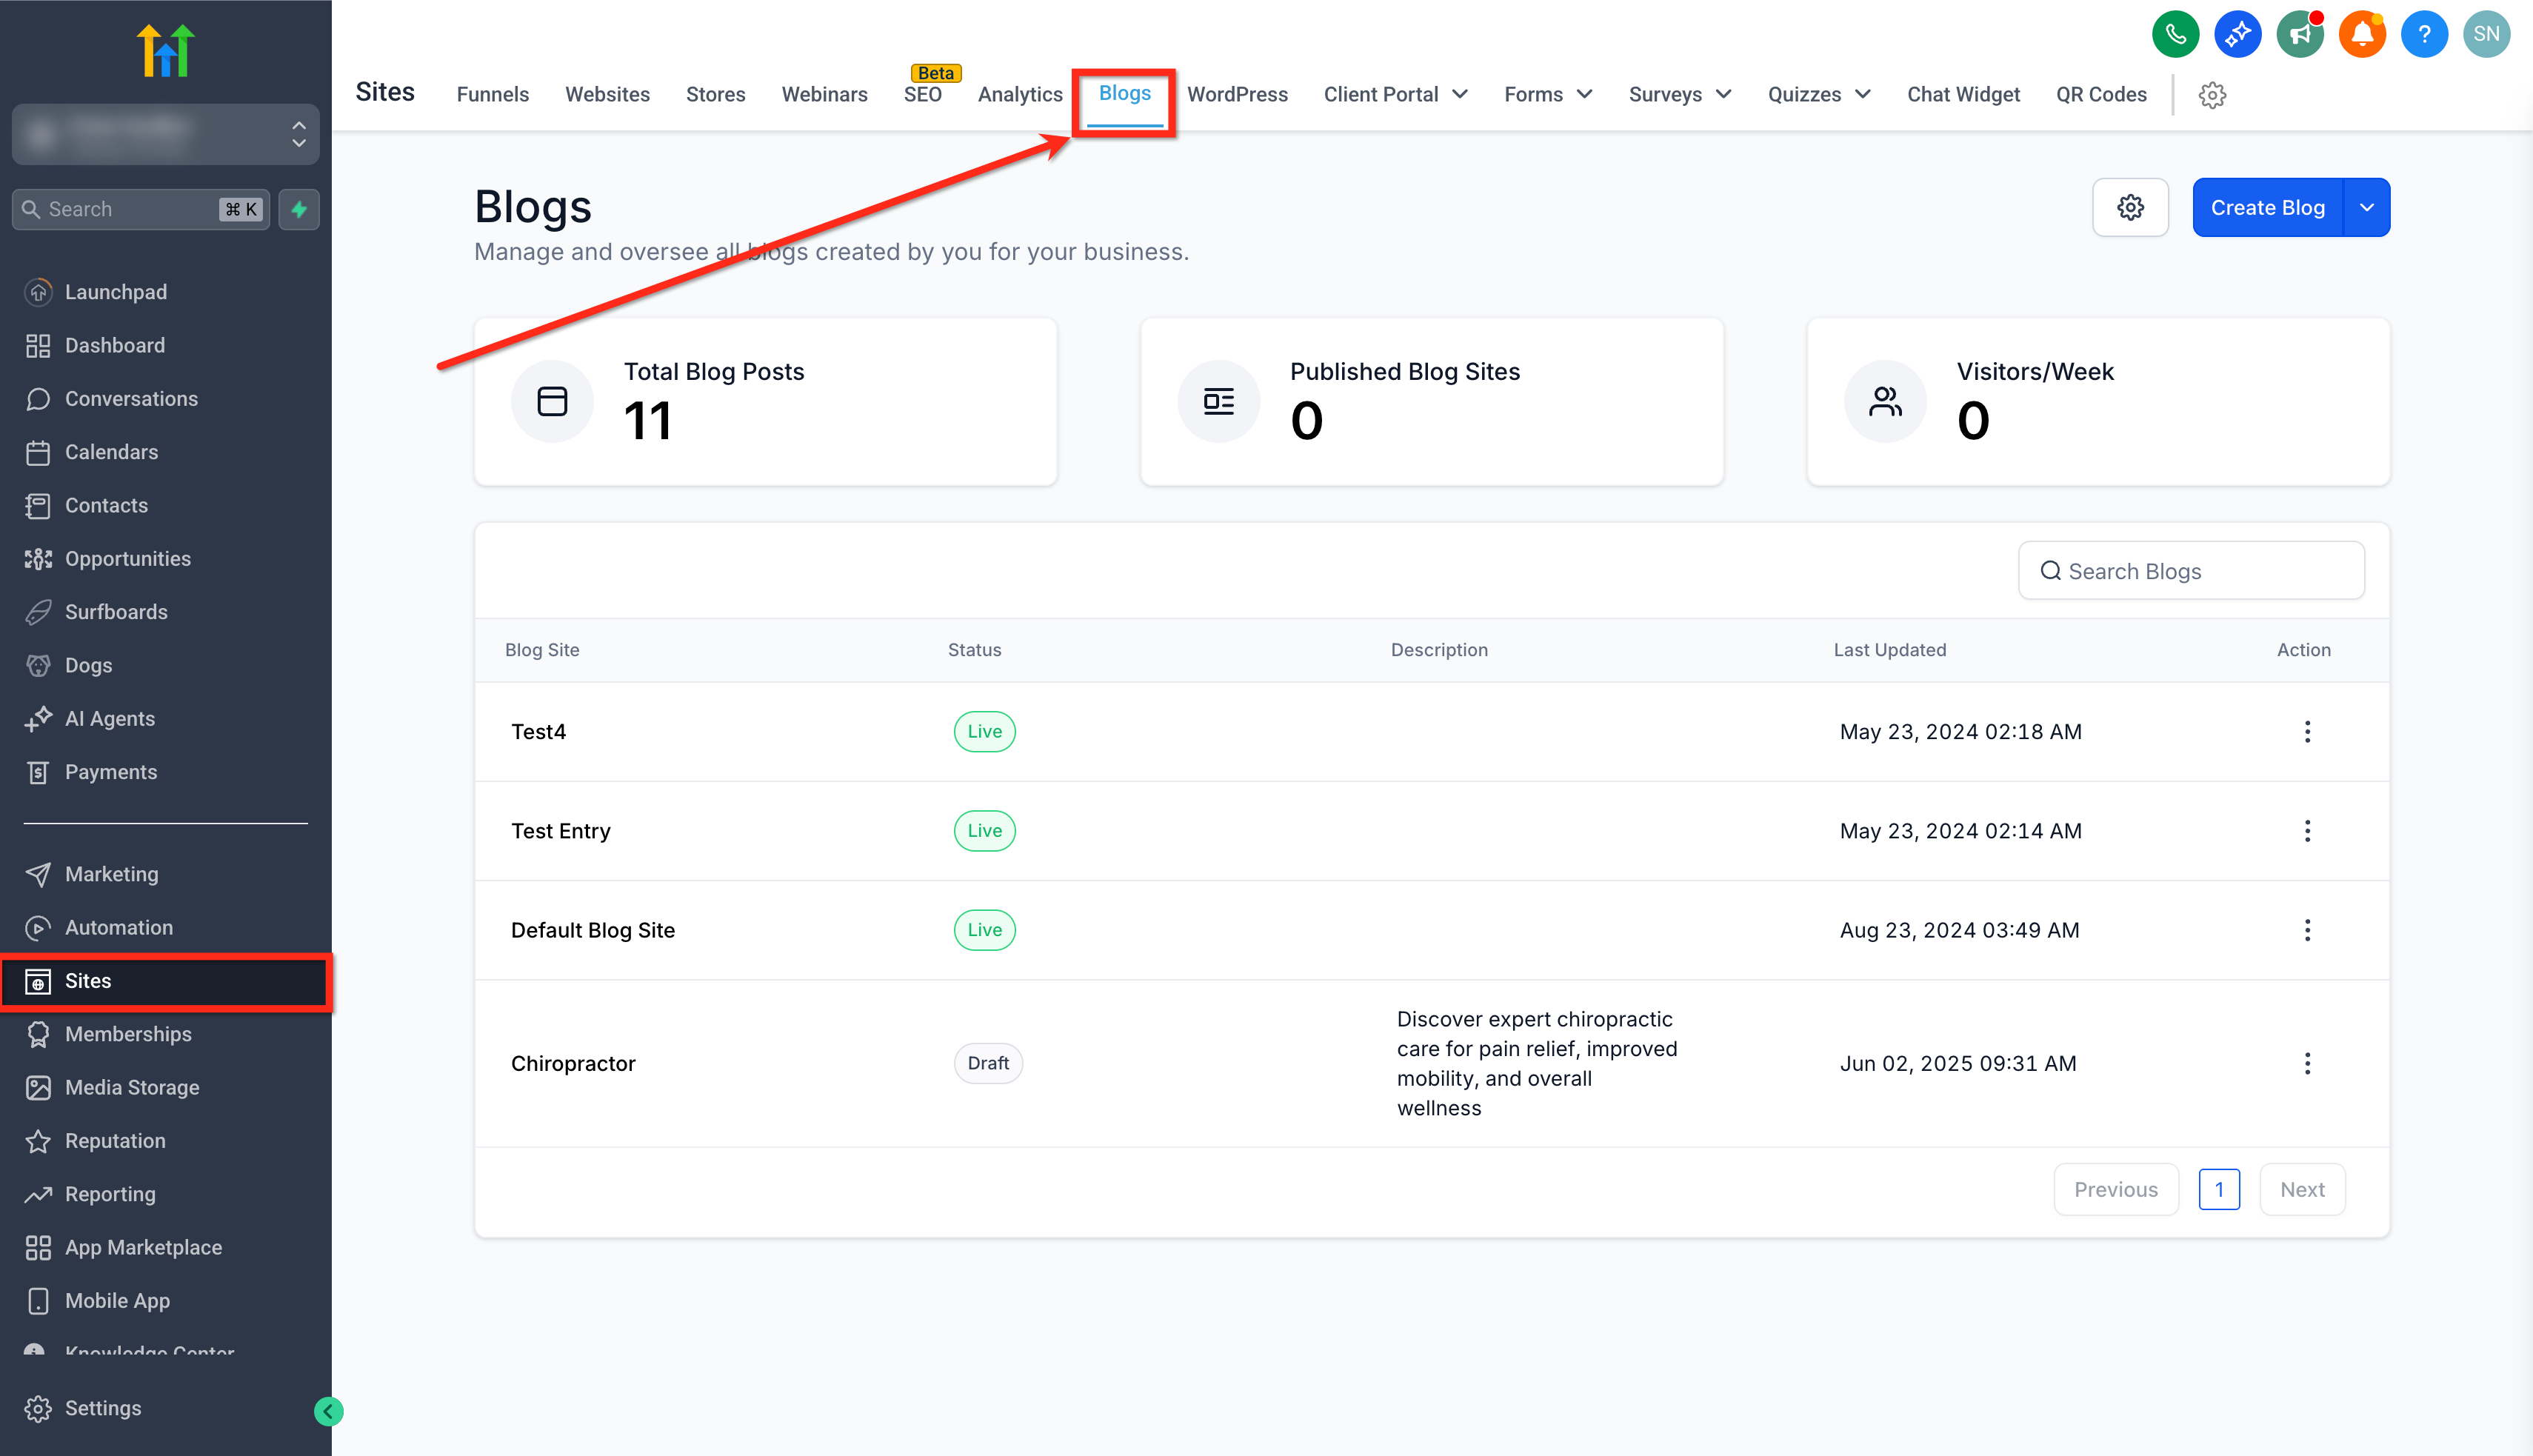
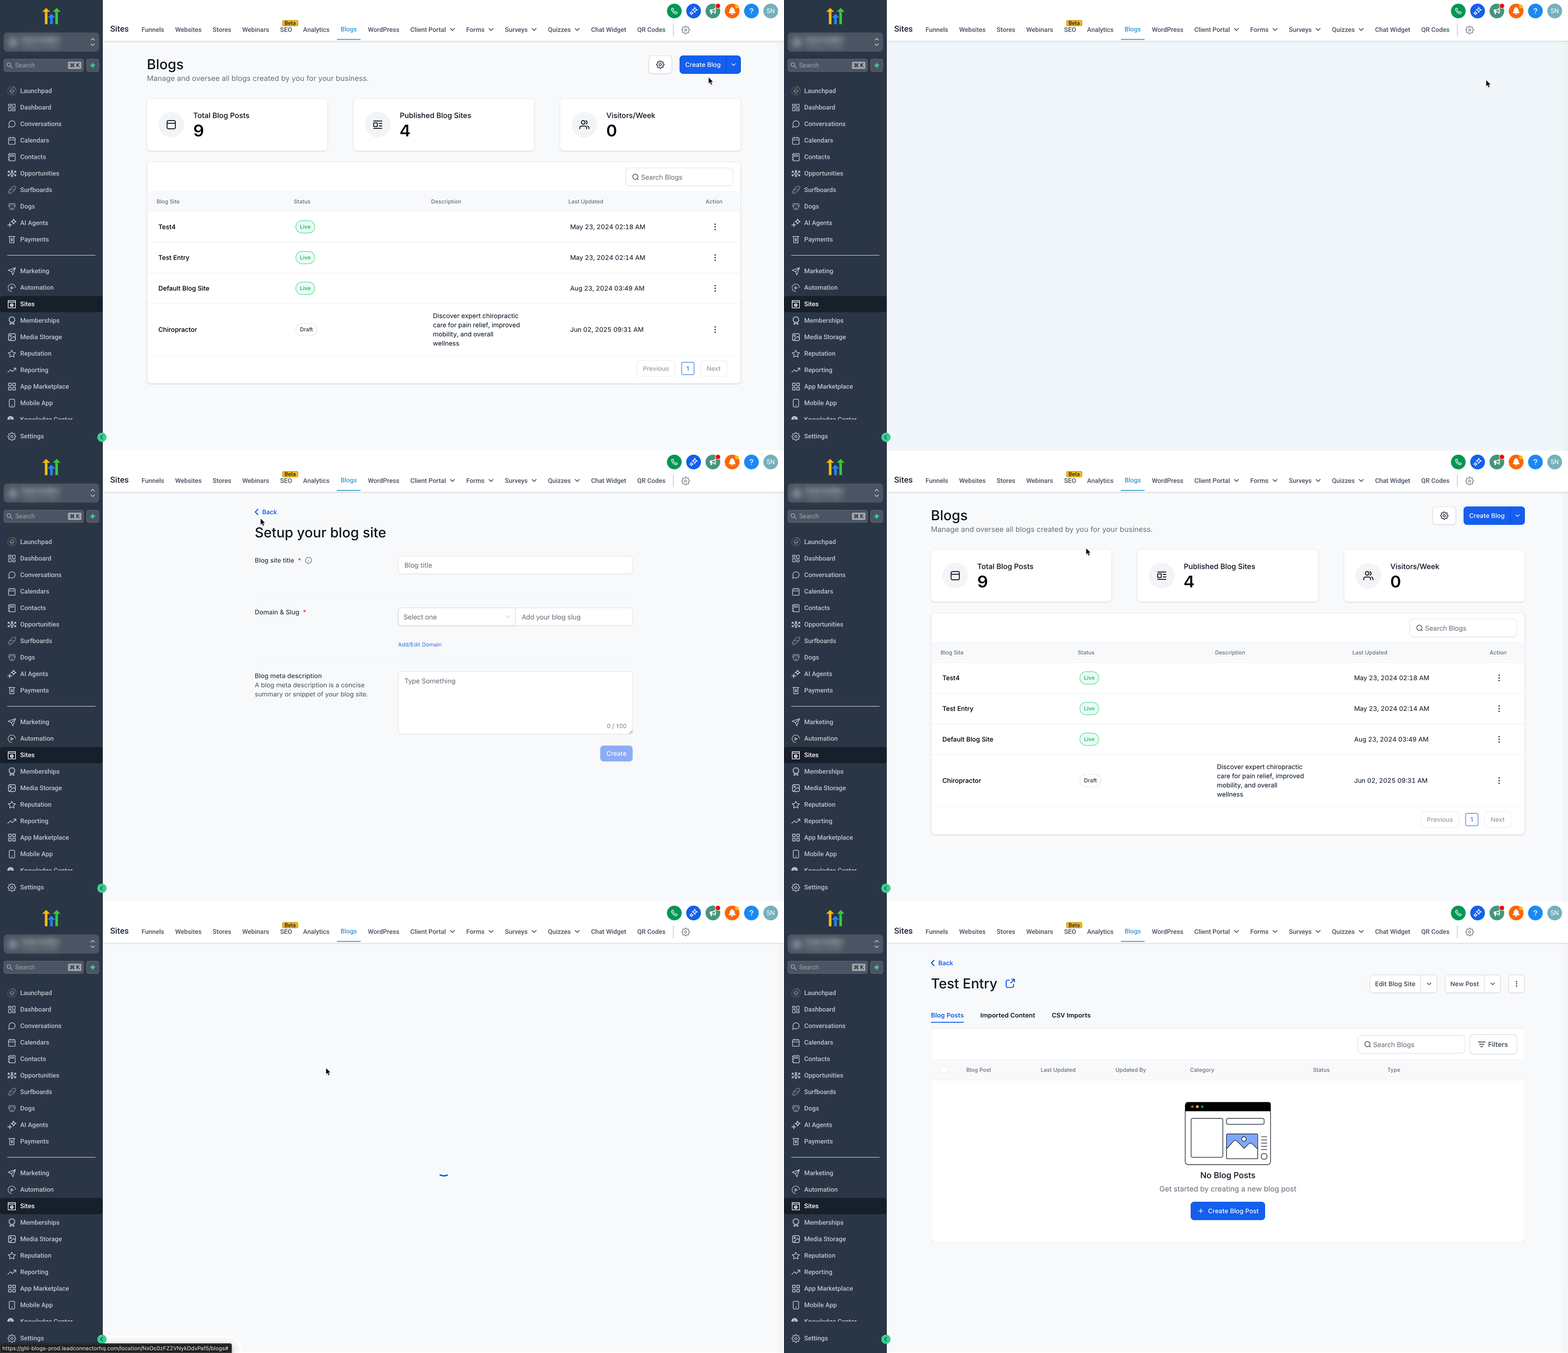
- To Create a New Blog Site: Click Create Blog dropdown → select Create a blog or Create a Blog from Templates.
- To use an existing blog: Click the blog site name to open it.
Step 2: Start a CSV Import
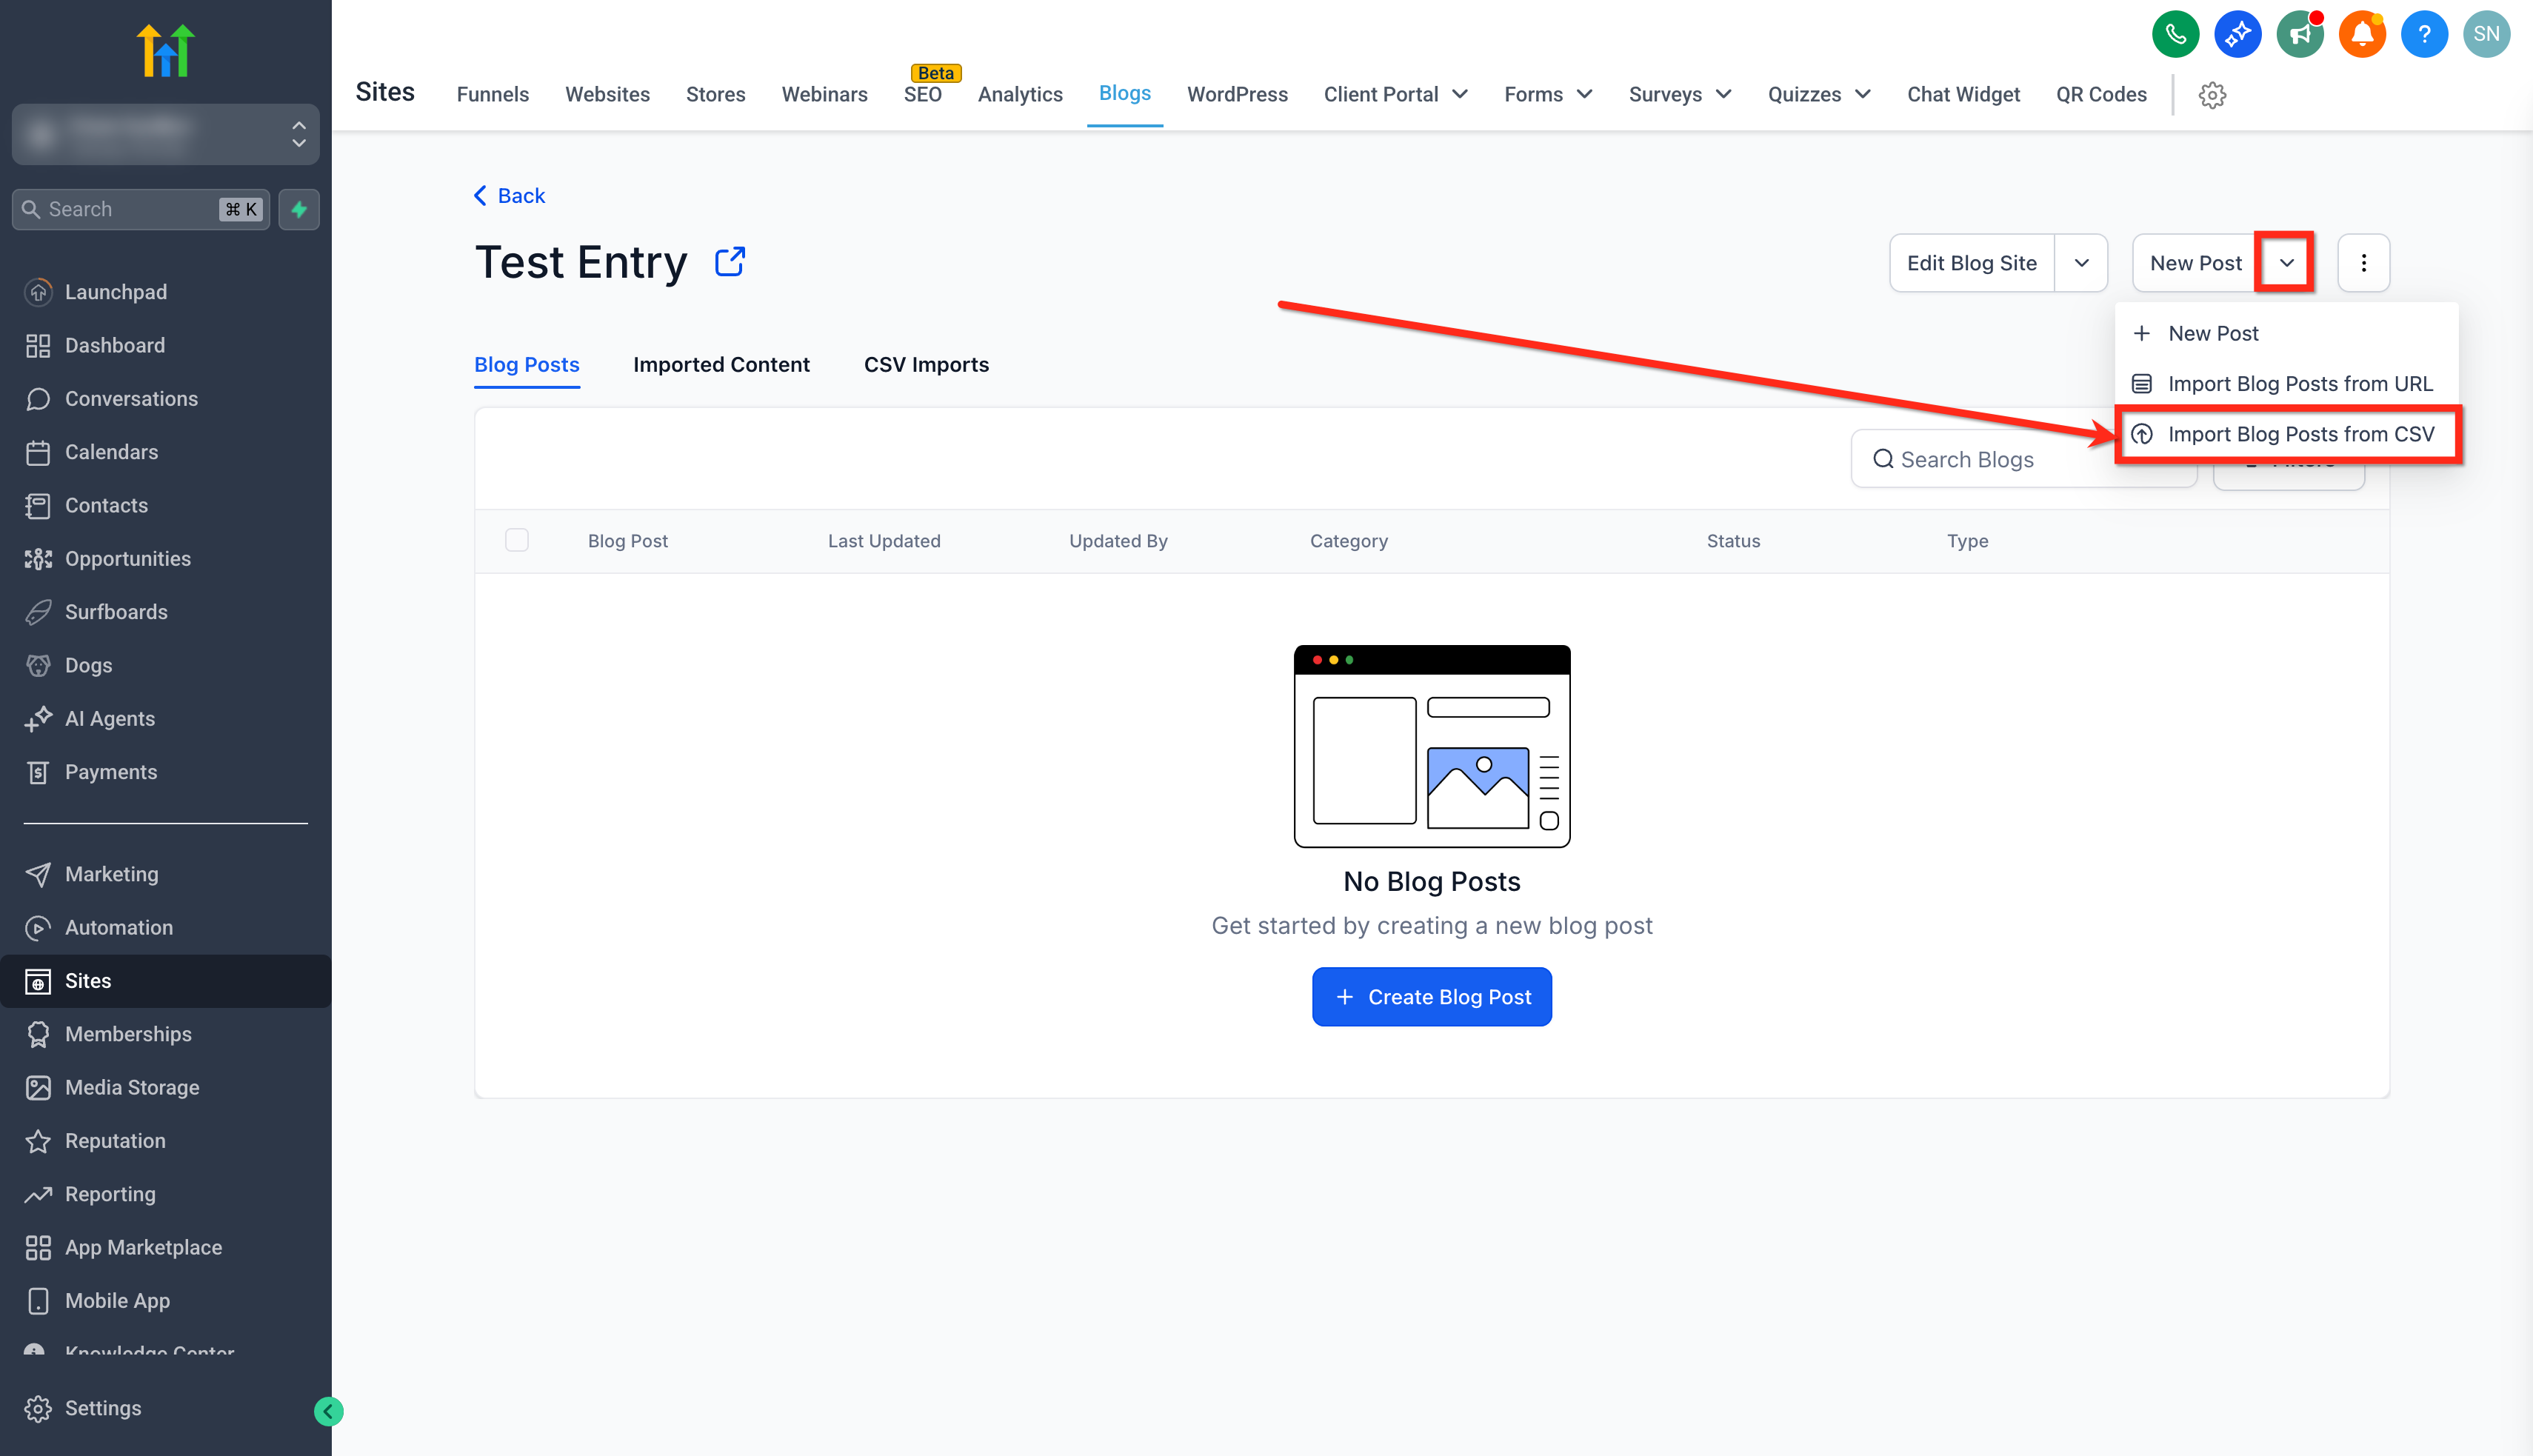
- Click on the New Post dropdown.
- Select Import Blog Post from CSV option.
Step 3: Prepare & Upload the File
- Click Download sample and populate the CSV or XLSX template to avoid header mismatches.
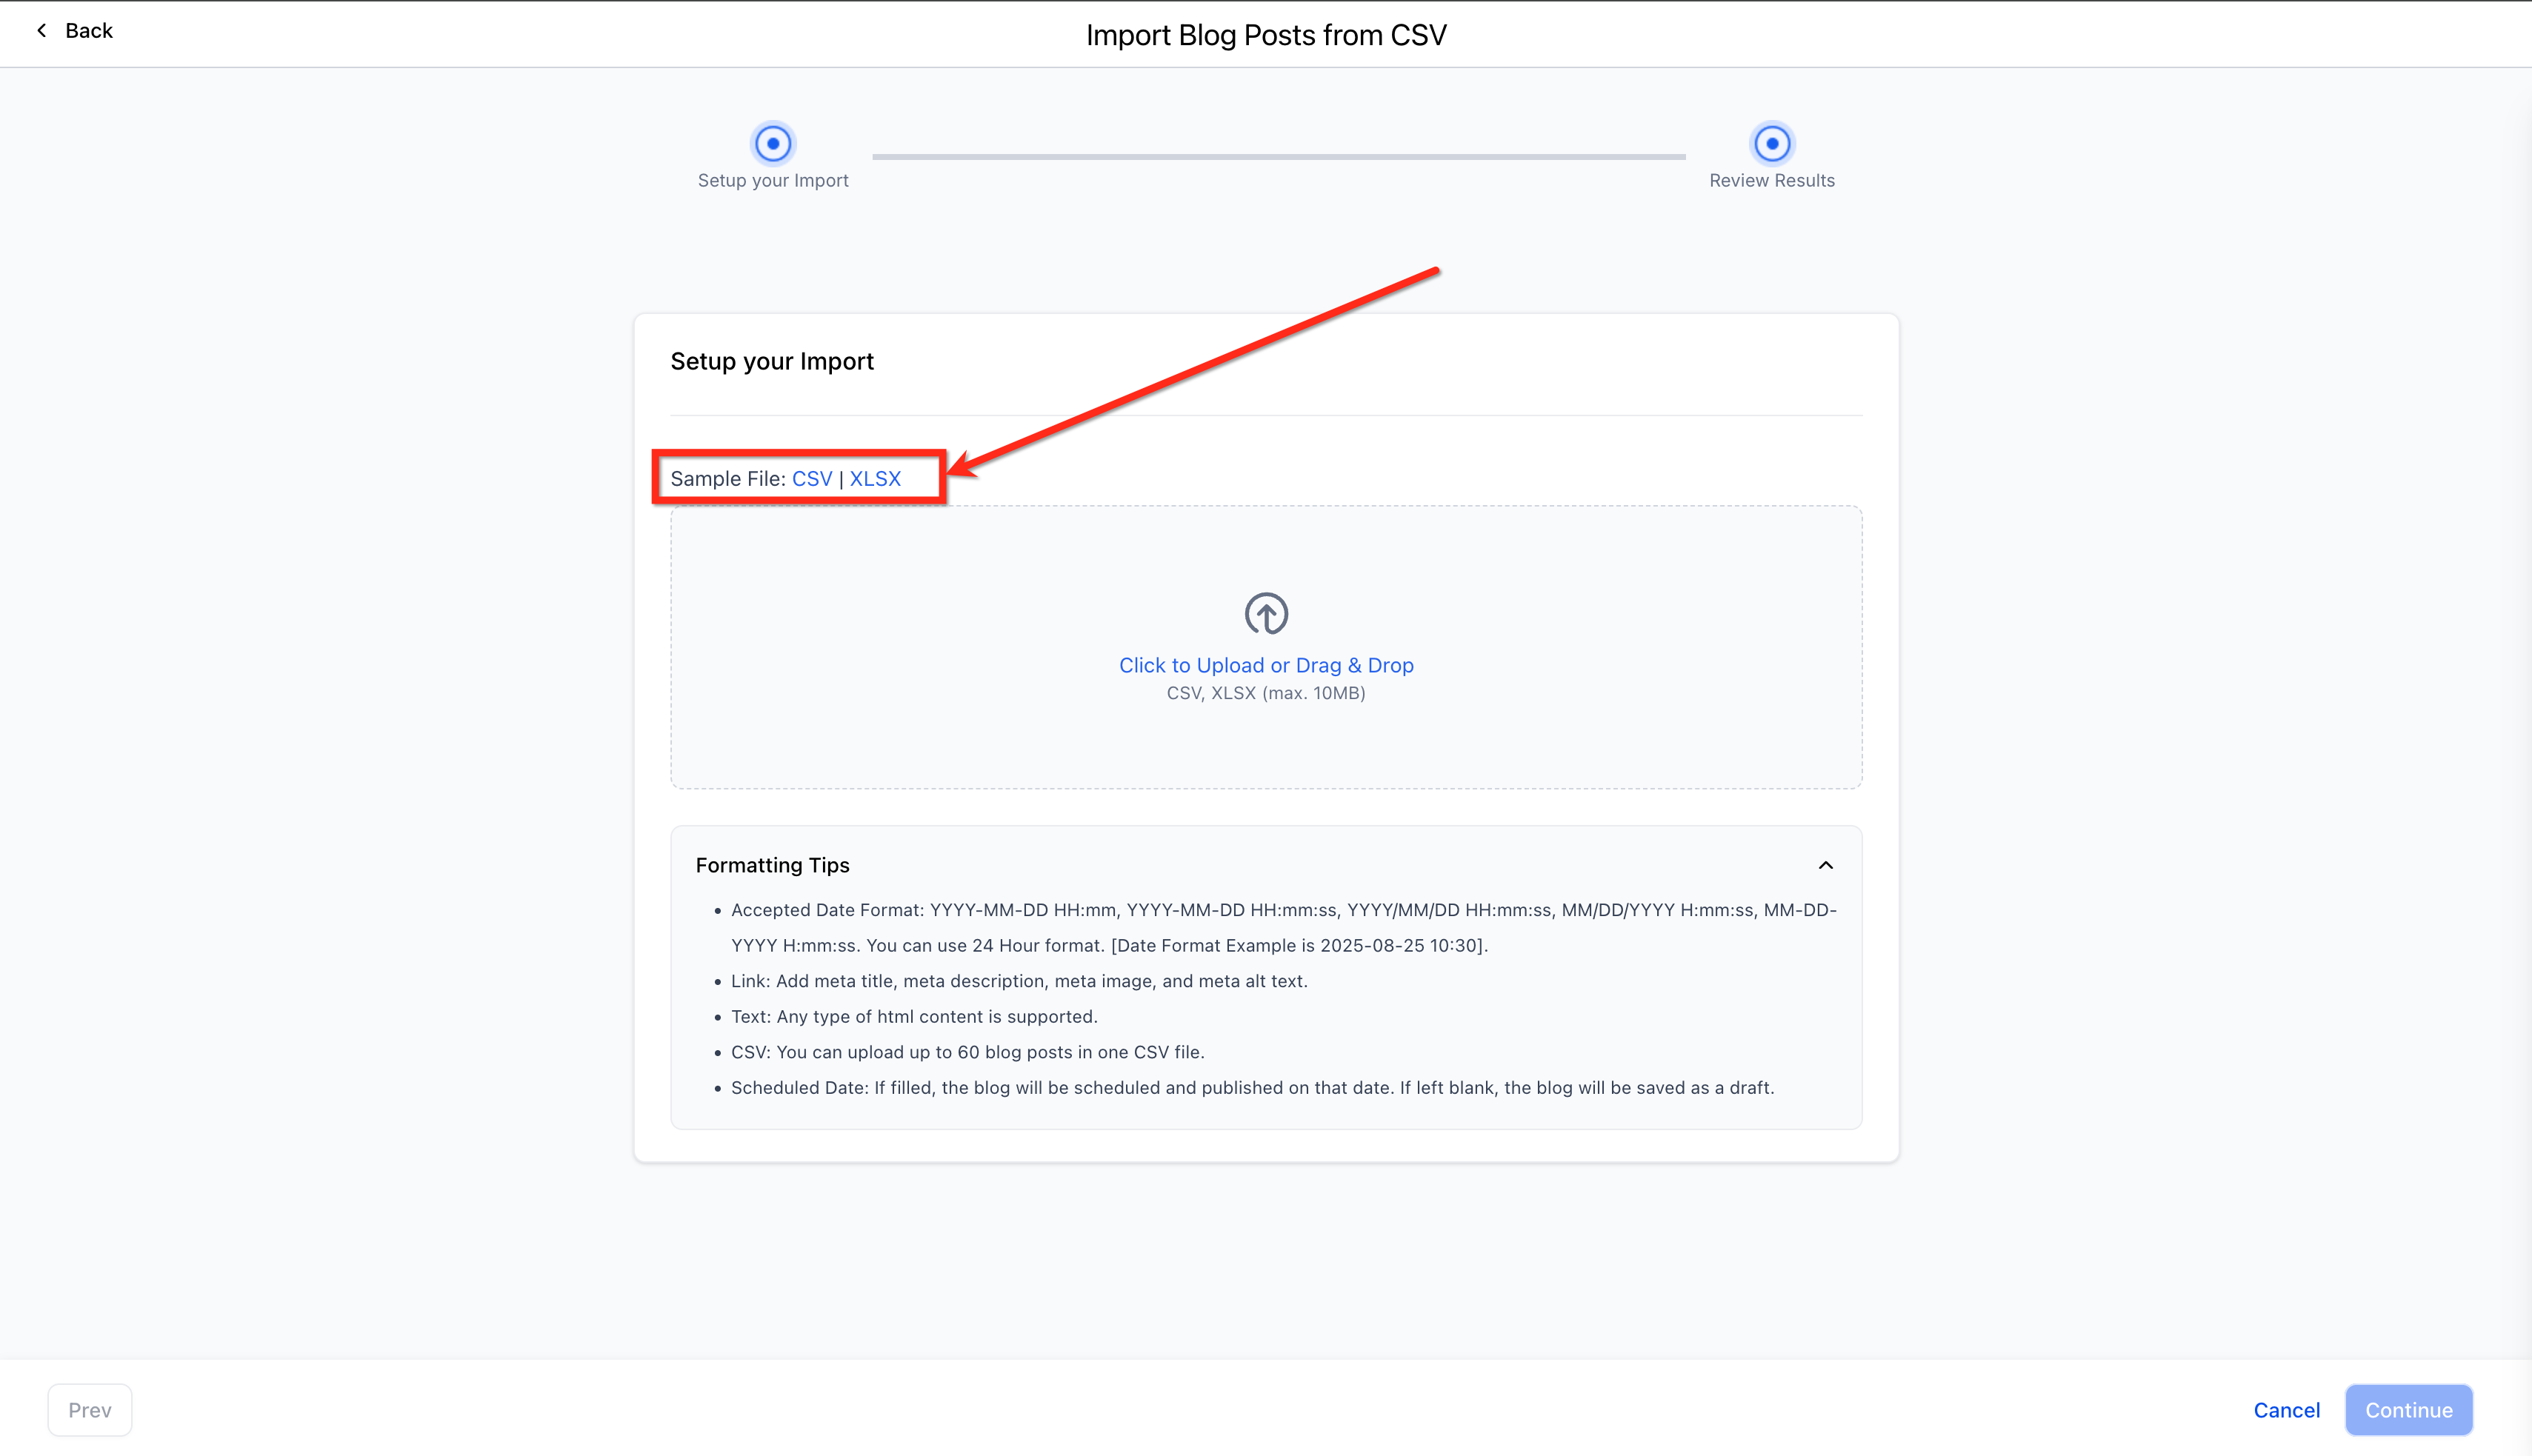
- Click on the Click to Upload or Drag & Drop → choose your prepared file.
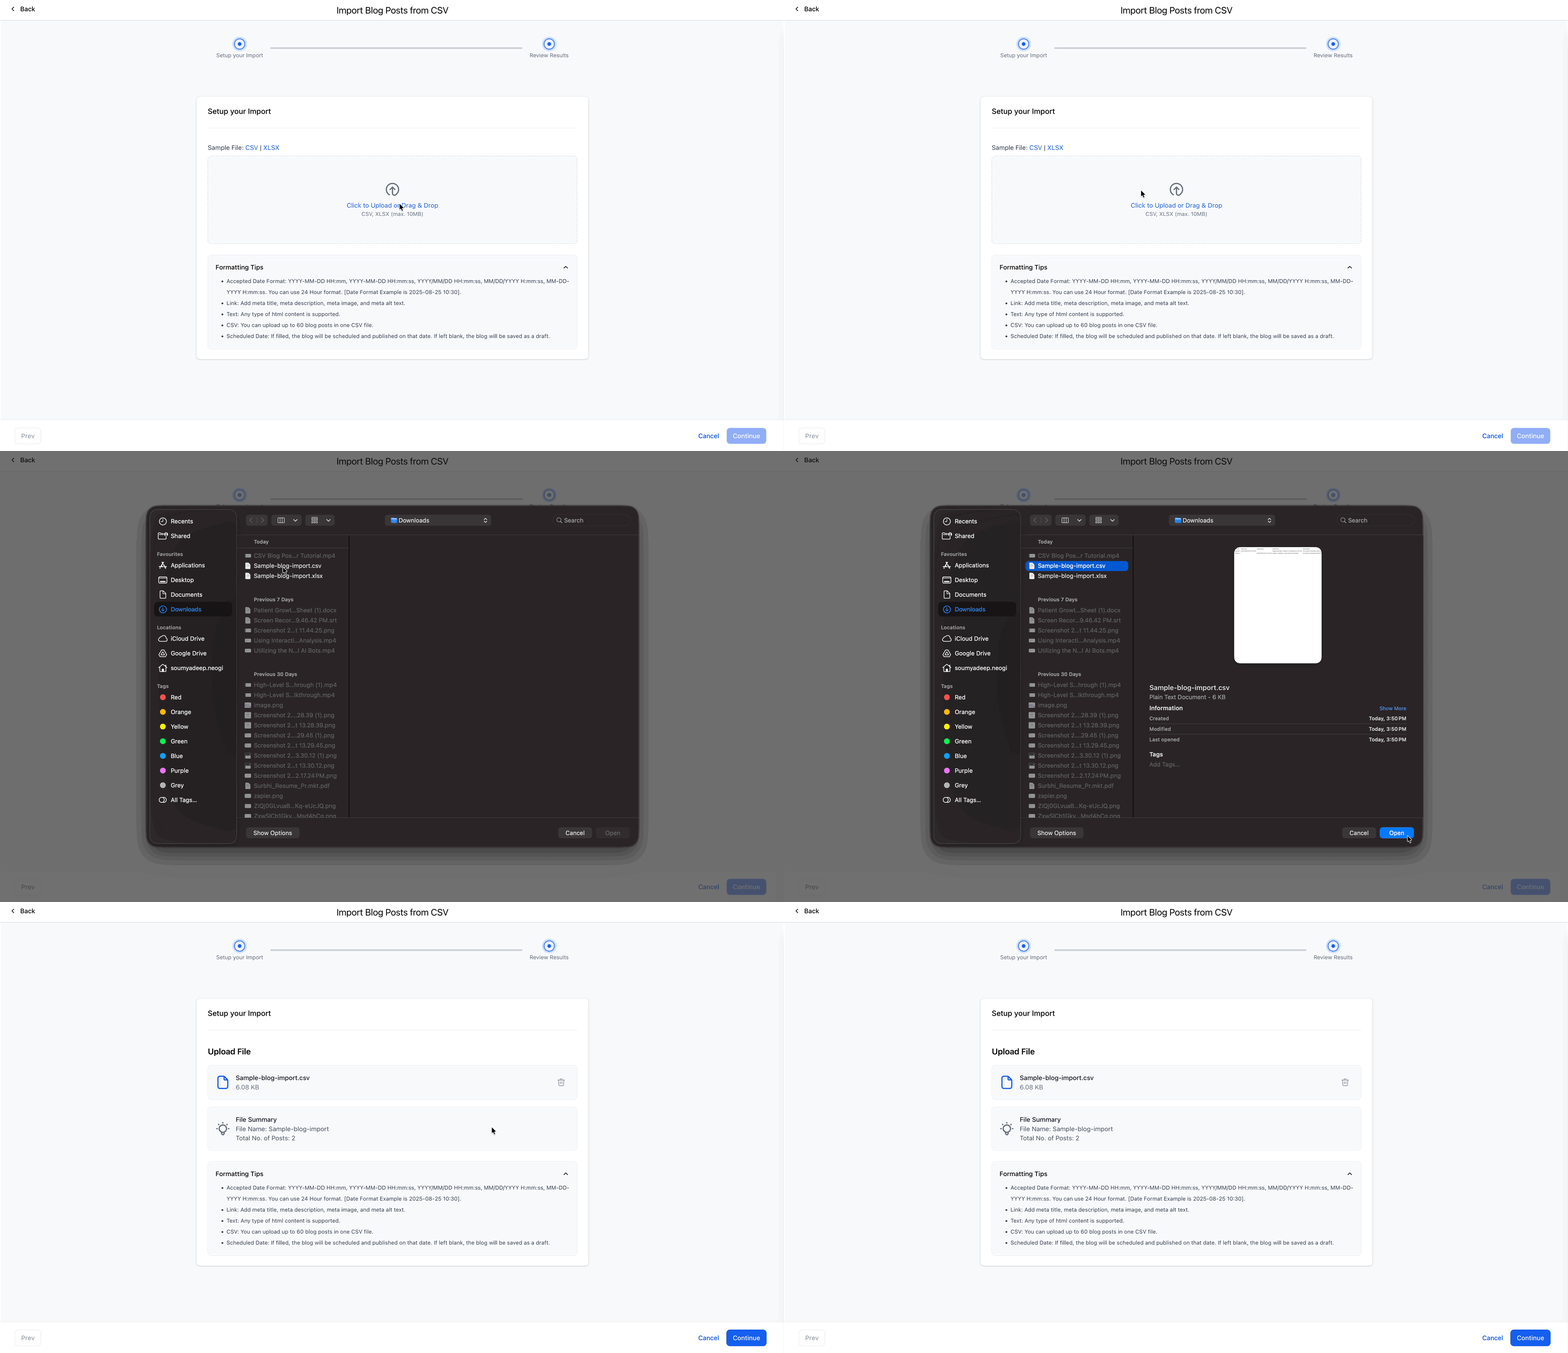
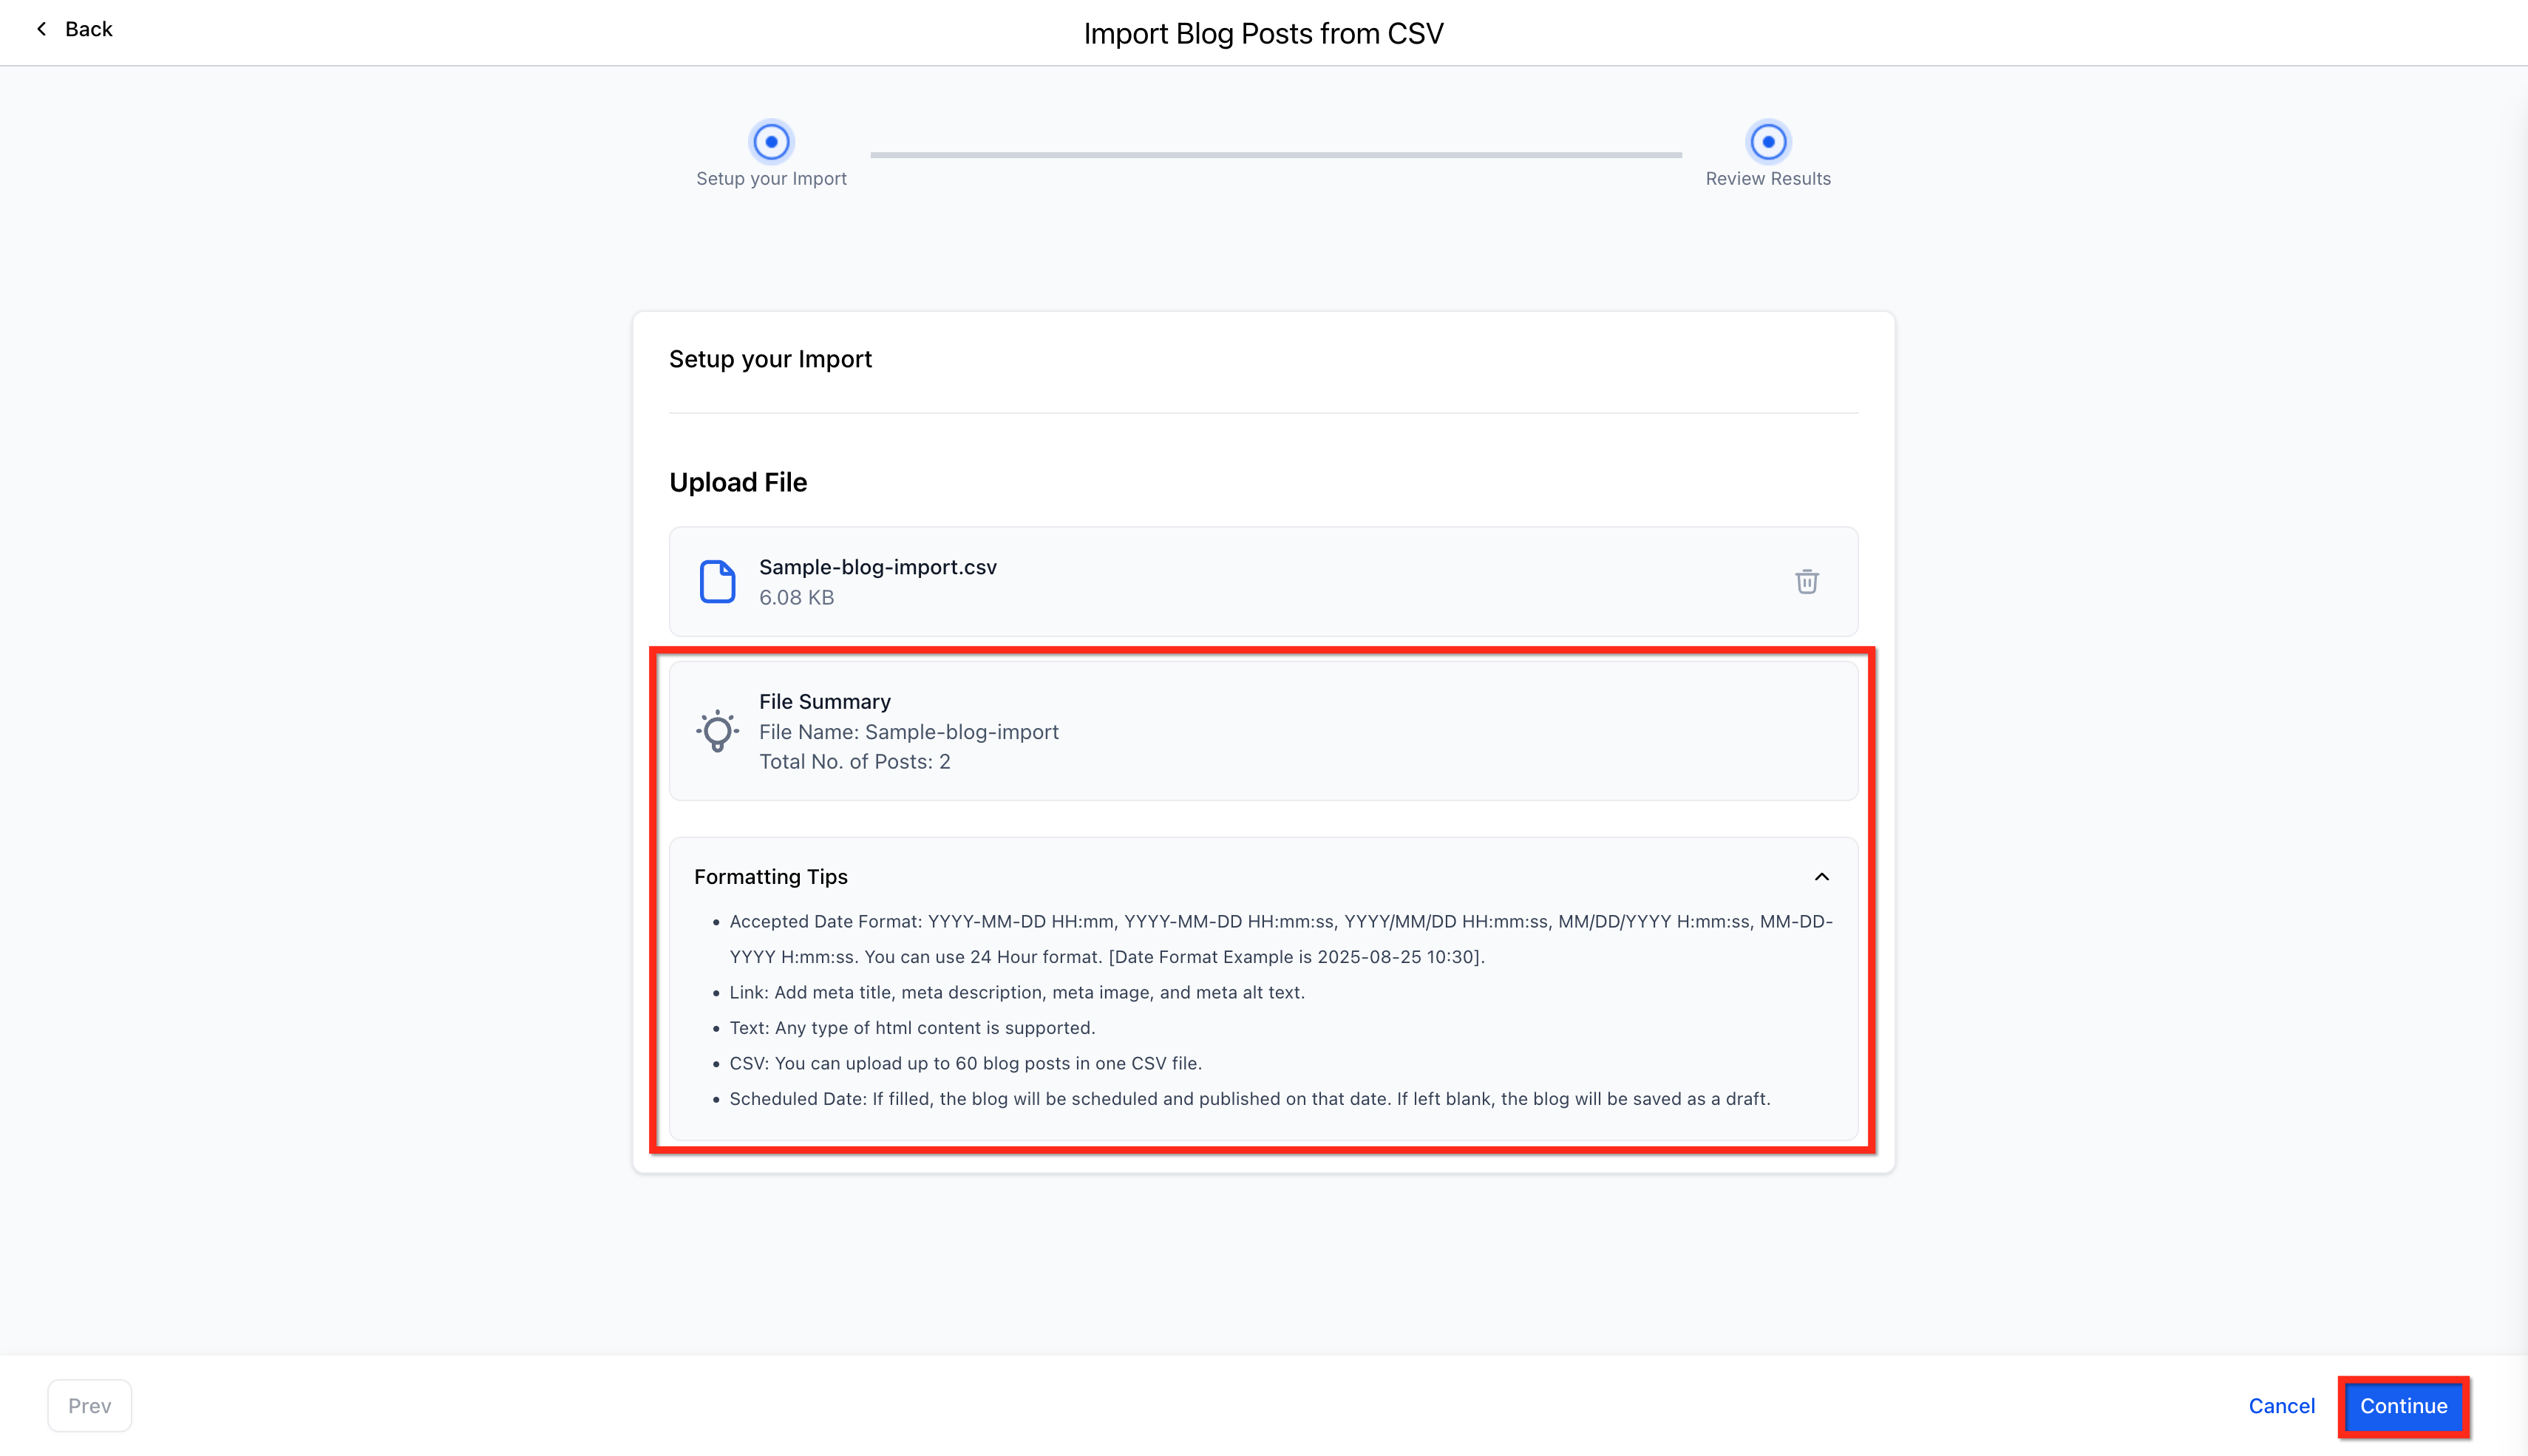
- Review the File summary (file name, total posts)
- Go through the Formatting Tips.
- Click on Continue.
Step 4: Preview, Edit & Schedule Posts
- Click any blog card to open Preview (check Desktop and Mobile views).
- Click the pencil icon to edit content as needed.
- Set the Publish/Schedule date with the date picker:
- Past date → imports as Published
- Future date → imports as Scheduled
- Blank date → imports as Draft
- Past date → imports as Published
Note: Invalid dates revert to Draft to prevent accidental publication.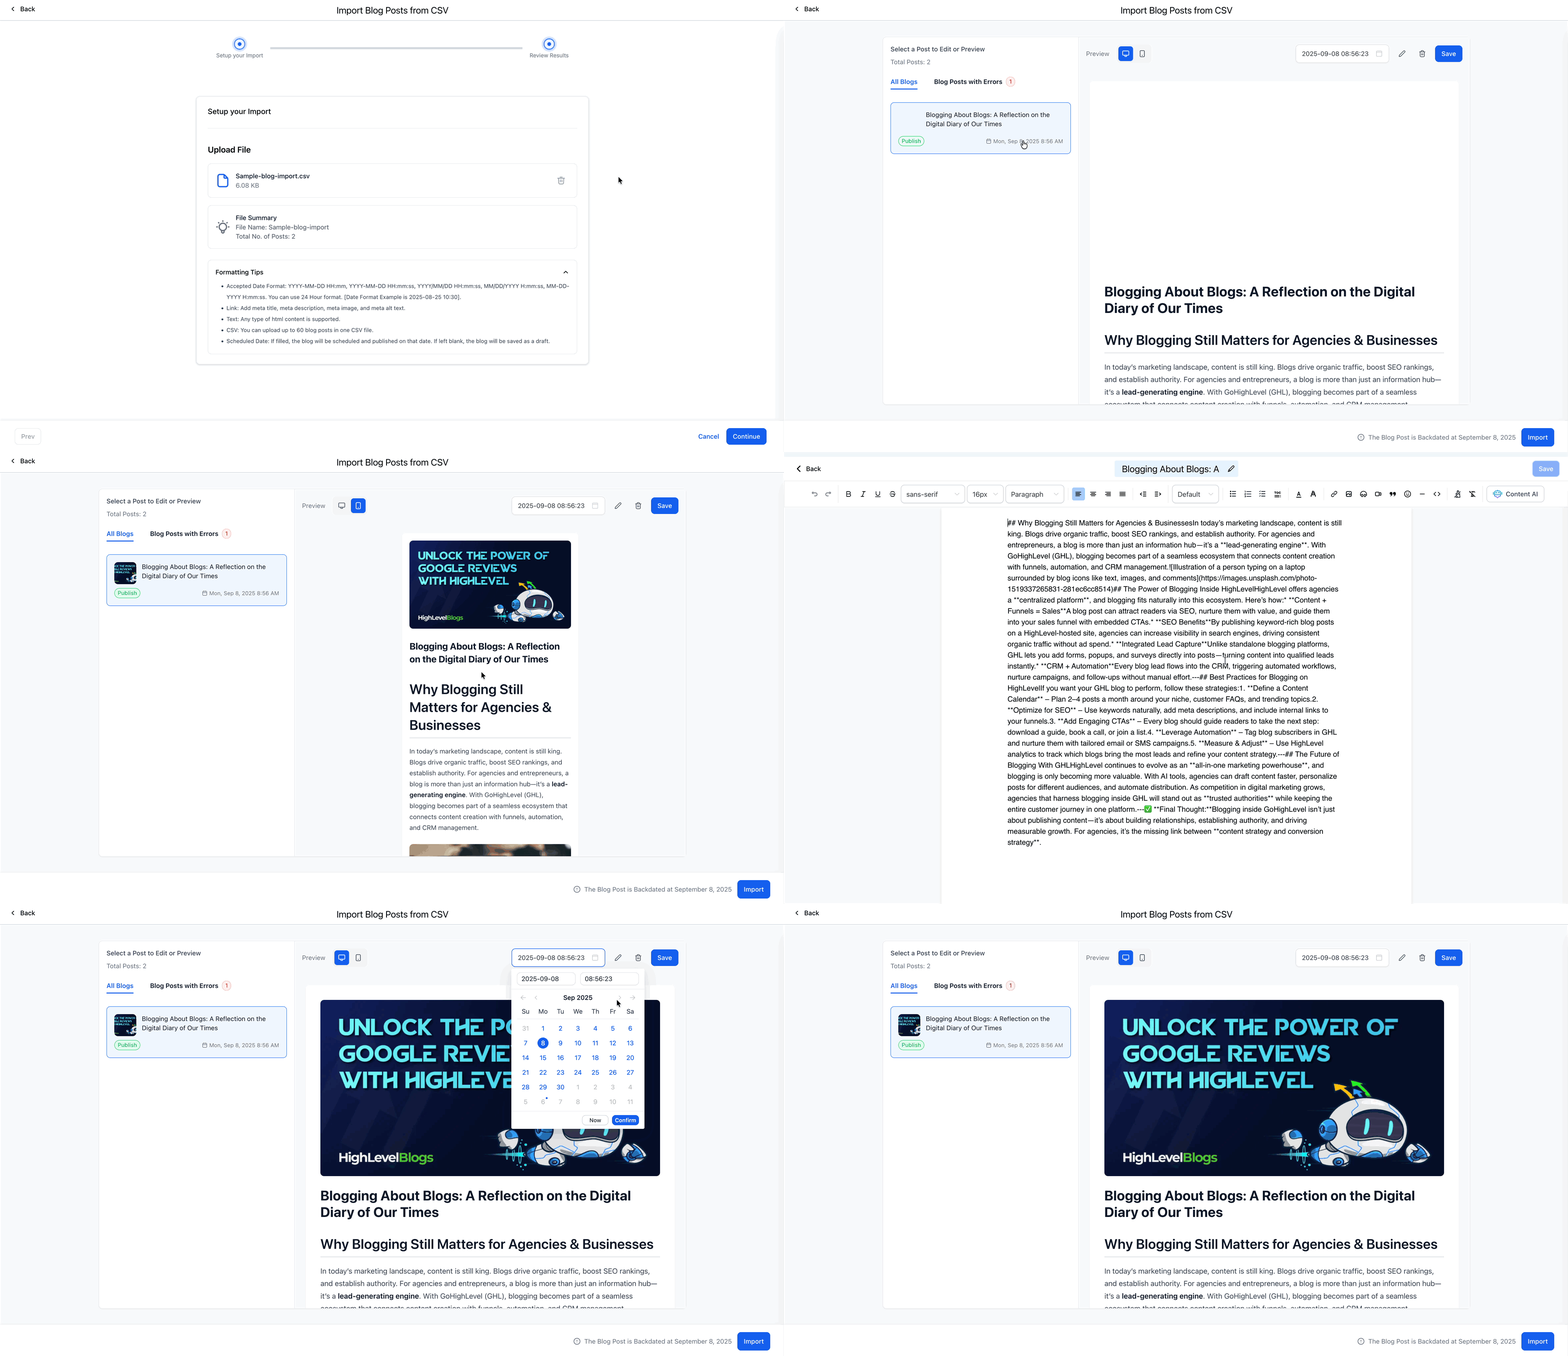
Step 5: Import & Confirm
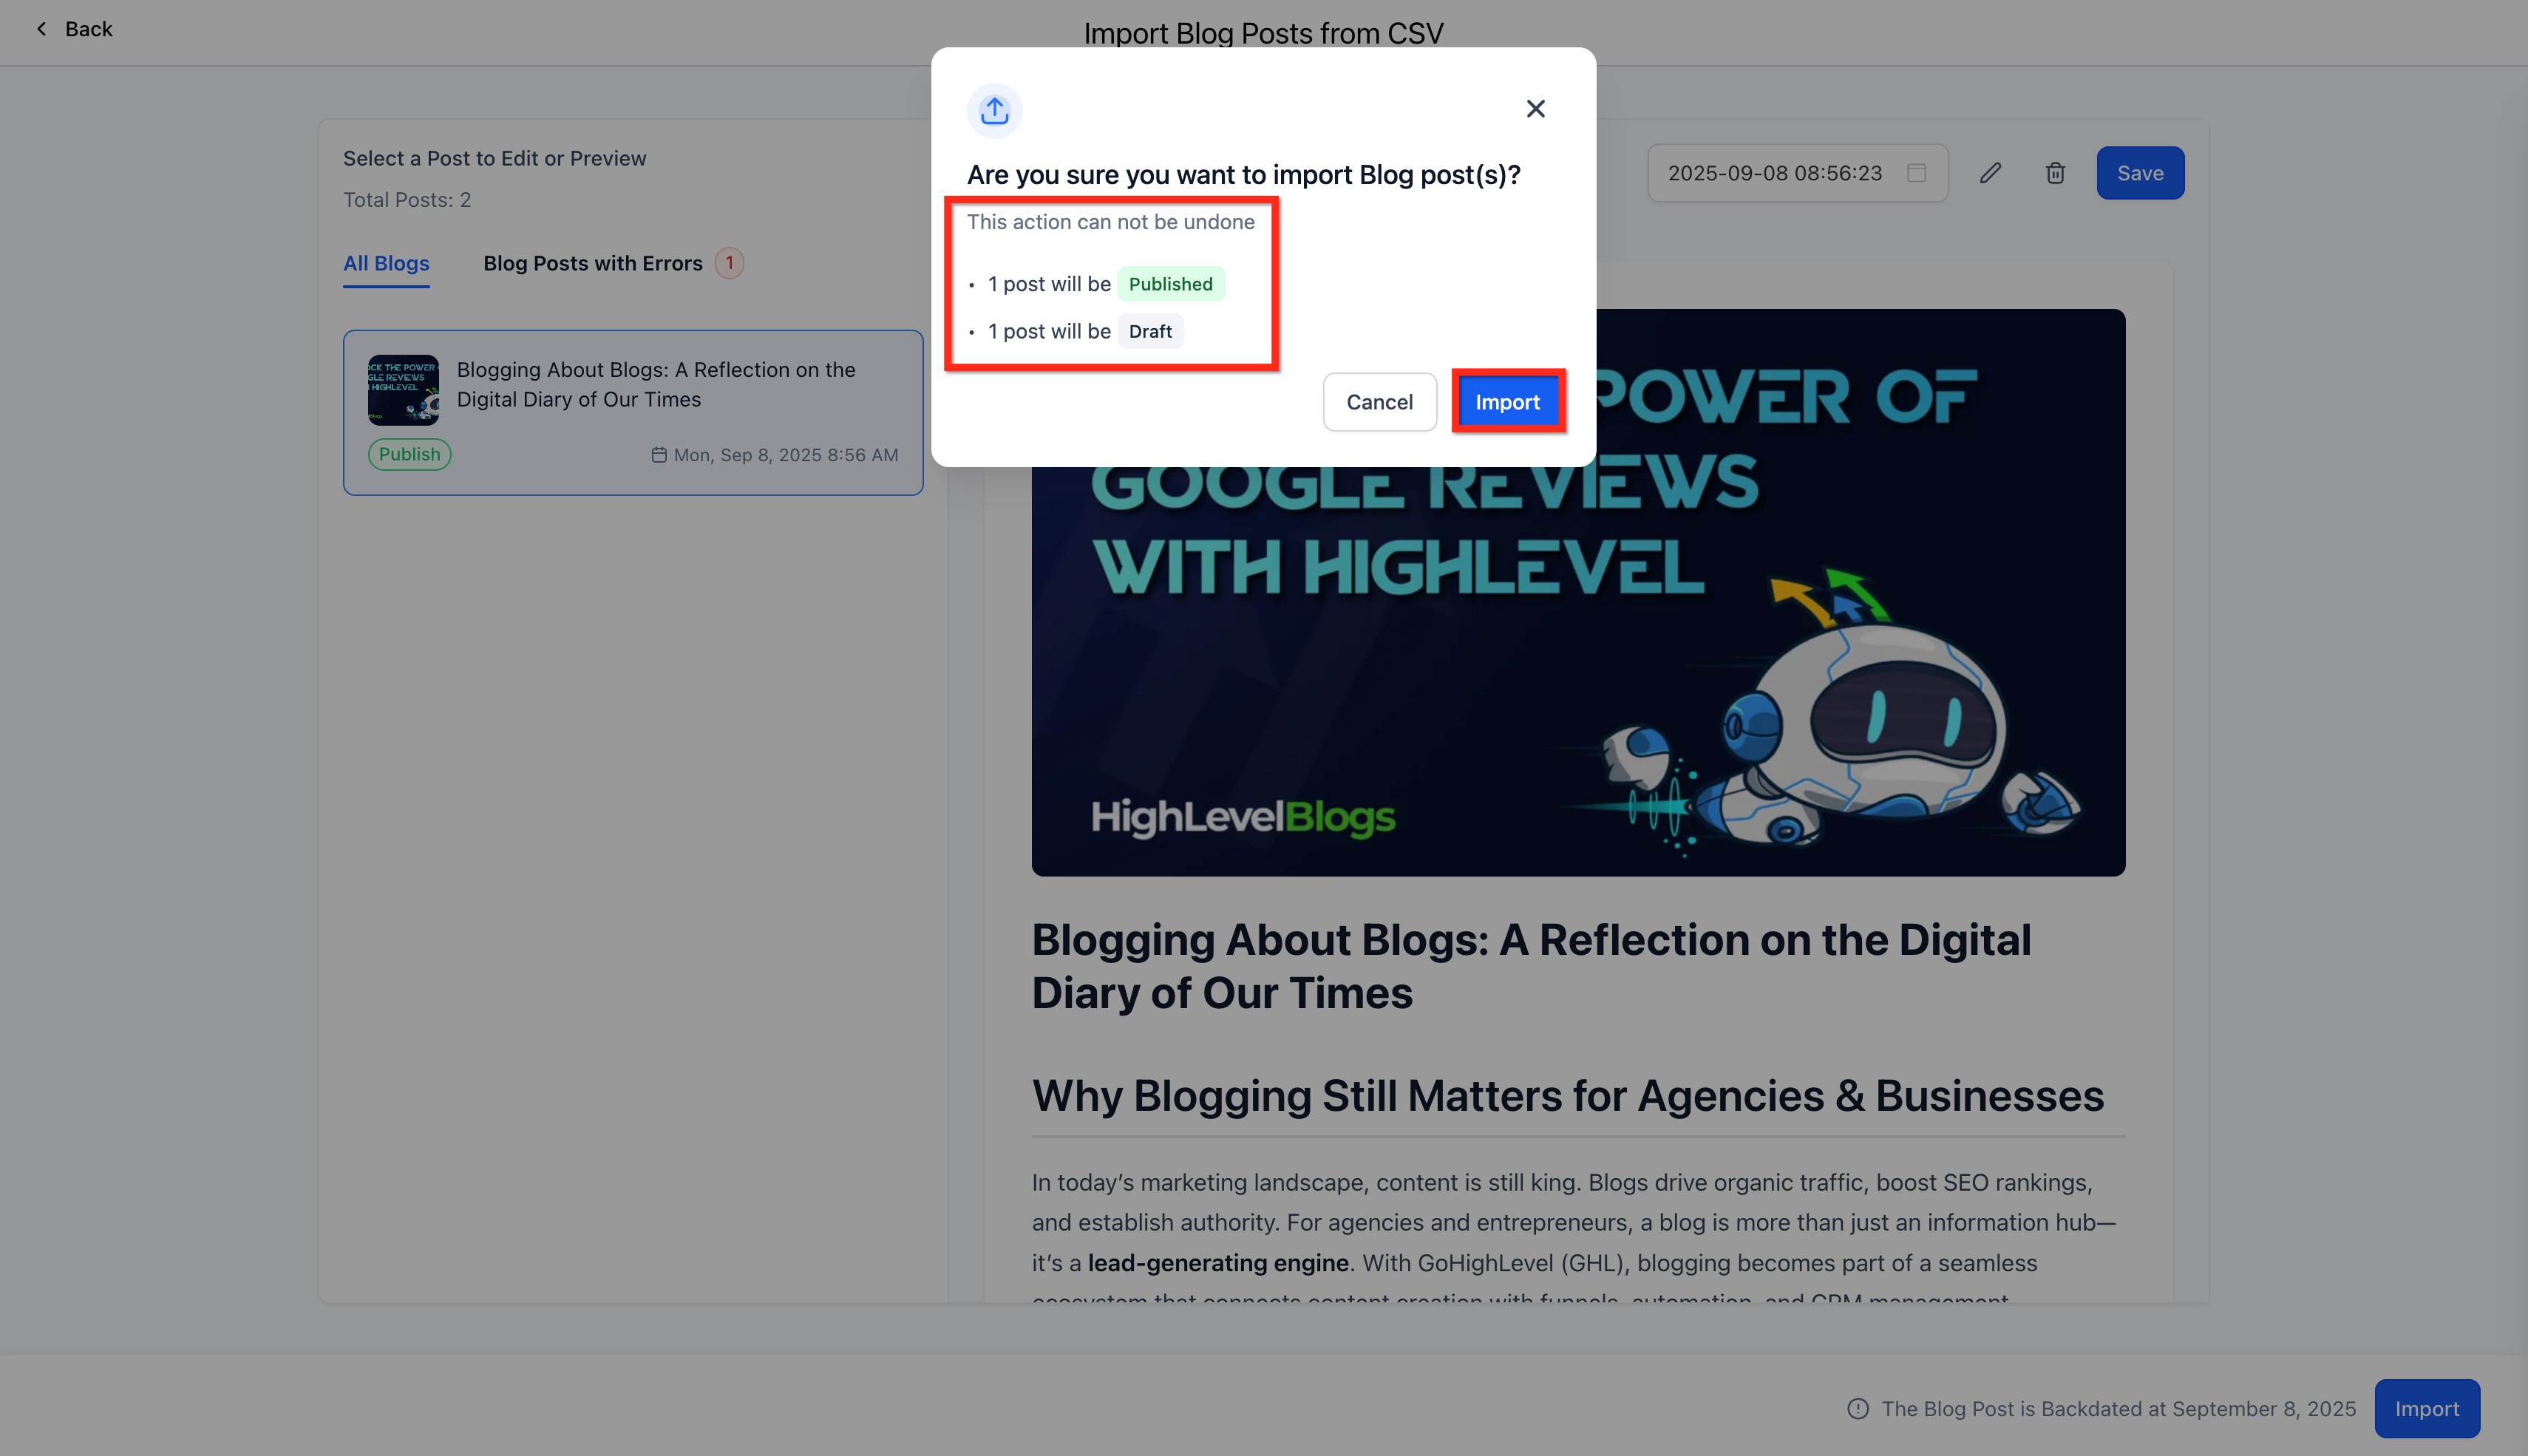
- Click Import.

- In the confirmation modal review the summary (e.g., 1 will be Published, 1 will be Draft)
- Click Import to confirm.
Posts with Errors (Row-Level Reports)

If any rows fail validation during review, open Posts with Errors to see a row-level report of what failed and why.

Each failed row should show:

The post title (or row identifier)

The field that failed validation

A validation message explaining what to fix
Frequently Asked Questions
Q: What’s the maximum number of posts I can import at once?
Up to 60 posts per CSV/XLSX file.
Q: Does the importer download and host my images?
Yes. Provide either full image URLs or relative paths accessible to the public internet; SourCherry will fetch and store them.
Q: Can I edit posts after importing?
Absolutely. Imported posts act like any other blog post—open the editor, adjust content, and republish.
Q: What happens if I re-import a post with the same title?
A new draft will be created; duplicates are not automatically merged.
Q: Is there a file-size limit?
Keep the file under 25 MB to avoid browser time-outs. Split larger files into smaller batches for best performance.
Q: Will unpublished drafts count toward the 60-post limit?
Yes, all rows in your CSV count toward the 60-row cap, regardless of their final status.
Q: Can I undo an import?
There’s no one-click rollback. Delete imported posts manually or use bulk-delete from the Blog Posts list.
Q: What happens if I don’t include an existing author or category in my CSV?
The system will auto-create them during the import process.
Q: What happens if I leave the publish date blank?
The post will be imported as a Draft.
Q: Can I re-upload a CSV if there are errors?
Yes, you can fix the errors in your file and re-upload anytime.
Q: What platforms can I migrate from?
Any platform that allows you to export structured content into CSV or Excel (e.g., Blogger, Wix, WordPress, etc.).
Q. How to resolve and retry failed errors ?
Open Posts with Errors. Select a failed row to review the message. Update the row (if inline edits are supported), or Fix the source CSV/XLSX and re-upload. Retry the import after resolving errors.