
Go-To connections for triggers lets you point each trigger to the exact action where its path should begin—right on the canvas. It keeps complex entry logic tidy without duplicating workflows or building giant if/else stacks.
Please Note: Connect node to node
Click the small connector dot on the trigger, drag to the connector dot on the action, and release.
TABLE OF CONTENTS
- What are Go-To Connections for Triggers?
- Key Benefits of Go-To Connections for Triggers
- How do Go-To Connections for Triggers work
- Connection Rules (Builder)
- Enrollment Rules (How Contacts Enter)
- Key Behavior of the Go-To Connection Triggers
- How to Use Go-To Connections for Triggers
- Frequently Asked Questions
What are Go-To Connections for Triggers?
Go-To Connections for Triggers are special dashed connectors that let you choose a unique “first action” for every trigger on the workflow canvas. When a trigger matches, the contact jumps directly to the connected action and the workflow continues from there—no detours, no duplicate workflows. You can now set a start action per trigger. Drag Go-To connections from the trigger to any action on the canvas - this means no more single entry path, you can define the entry path for each of your triggers!
IMPORTANT NOTES:

1. Advanced Builder only: Go-To Connections for Triggers are exclusive to Advanced Builder.
2. Every trigger must connect once. Unassigned triggers auto-connect to Root, but you should explicitly set the correct start action.
3. Single enrollment per contact. A contact won’t run concurrently down multiple branches in the same workflow.
4. Switching back to Standard Builder. Remove Advanced-only features (Trigger Go-To, Delinked nodes, Disabled nodes) before switching views.
Key Benefits of Go-To Connections for Triggers
- One trigger, one journey—design multiple entry paths within a single workflow.
- Cleaner logic—eliminate giant if/else branches and keep the canvas easy to scan.
- Faster execution—contacts skip unnecessary steps and start exactly where they should.
- Easy maintenance—drag a new dashed line to repoint any trigger in seconds.
How do Go-To Connections for Triggers work
- Set a start action per trigger: Drag a dashed Go-To connection from the trigger to the action where that trigger should begin.
- Clean visual routing: Trigger Go-To links are dashed with an arrowhead; normal sequential paths stay solid.
- Direct execution: When a trigger matches, the workflow jumps directly to its connected start action and continues from there.
Example:
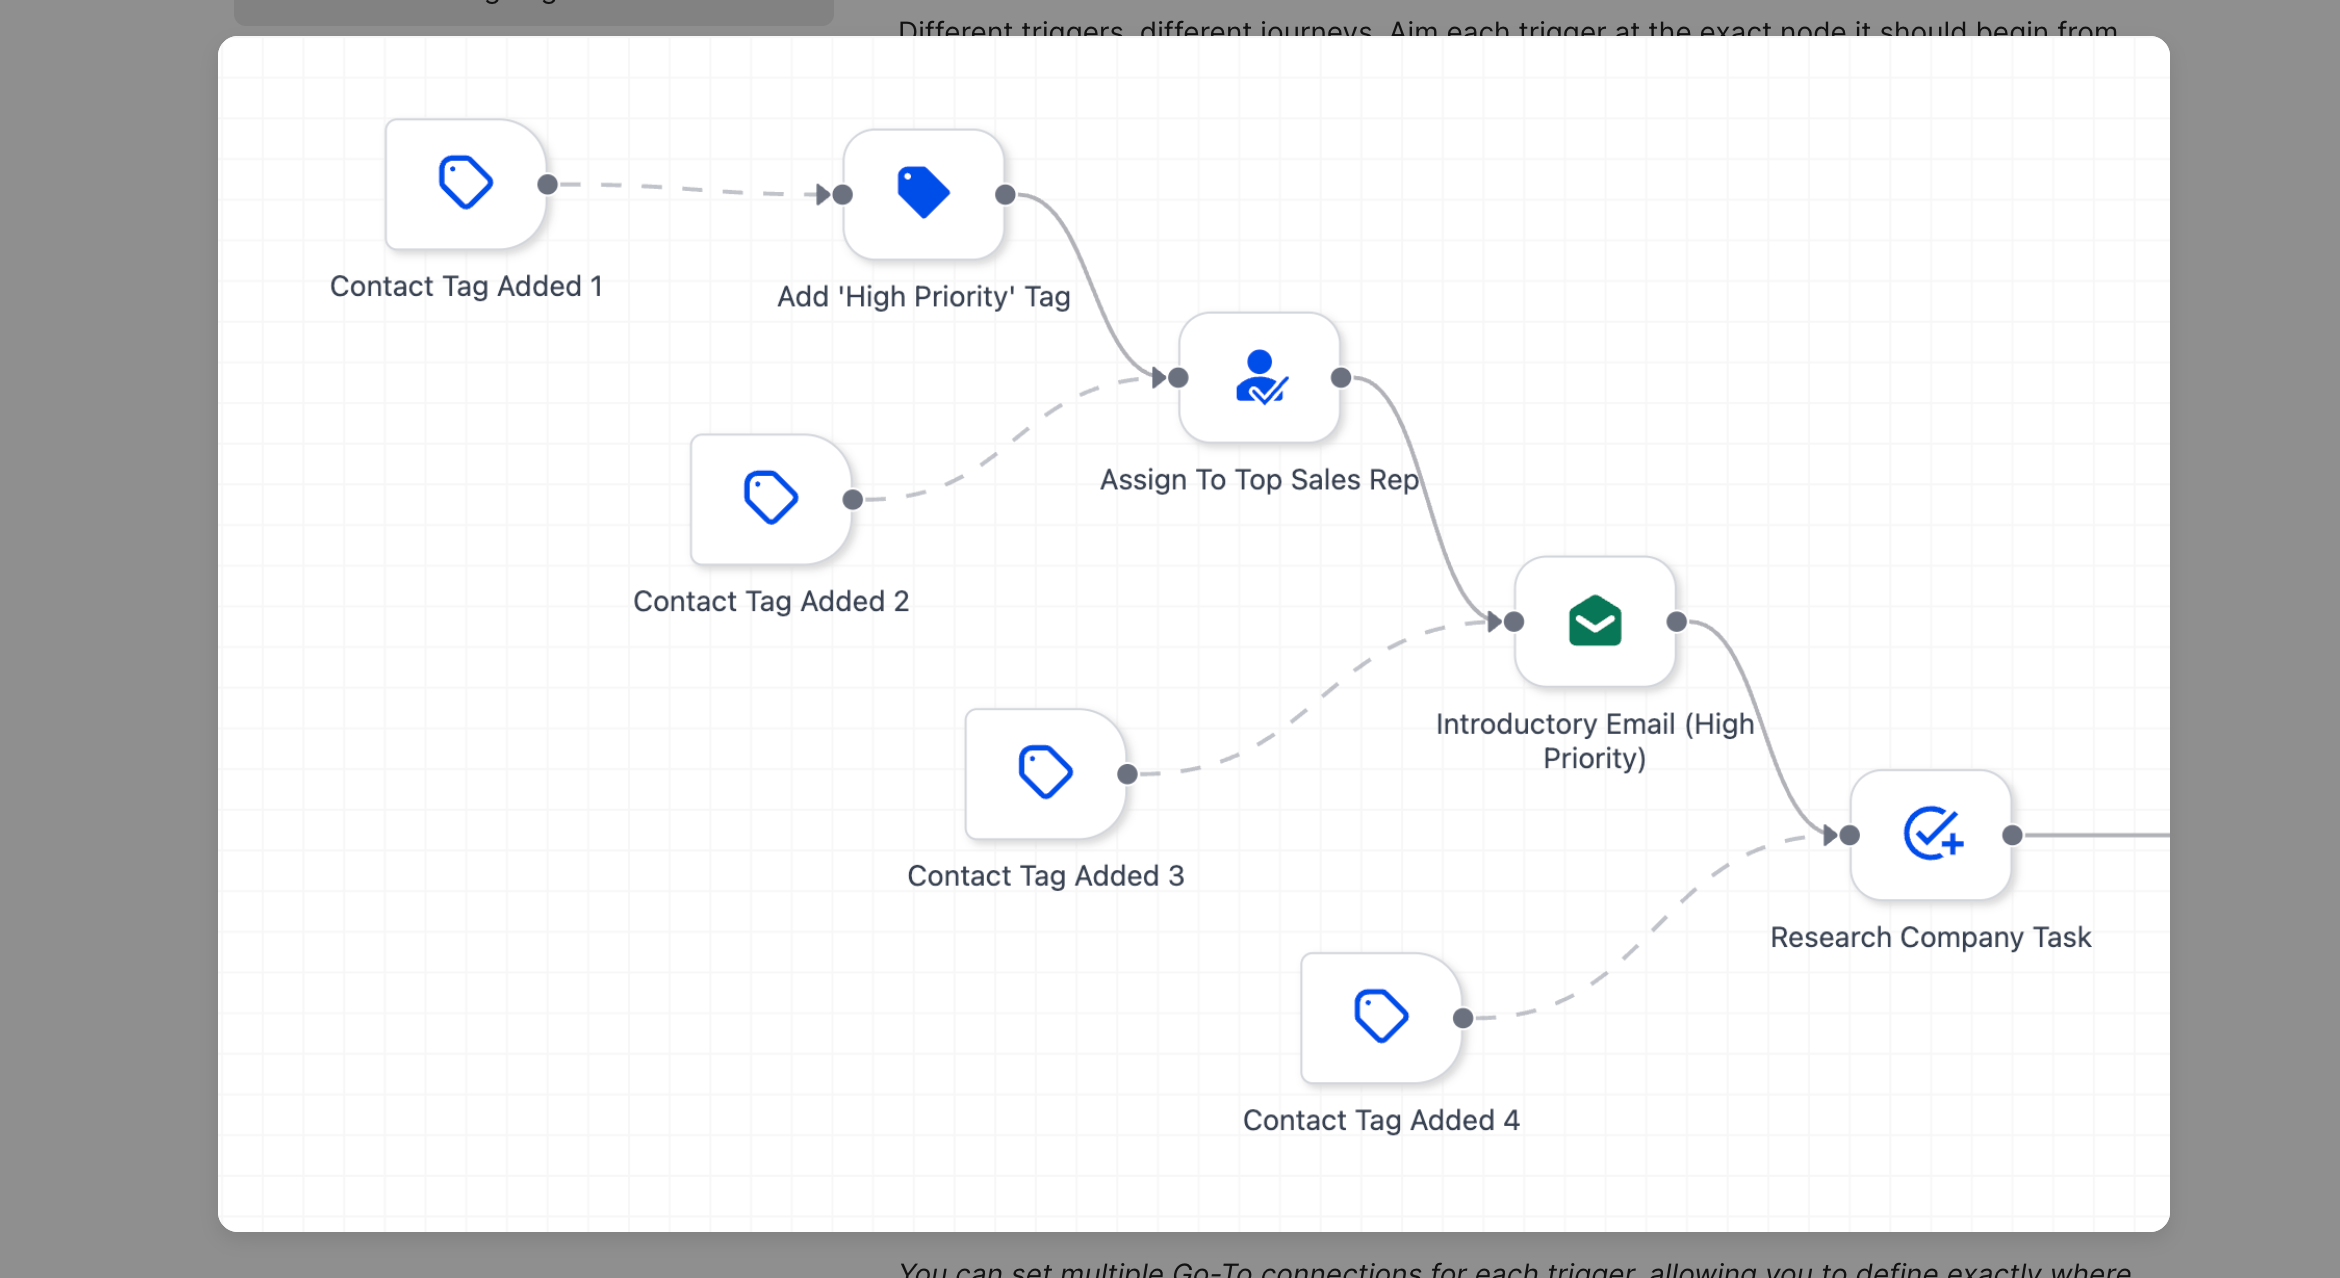
You can set multiple Go-To connections for each trigger, allowing you to define exactly where a contact should start when that specific trigger fires.
Connection Rules (Builder)
- 1:1 connections only: Each trigger can connect to one next action, and each action can have one incoming connection (from a trigger or a previous action).
- No branching from a single action: an action can have only one “Next step.” If an action already points to a next step, connecting it to another action will overwrite the existing link (i.e., the previous connection is removed).
Enrollment Rules (How Contacts Enter)
One trigger per enrollment: A contact enters a workflow once per run, and that entry is attributed to the single trigger that fired. Narration and statistics reflect that trigger.
If multiple triggers could qualify around the same time, the workflow still records one enrollment for that moment (tied to one trigger).
If your workflow allows re-entry (per your settings), the same contact may enter again later when another trigger fires—each run is still initiated by exactly one trigger.
Key Behavior of the Go-To Connection Triggers
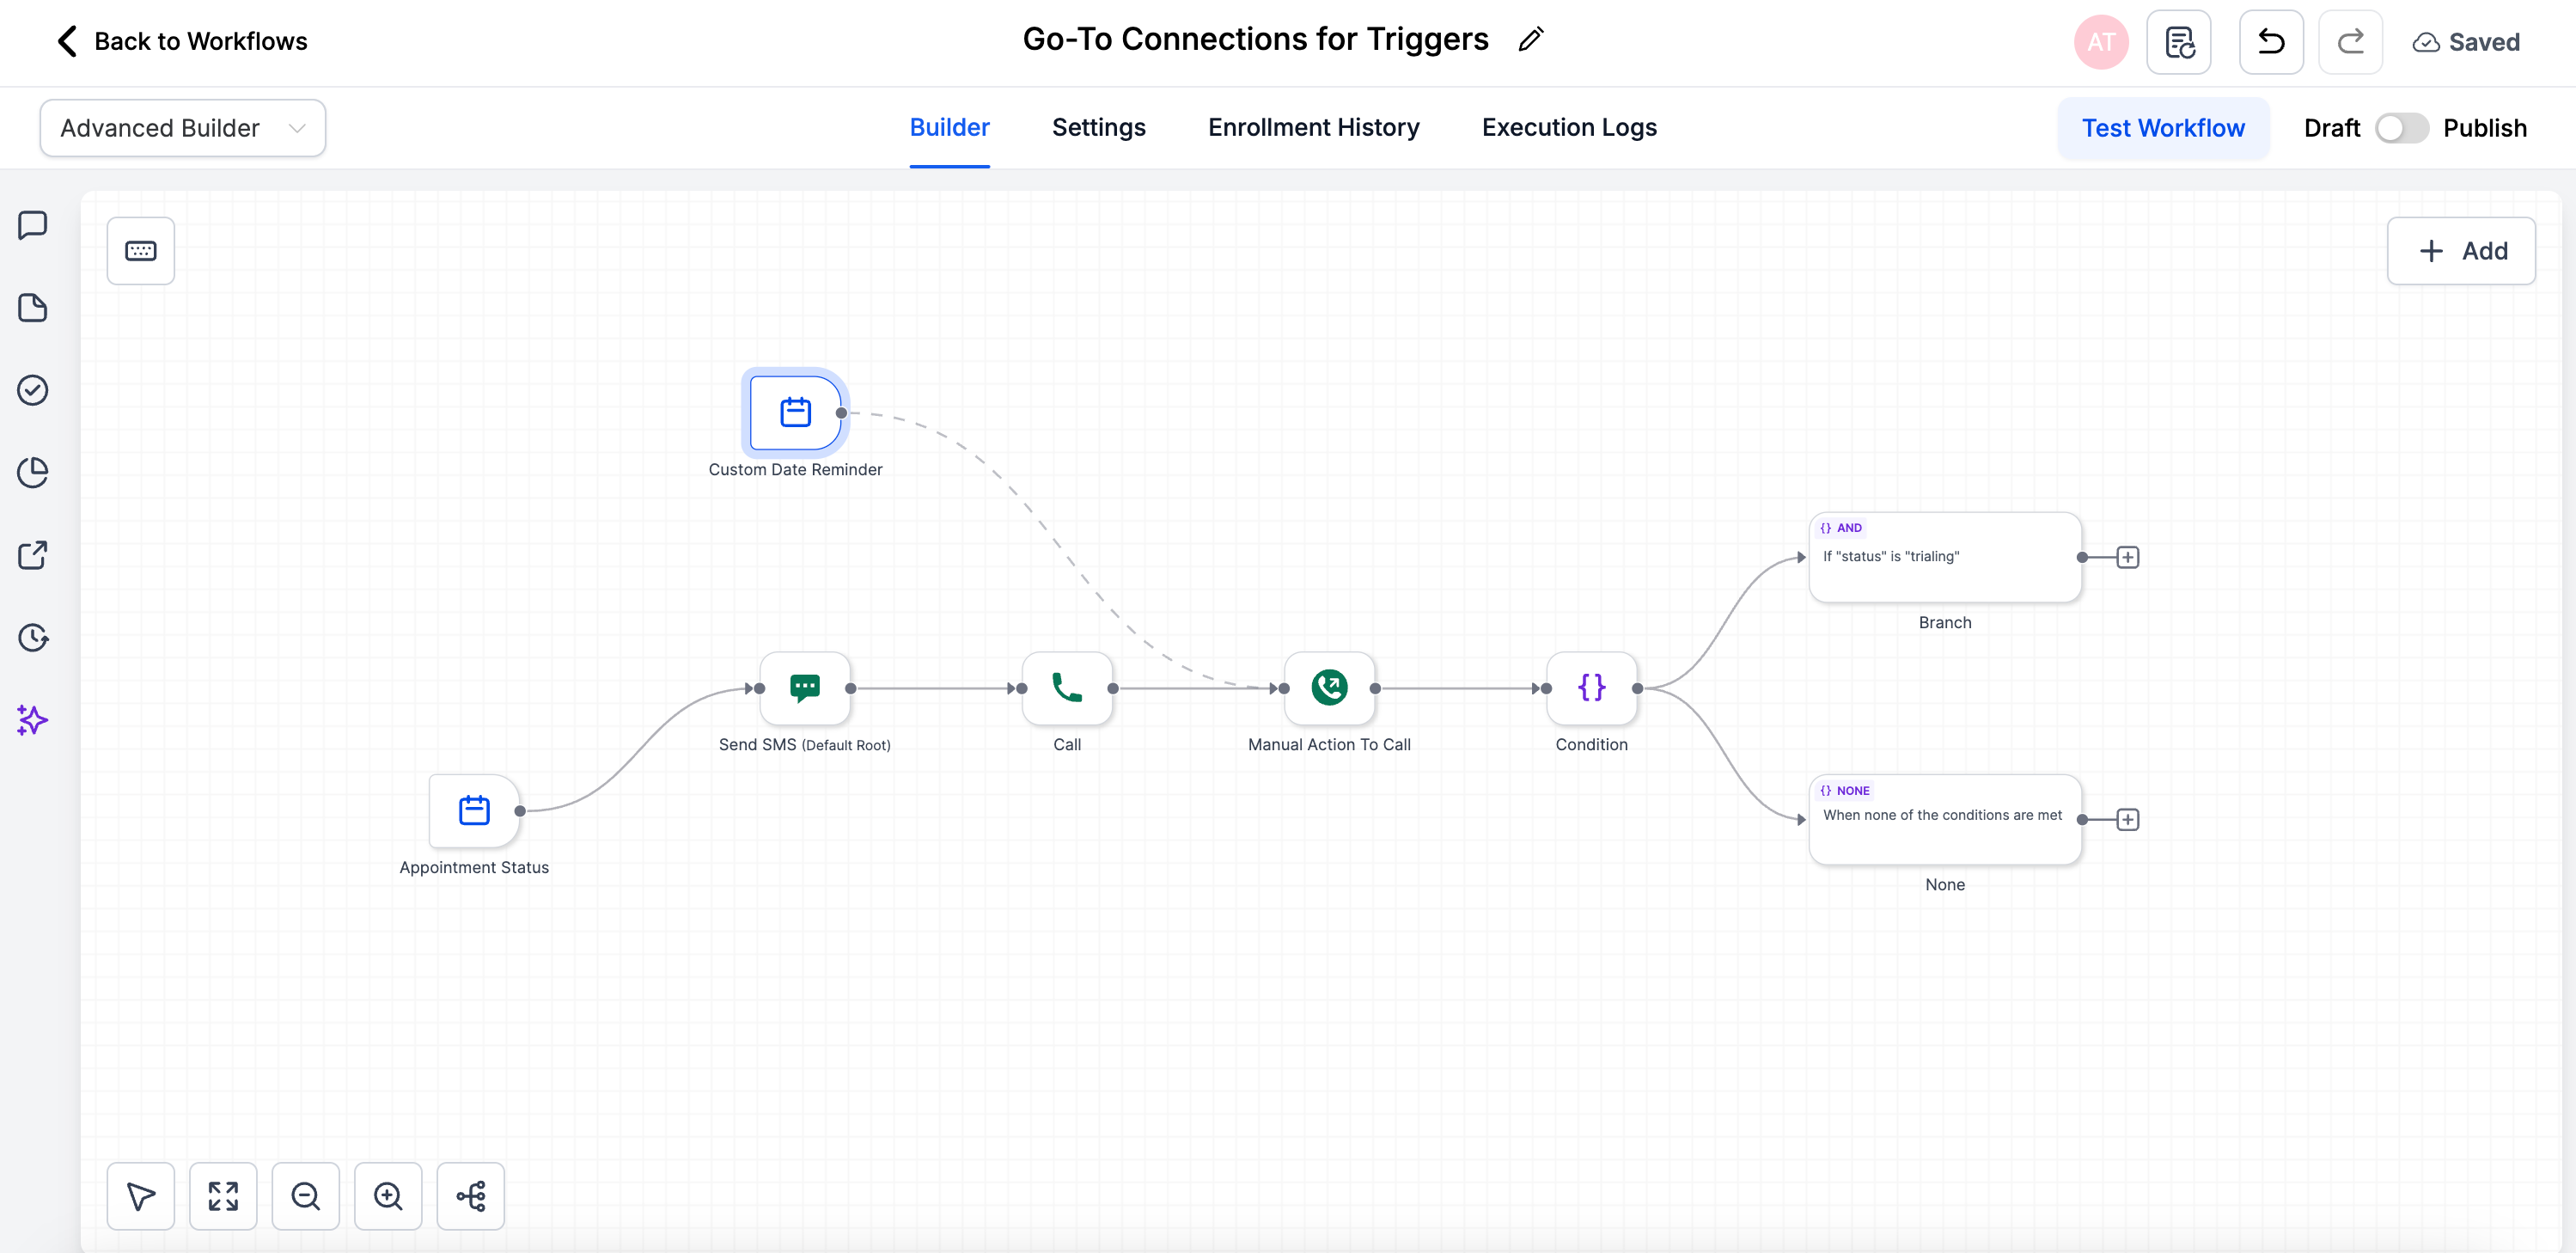
Dashed connector: Trigger Go-To appears as a dashed line with an arrowhead from the trigger to its start action.
Default (“dangling”) behavior: If a trigger has no Go-To set, it auto-connects to the Root (first) action.
Save rule: Every trigger must connect to exactly one action to save the workflow; reassign any time by dragging the dashed connector.
Execution: When the trigger matches, the contact is sent straight to the target action; the rest of the path runs normally.
How to Use Go-To Connections for Triggers
1. Open your workflow in Advanced Builder.
2. Add/position your triggers and actions.
3. From each trigger, drag the dashed Go-To connection to the action where it should start.
4. Reassign later by dragging the same connector to a new node.
5. Save → Publish when ready.
Frequently Asked Questions
Q: Can a trigger have more than one Go-To connection?
No. Each trigger must connect to exactly one action to keep execution deterministic.
Q: What happens if I delete the action that a trigger points to?
The Go-To link becomes invalid, so the trigger will automatically reconnect to the Root action until you assign a new target.
Q: Will contacts already in the workflow follow the new route after I republish?
No. Routing changes apply only to contacts who enter the workflow after you’ve published the update.
Q: Can I export a workflow with Trigger Go-Tos in a snapshot?
Yes. Snapshots retain all Advanced Builder features, including Trigger Go-Tos.
Q: Does this feature work in the Standard Builder?
Not yet. You’ll need to stay in Advanced Builder or remove the dashed links before switching.