Template Library Marketplace Integration brings template discovery, preview, installation, and selling into one connected experience inside SourCherry. Agencies can browse free and paid templates, install them without leaving the platform, and use Marketplace tools to sell their own templates. This helps users find ready-made assets faster while giving creators a simple path to monetize their work.
TABLE OF CONTENTS
- What is Template Library Marketplace Integration?
- Key Benefits of Template Library Marketplace Integration
- How to Preview & Install Templates
- How to Sell Templates Through the Marketplace
- Marketplace Seller Portal Configuration
- Frequently Asked Questions
- Related Articles
What is Template Library Marketplace Integration?
Template Library Marketplace Integration connects the Template Library with the SourCherry Marketplace so users can discover, preview, install, and sell templates from one place. Instead of relying on separate workflows, users can access Marketplace templates directly inside Template Library and move from browsing to installation more efficiently. This makes it easier to find the right template, evaluate it before use, and manage template selling from within SourCherry.
Key Benefits of Template Library Marketplace Integration
Centralized discovery: Browse Marketplace templates directly from Template Library.
Faster setup: Install templates without leaving SourCherry.
More template options: Access both free and paid templates in one place.
Creator monetization: List your own templates on the Marketplace for sale.
Simplified workflows: Preview, purchase, install, and manage templates from connected experiences.
How to Preview & Install Templates
Go to Template Library in Agency View.
Click Marketplace.
Browse templates or use search and filters.
Open a template preview.
Review the template details and support information.

Select a pricing plan if the template is paid.
Click Confirm and complete the flow.

How to Sell Templates Through the Marketplace
Selling templates through the Marketplace gives creators a direct way to distribute and monetize their work. The built-in selling flow reduces manual setup by sending template details into the Marketplace Seller Portal, where the remaining listing information can be completed.
Login to your Agency Account and click on Template Library.

Click + Create Template to create a template.
Select the sub-account to create from.
Select a product type.
Choose the template and click Continue.

Rename your template and click on create.

Edit Template Info and click on Save.

Click the three-dot menu in the template preview.
Select Sell Template On The Marketplace.
In the confirmation modal, click Go to Seller Portal.
Complete the required Marketplace listing details.
Submit the template for review.

Marketplace Seller Portal Configuration
Completing the Seller Portal setup ensures your template listing includes the information buyers need before purchasing or installing. Accurate listing details, support details, and pricing help reduce confusion and improve the buyer experience.
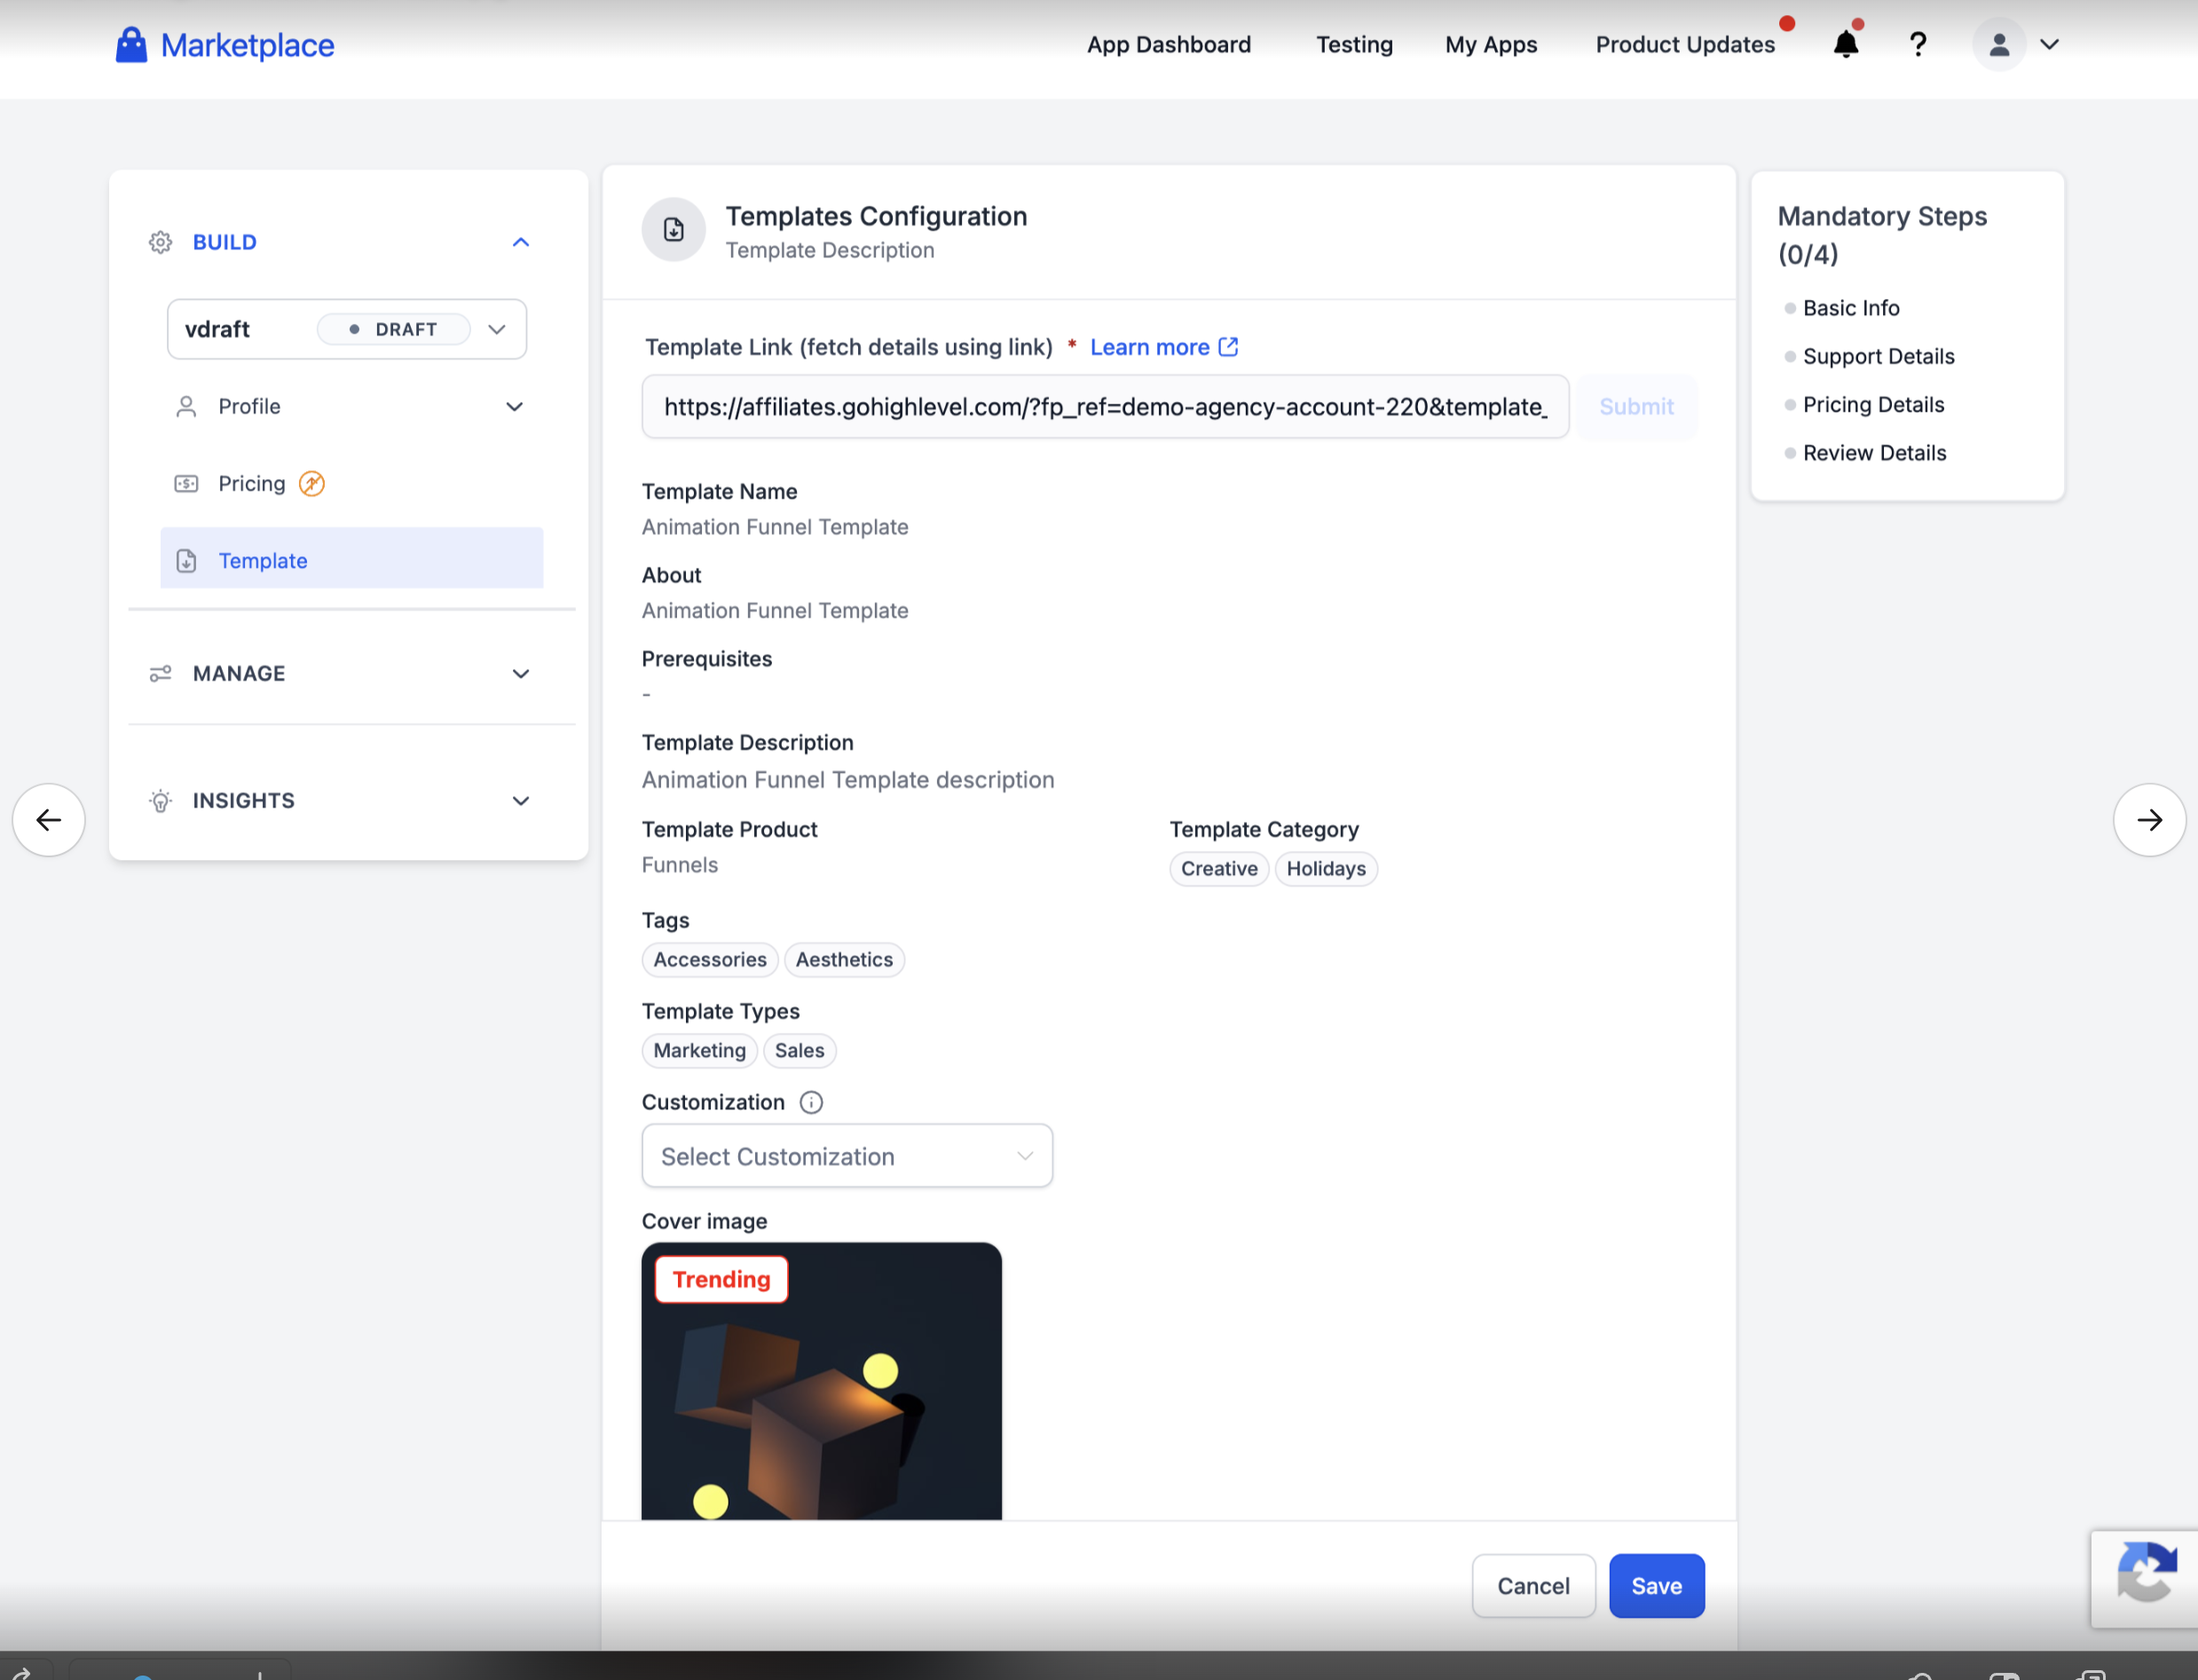
Template Listing Details
Template listing details help buyers understand what the template includes and how it should be used. Well-prepared listing information also improves discoverability inside the Marketplace.
Add or review the following information in the Seller Portal:
Template link
Template name
About information
Prerequisites
Template description
Product type
Template category
Tags
Template types
Customization details
Cover image
Support Details
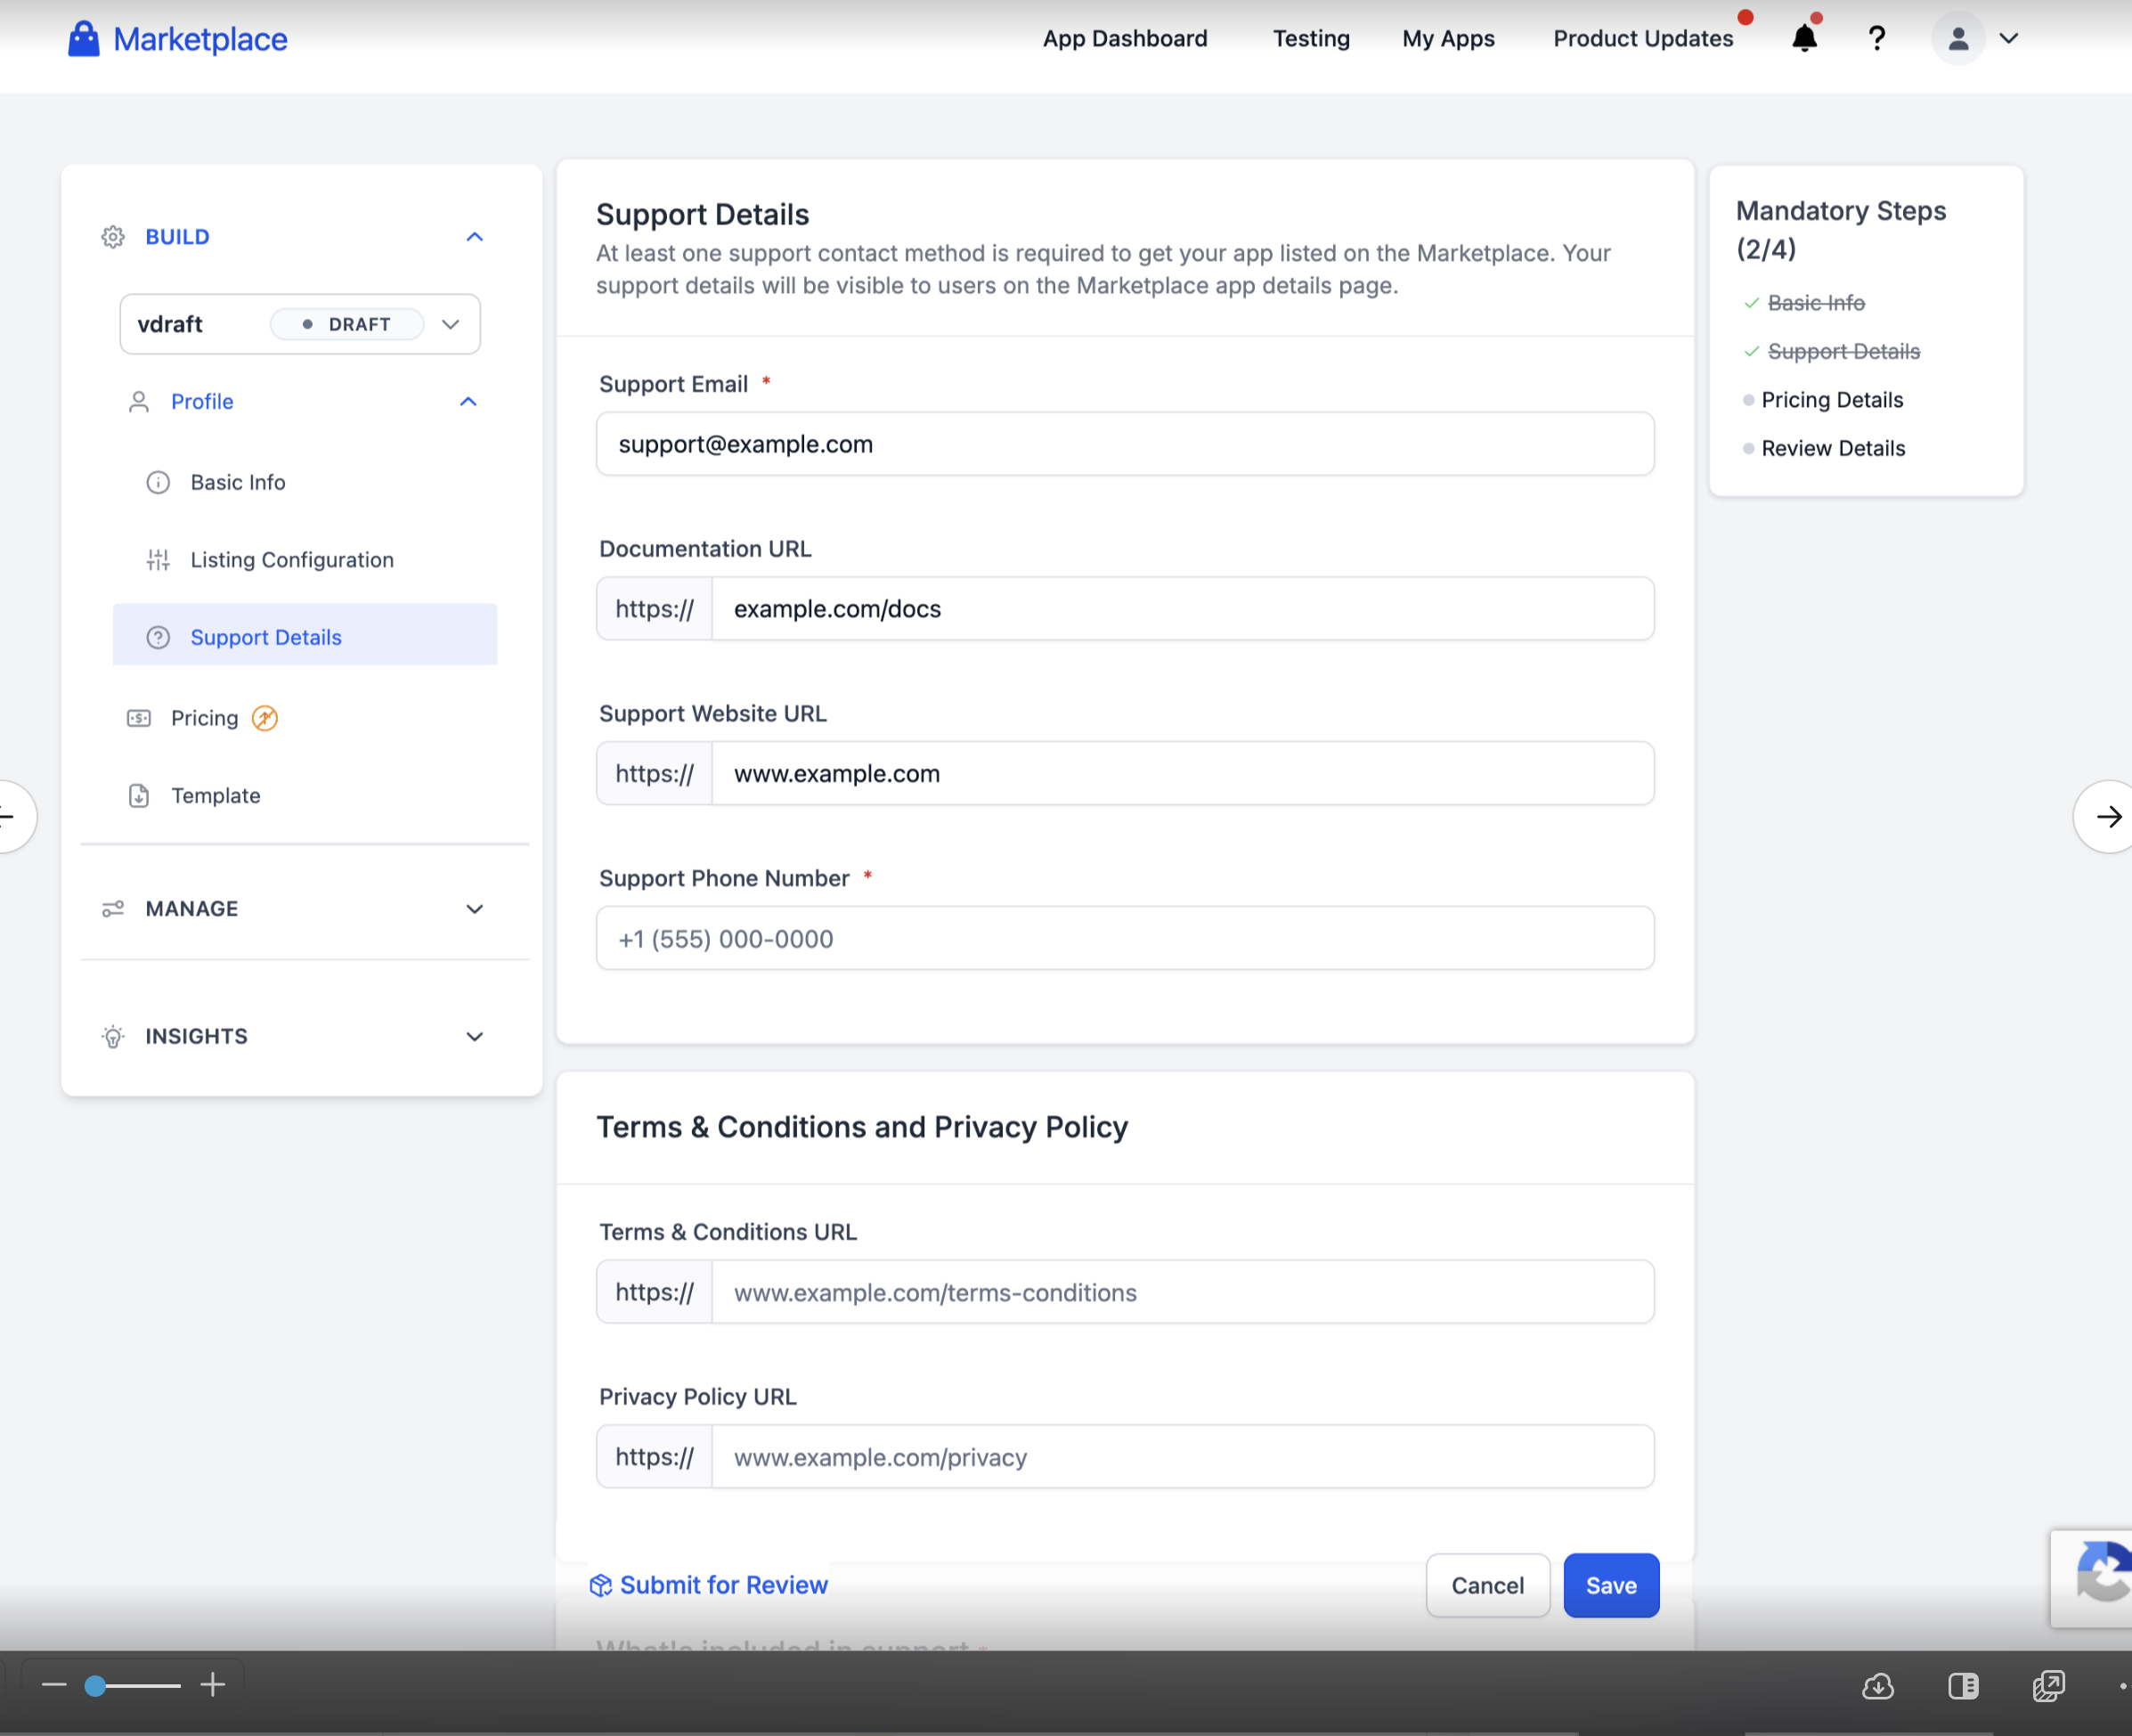
Support information helps buyers understand how to contact the seller and what kind of assistance is available after installation or purchase. Clear support details build trust and reduce post-purchase friction.
Add or review the following support information:
Support email
Documentation URL
Support website URL
Support phone number
Terms and Conditions URL
Privacy Policy URL
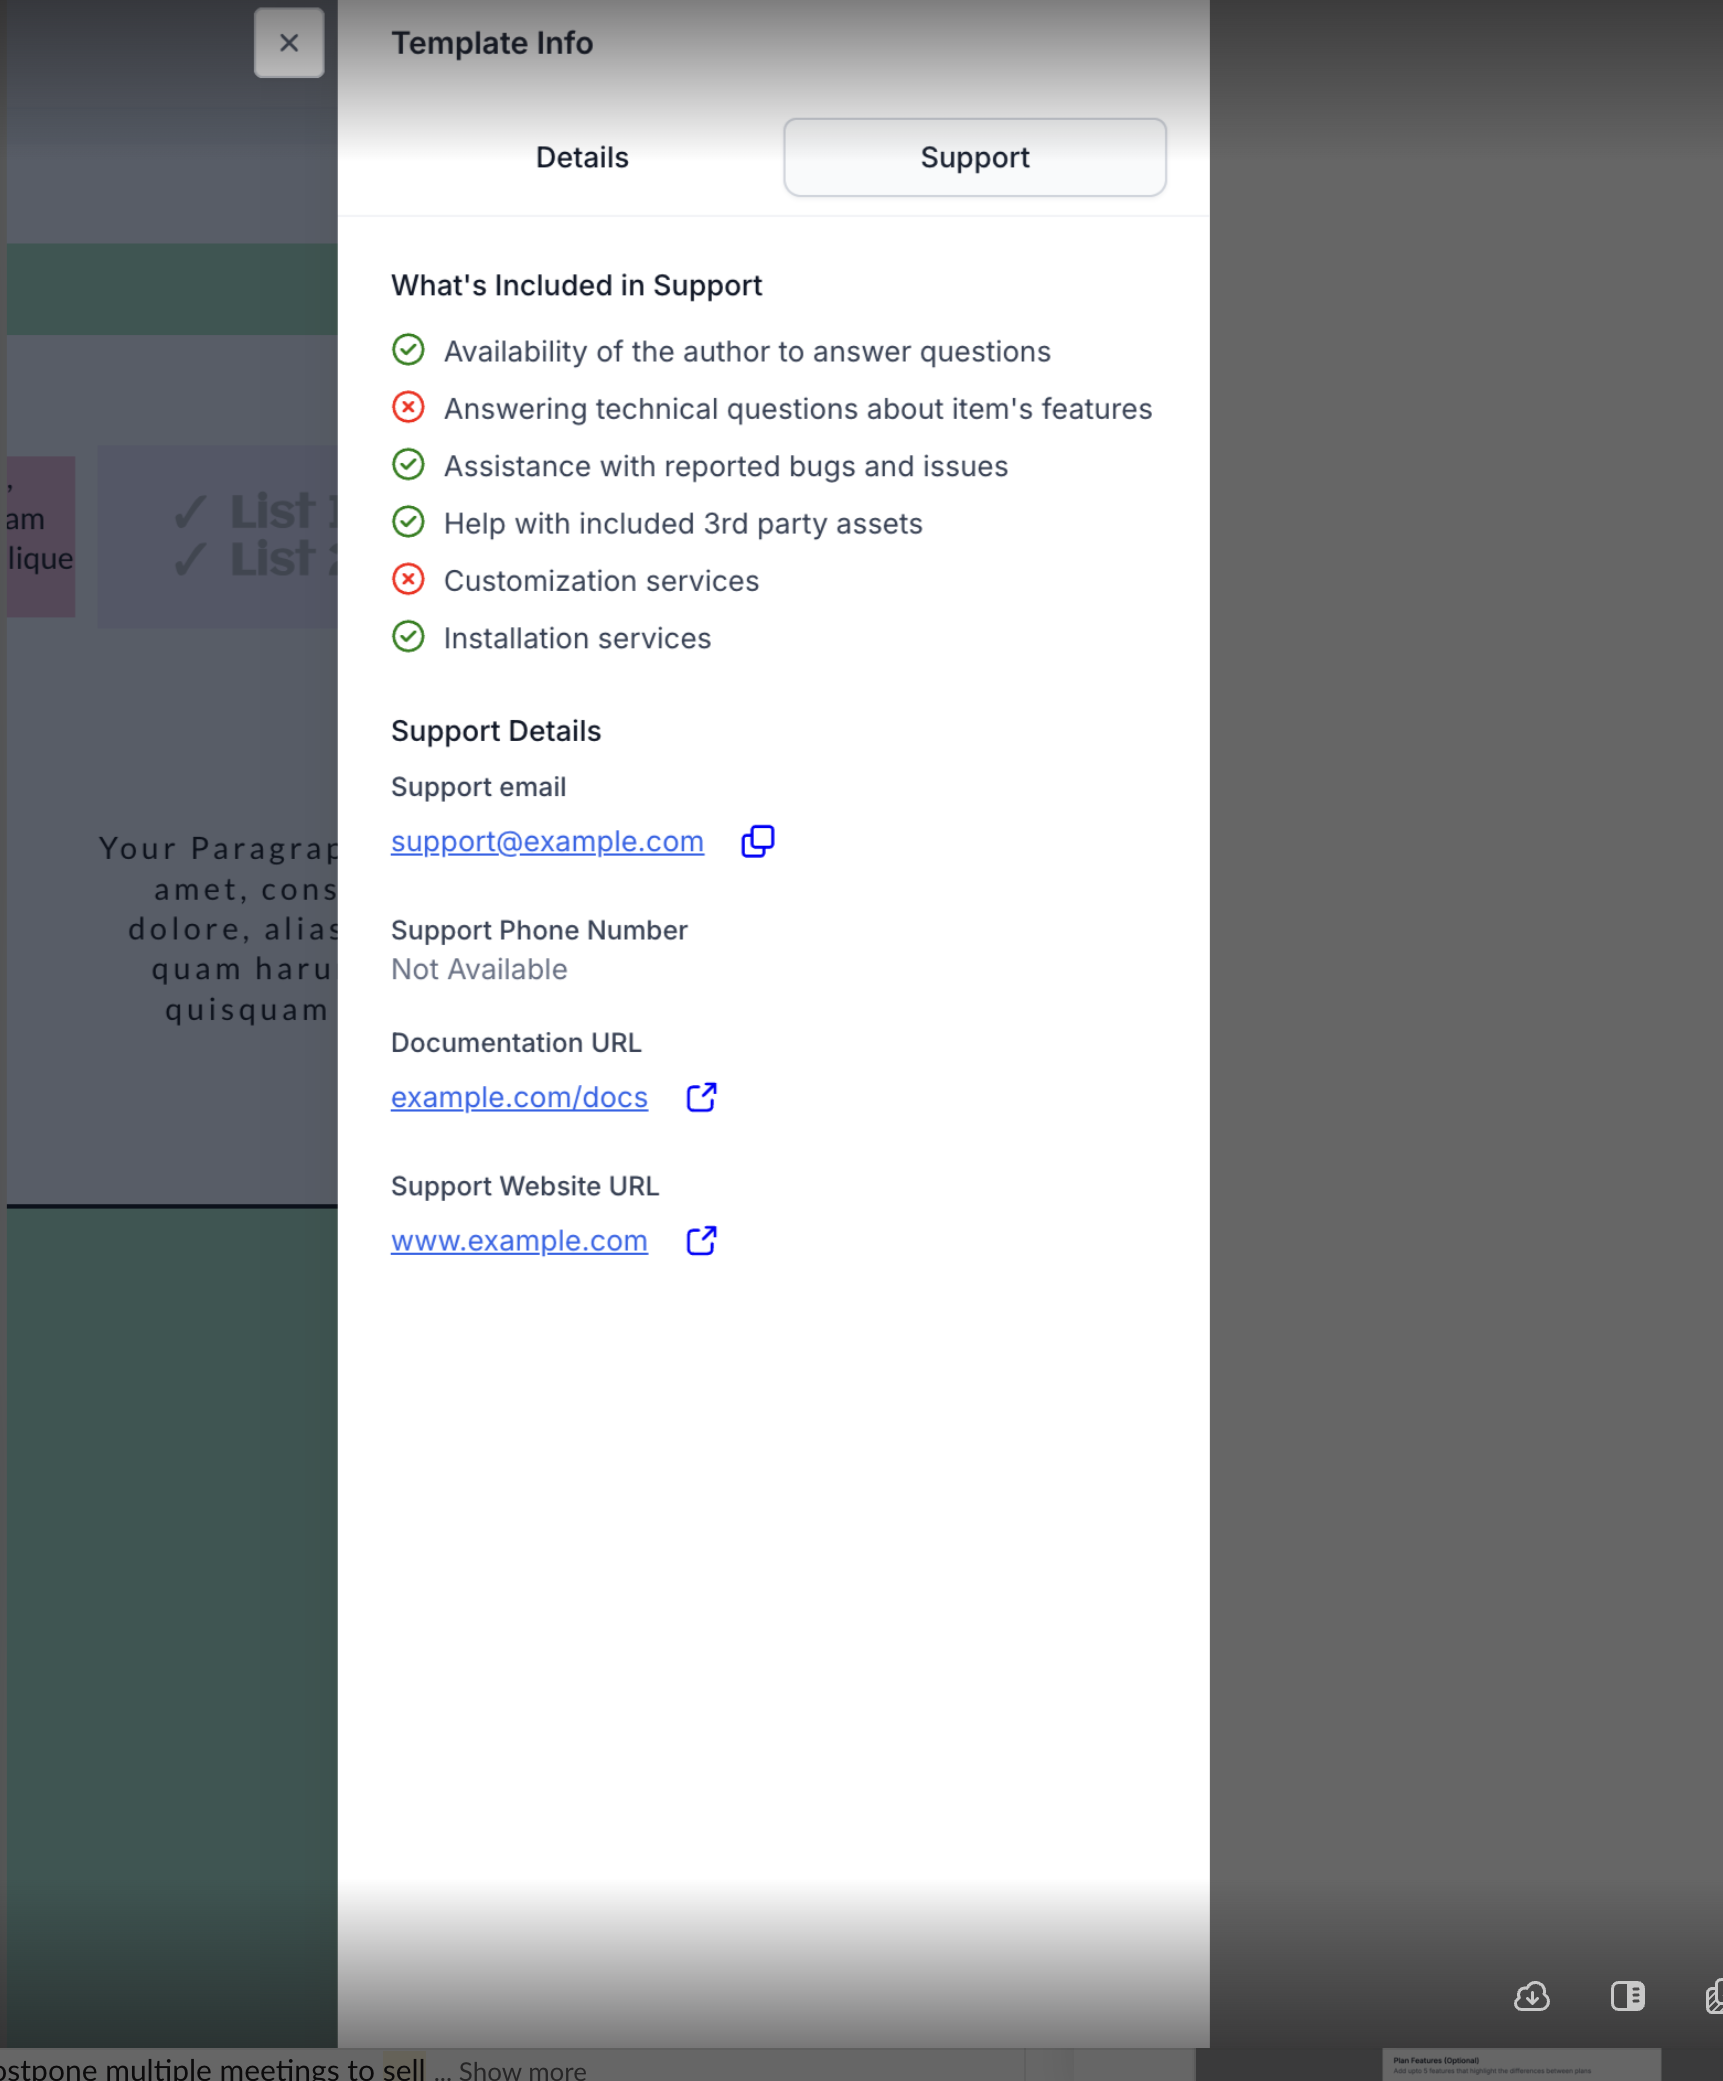
Buyers may also be able to view support information from the template details panel before installing the template.
Pricing Details
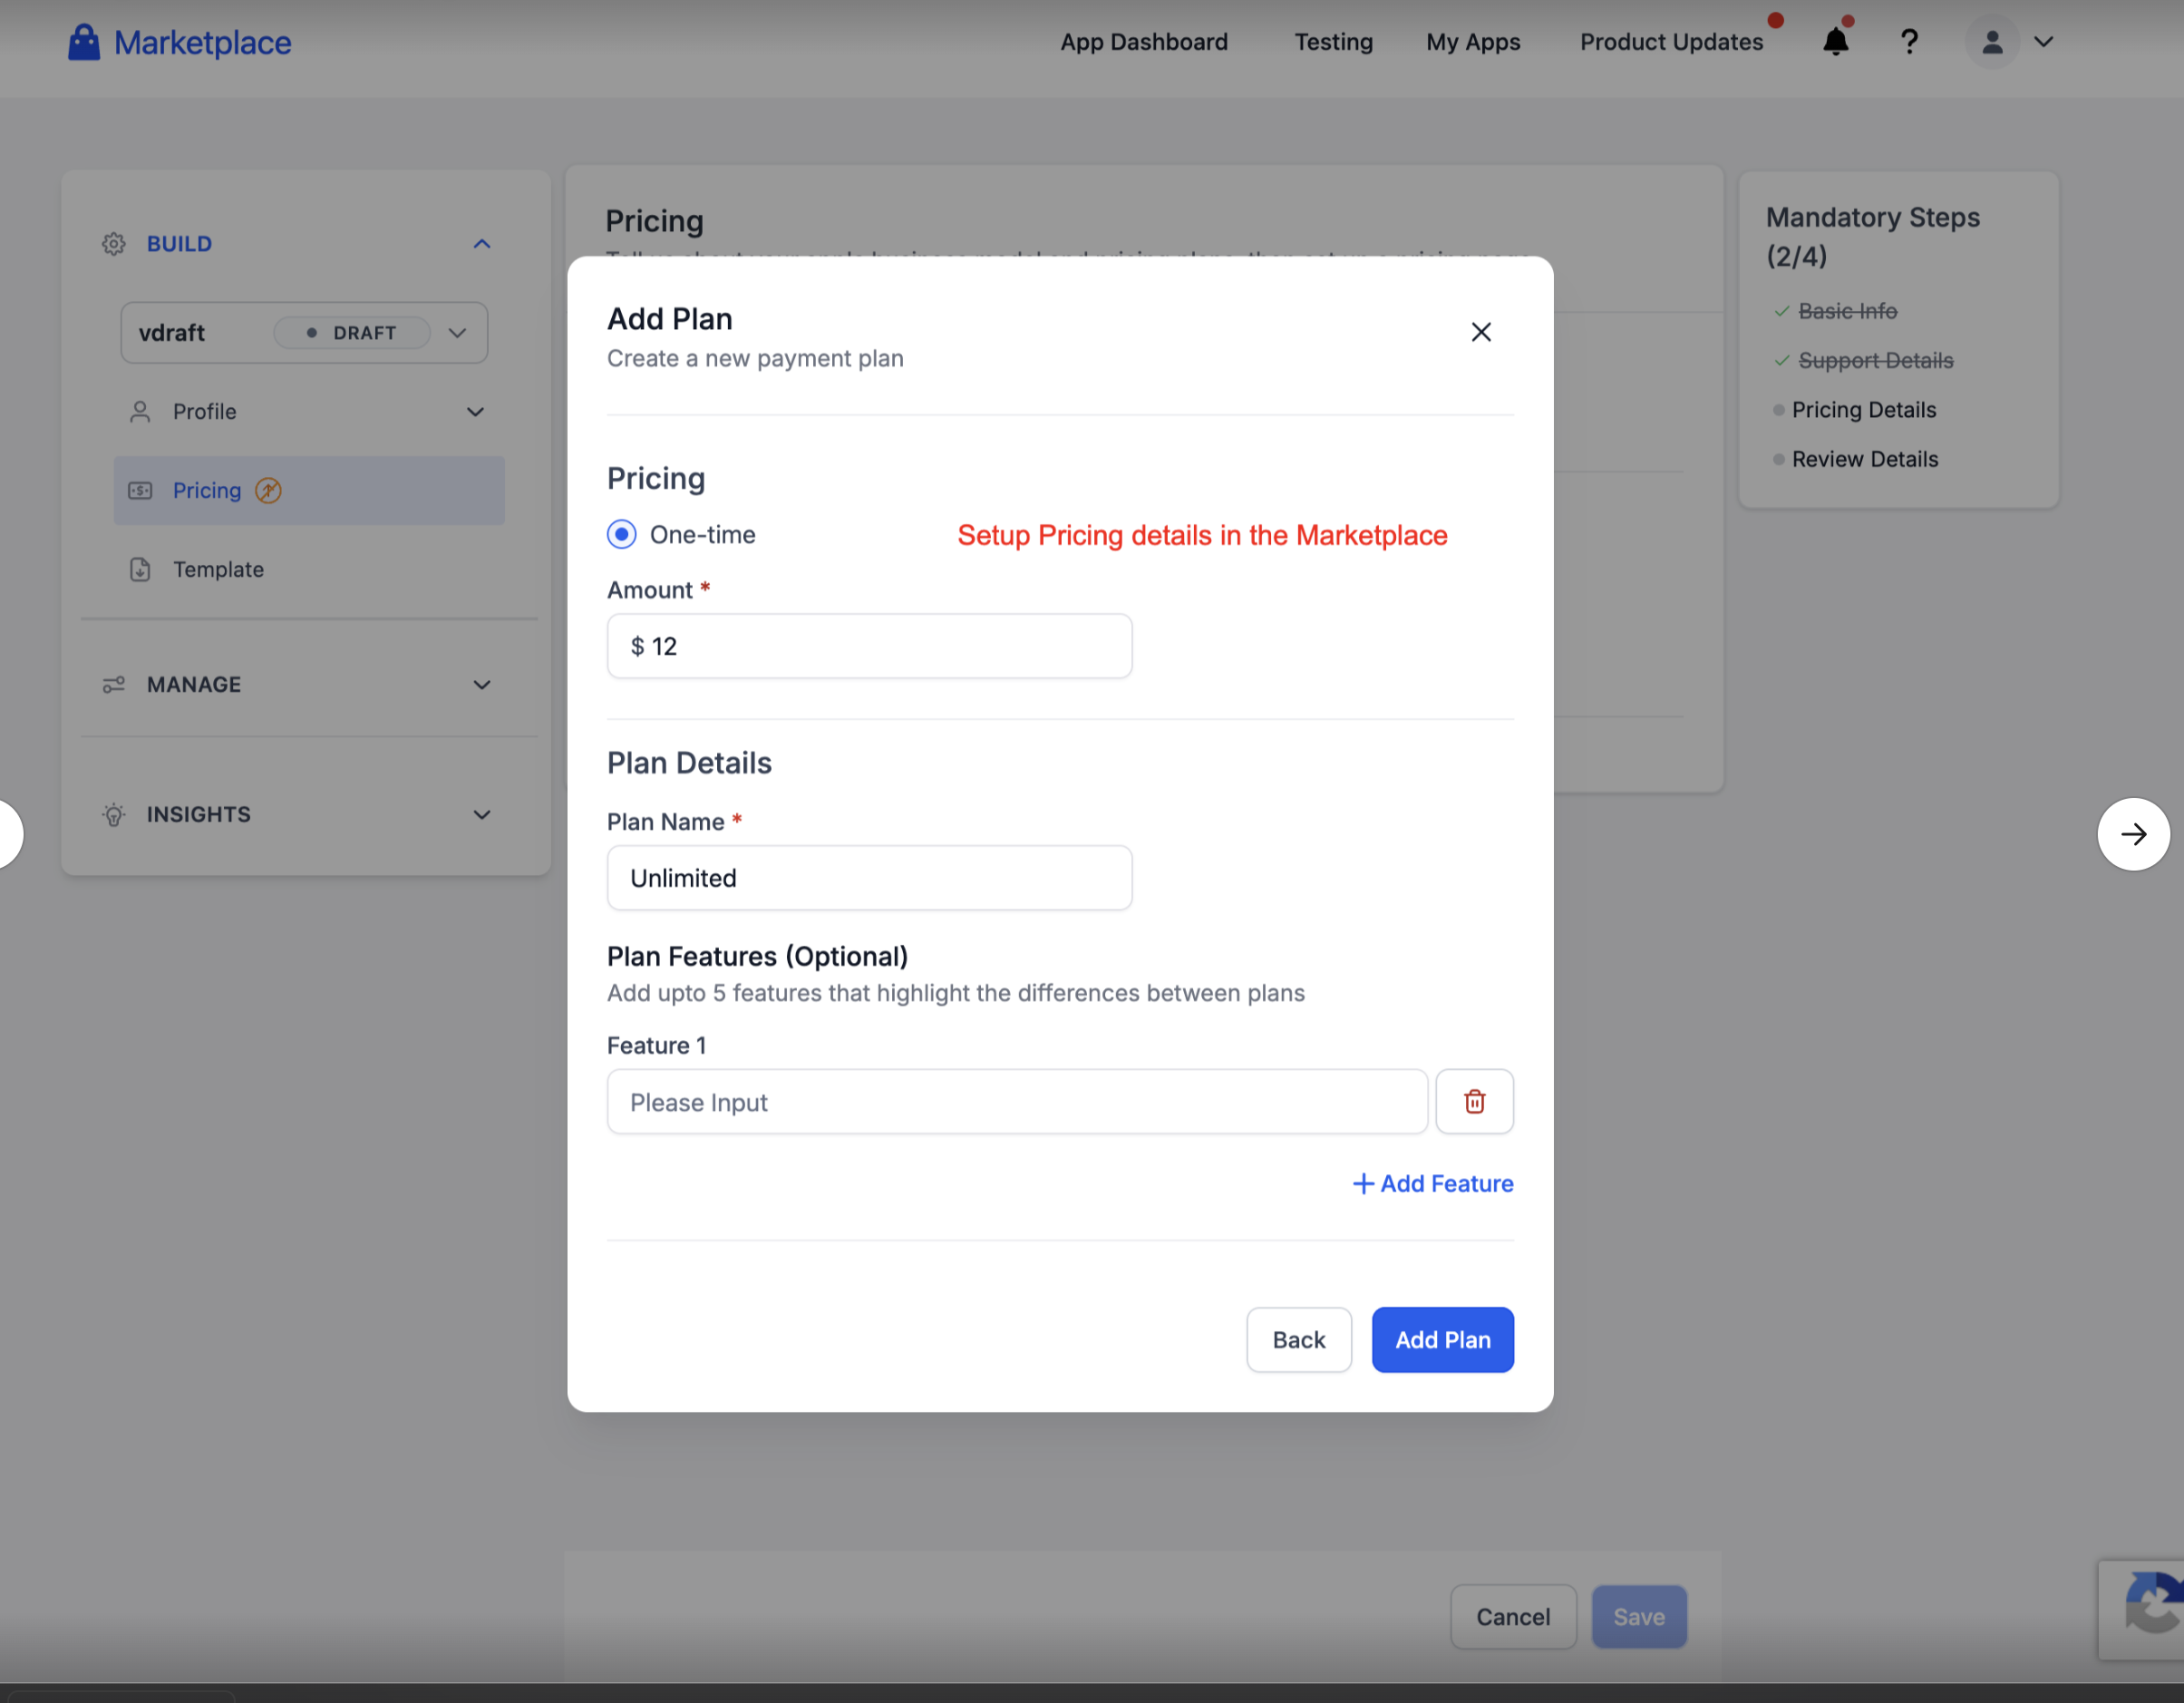
Pricing setup defines how a paid template is presented to buyers during installation. Clear plan names and pricing details help users understand what they are purchasing before they continue.
When configuring pricing, add:
Pricing type
Amount
Plan name
Optional plan features
Frequently Asked Questions
Q: Is the payment for templates one-time or recurring?
Templates are available on a one-time payment basis. Once purchased, you can use the template without any recurring charges.
Q: What happens after I install a template?
The template will be available under My Templates and can be edited and used in builders.
Q: Can I update a template after listing it?
Yes, you can refresh your template and share updates with users via the What’s New section.
Q: Can I install both free and paid templates from Template Library?
Yes. Users can browse free and paid templates from the Marketplace and complete the required install or purchase flow.
Q: Can I filter Marketplace templates before installing them?
Yes. Available filters can help narrow templates by items such as pricing and install status.
Q: Where do installed templates appear after installation?
Installed templates can be accessed from My Templates in the relevant builder.
Q: What information do I need before submitting a template for review?
You should complete the required listing details, support details, and pricing details if the template is paid.
Q: Can buyers view seller support information before installing a template?
Yes. Support details may be visible from the template details experience.