
**NOTE : Events feature is currently in Private Beta and will go live in a few weeks.**
SourCherry Events lets you create and manage Ticketed and RSVP events directly inside your sub-account. You can build a public event page, sell tickets, collect registrations, add schedules and speakers, send event notifications, and check in attendees from one place. This article walks you through setting up an event from draft to published status, then managing registrations and attendee check-in after launch.
TABLE OF CONTENTS
- What are Events?
- Event Types and Locations
- How To Setup Events
- Attendee Experience
- Frequently Asked Questions
- Related Articles
What are Events?
Events gives businesses and agencies a dedicated way to promote and manage event registrations inside SourCherry. Instead of using a separate event platform, you can create an event, configure ticketing or RSVP registration, customize the public event page, and track attendees from the same sub-account where your contacts, payments, and marketing tools live.
Events are best suited for public-facing experiences that need registration, tickets, schedules, speakers, attendee tracking, or check-in. This is different from Event Calendars, which are designed for calendar-based bookings, and Community Events, which are designed for events hosted inside SourCherry Communities.
Event Types and Locations
Choosing the right event type and location determines how attendees register, whether payment is required, and how they access the event. These settings are selected during event creation, so it is important to choose the format that matches your event before moving into tickets, registration, and publishing.
| Category | Option | Description | Best Used For |
|---|---|---|---|
| Event Type | Ticketed | Sell tickets with multiple pricing tiers, including free and paid ticket types. Attendees complete a checkout flow before registration is confirmed. | Paid events, VIP tiers, conferences, workshops, concerts, paid webinars, and events with limited ticket inventory |
| Event Type | RSVP | Create a free event where guests confirm attendance without a payment step. | Free meetups, community events, weddings, internal events, free webinars, and open-house events |
| Location Type | In-person | Add a physical address. The public event page displays the location with a map and Get directions link. | Venue-based events, local meetups, conferences, workshops, and live performances |
| Location Type | Online | Add a session title, meeting URL, optional image, and joining instructions. You can control when the join link becomes visible to registered attendees. | Webinars, virtual workshops, online classes, livestreams, and remote sessions |
Imp: You cannot switch between Ticketed and RSVP after creating the event.
How To Setup Events
Proper setup ensures attendees can register successfully, receive the correct event information, and complete checkout or RSVP without confusion. Follow the grouped steps below to create the event, configure event settings, publish the event, manage registrations, and review the attendee experience.
Create a New Event
Creating a new event covers the initial setup details required before the event exists in Draft status. These steps define the event type, public-facing details, timing, location, and organizer information.
Step 1: Navigating to Events
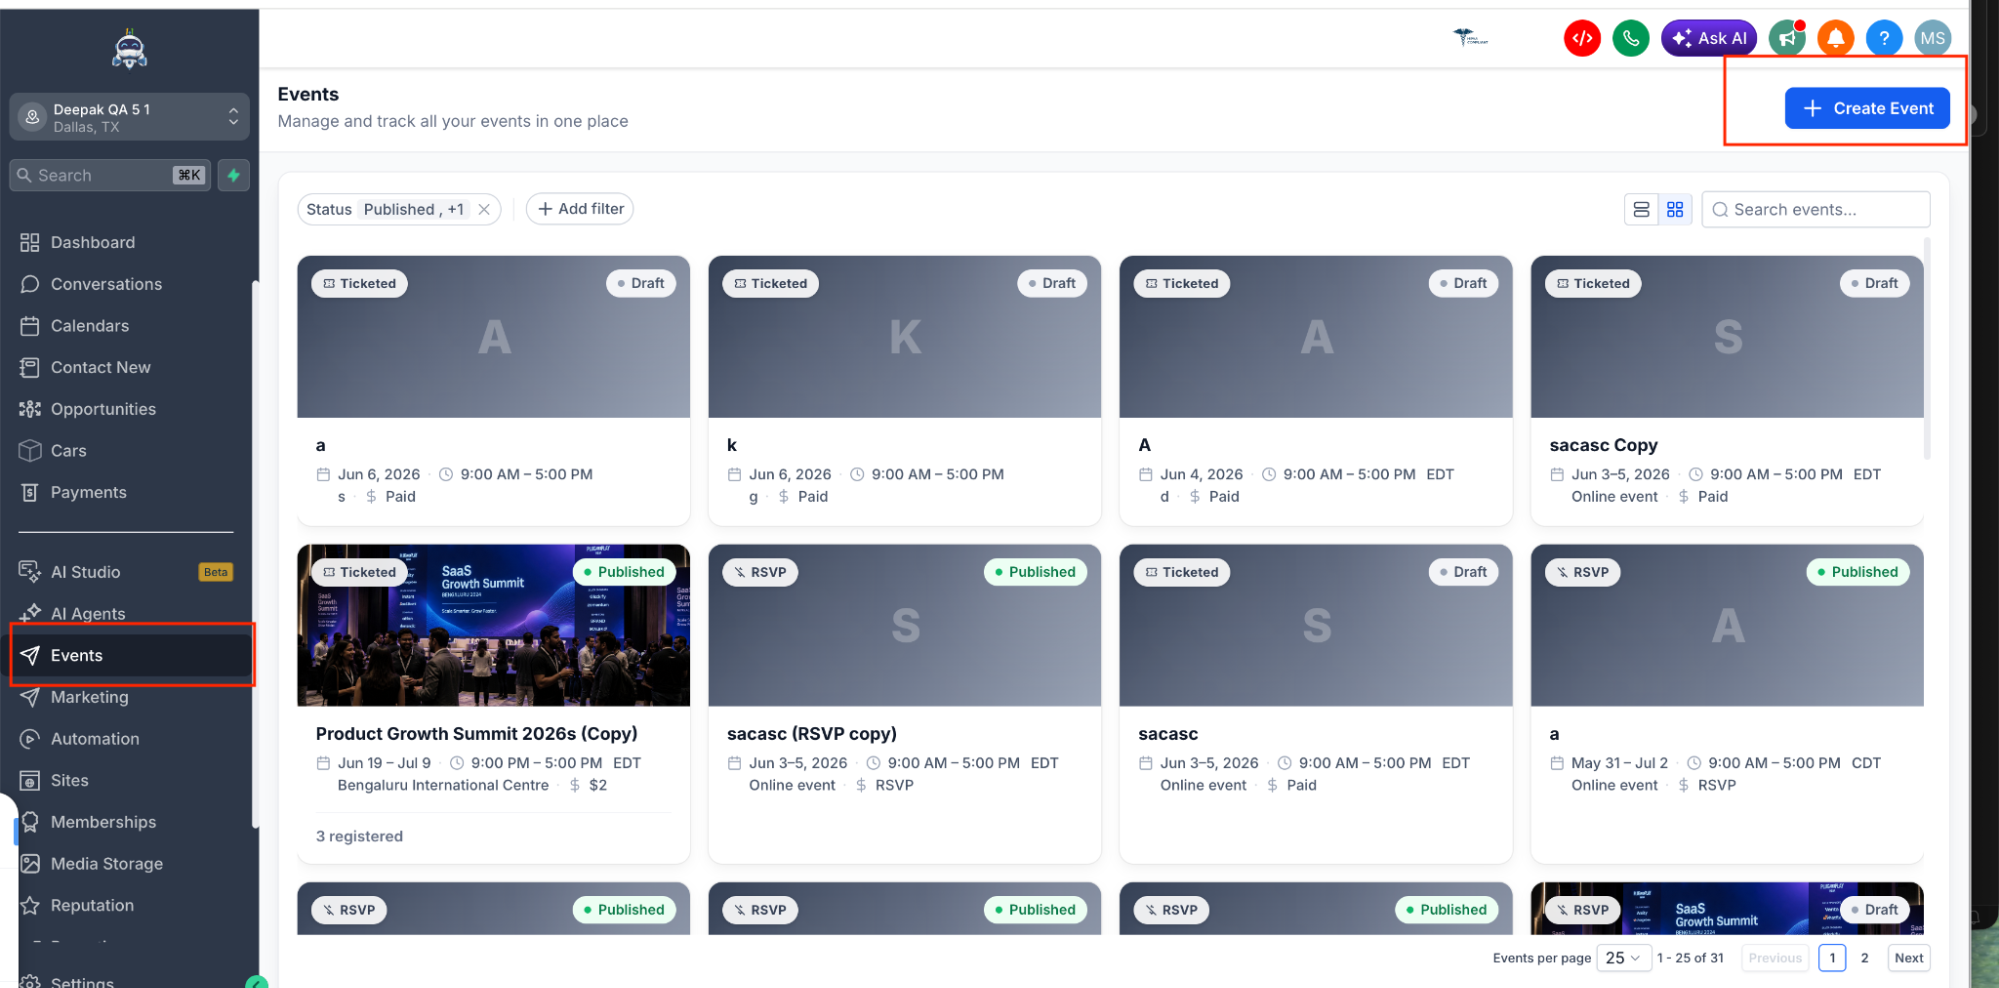
In the left sidebar of your SourCherry sub-account, scroll to Marketing and click Events. The Events dashboard shows all your events with their status, such as Draft, Published, RSVP, or Ticketed.
From the Events dashboard, you can:
- Use the Status filter to find events quickly.
- Use the search bar to locate an event by name.
- Click + Create Event in the top-right corner to start a new event.
Step 2: Choose your event type
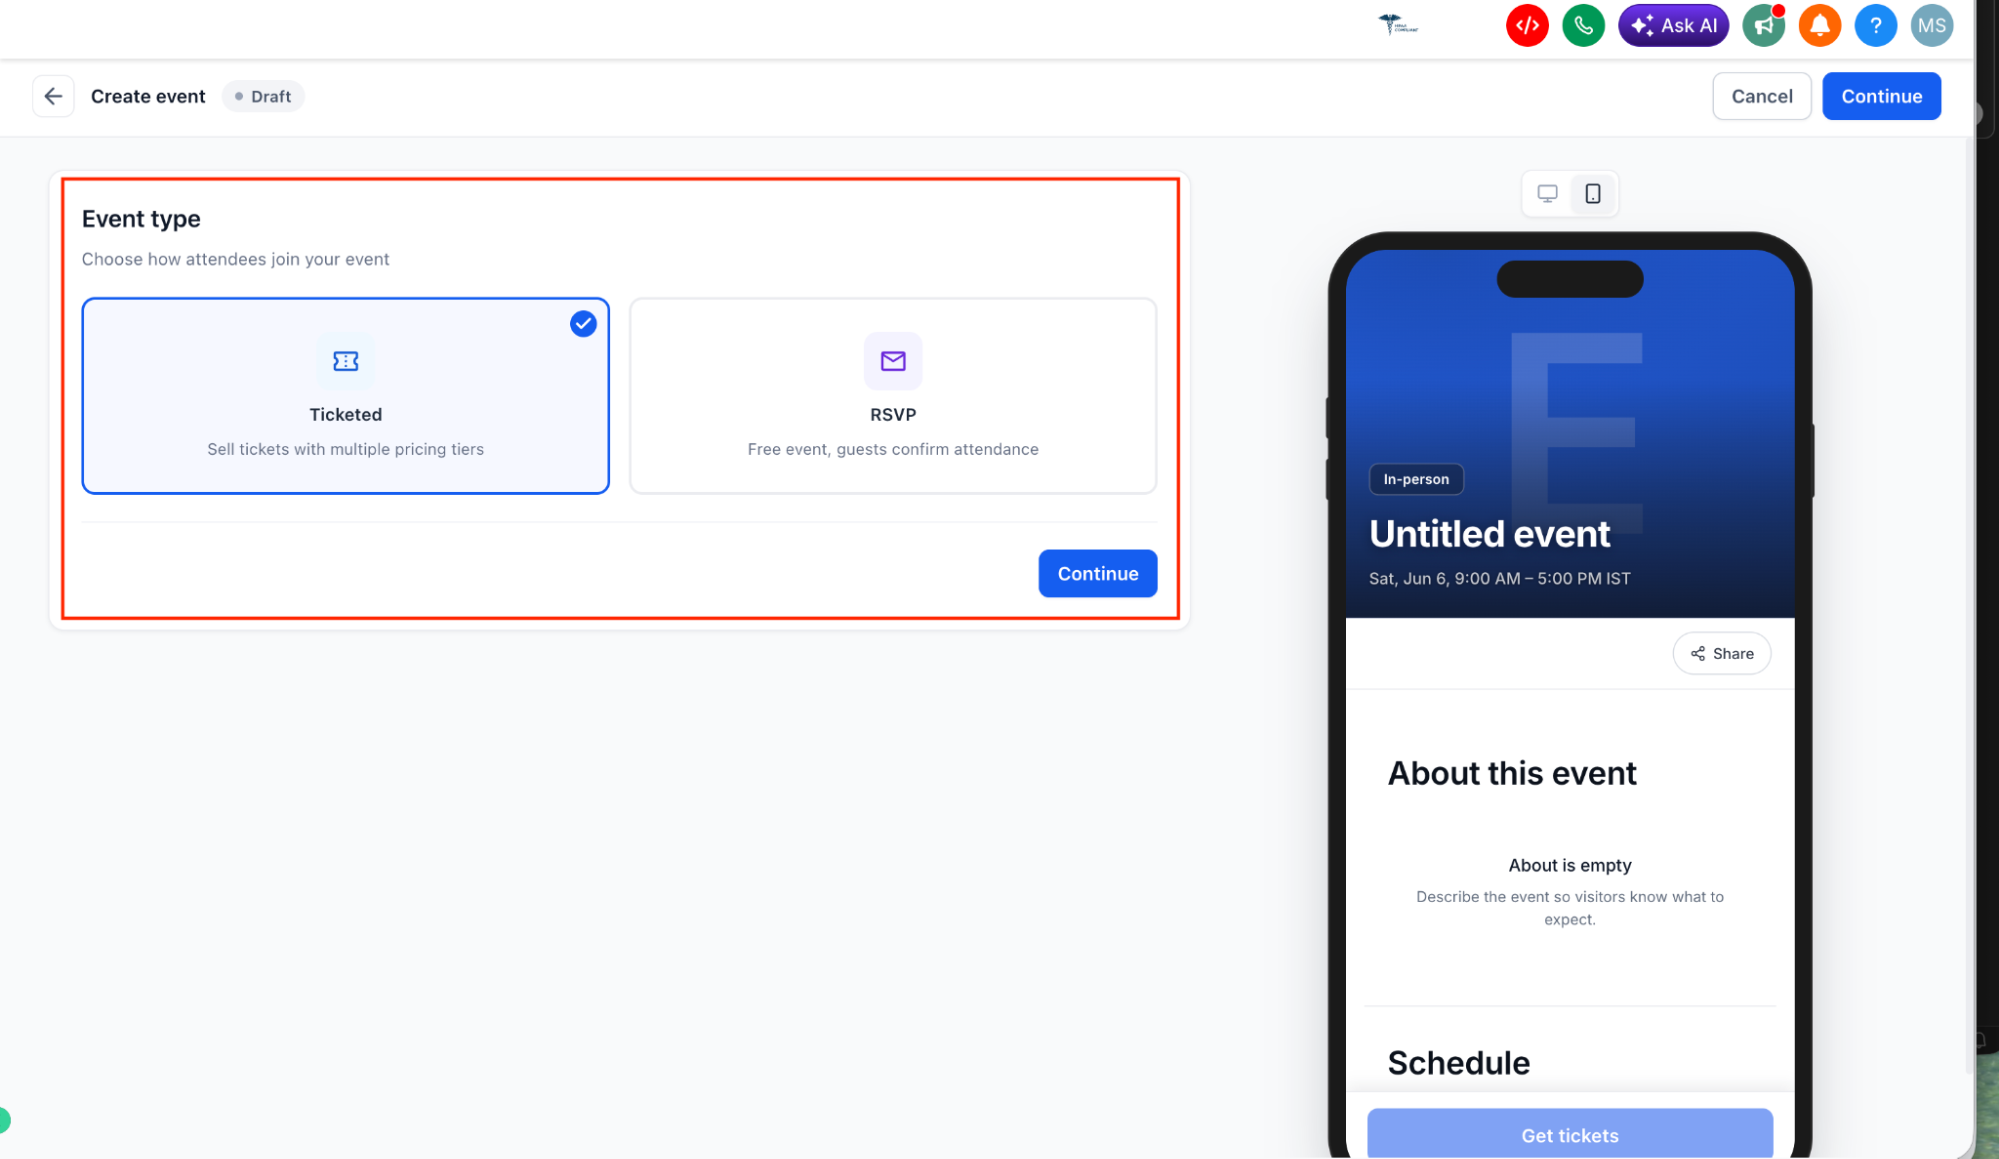
Click + Create Event. You will first be asked to choose how attendees join your event.
- Ticketed: Sell tickets with multiple pricing tiers, including free and paid options. Attendees complete a checkout flow.
- RSVP: Create a free event where guests confirm attendance without a payment step.
Step 3: Add event details
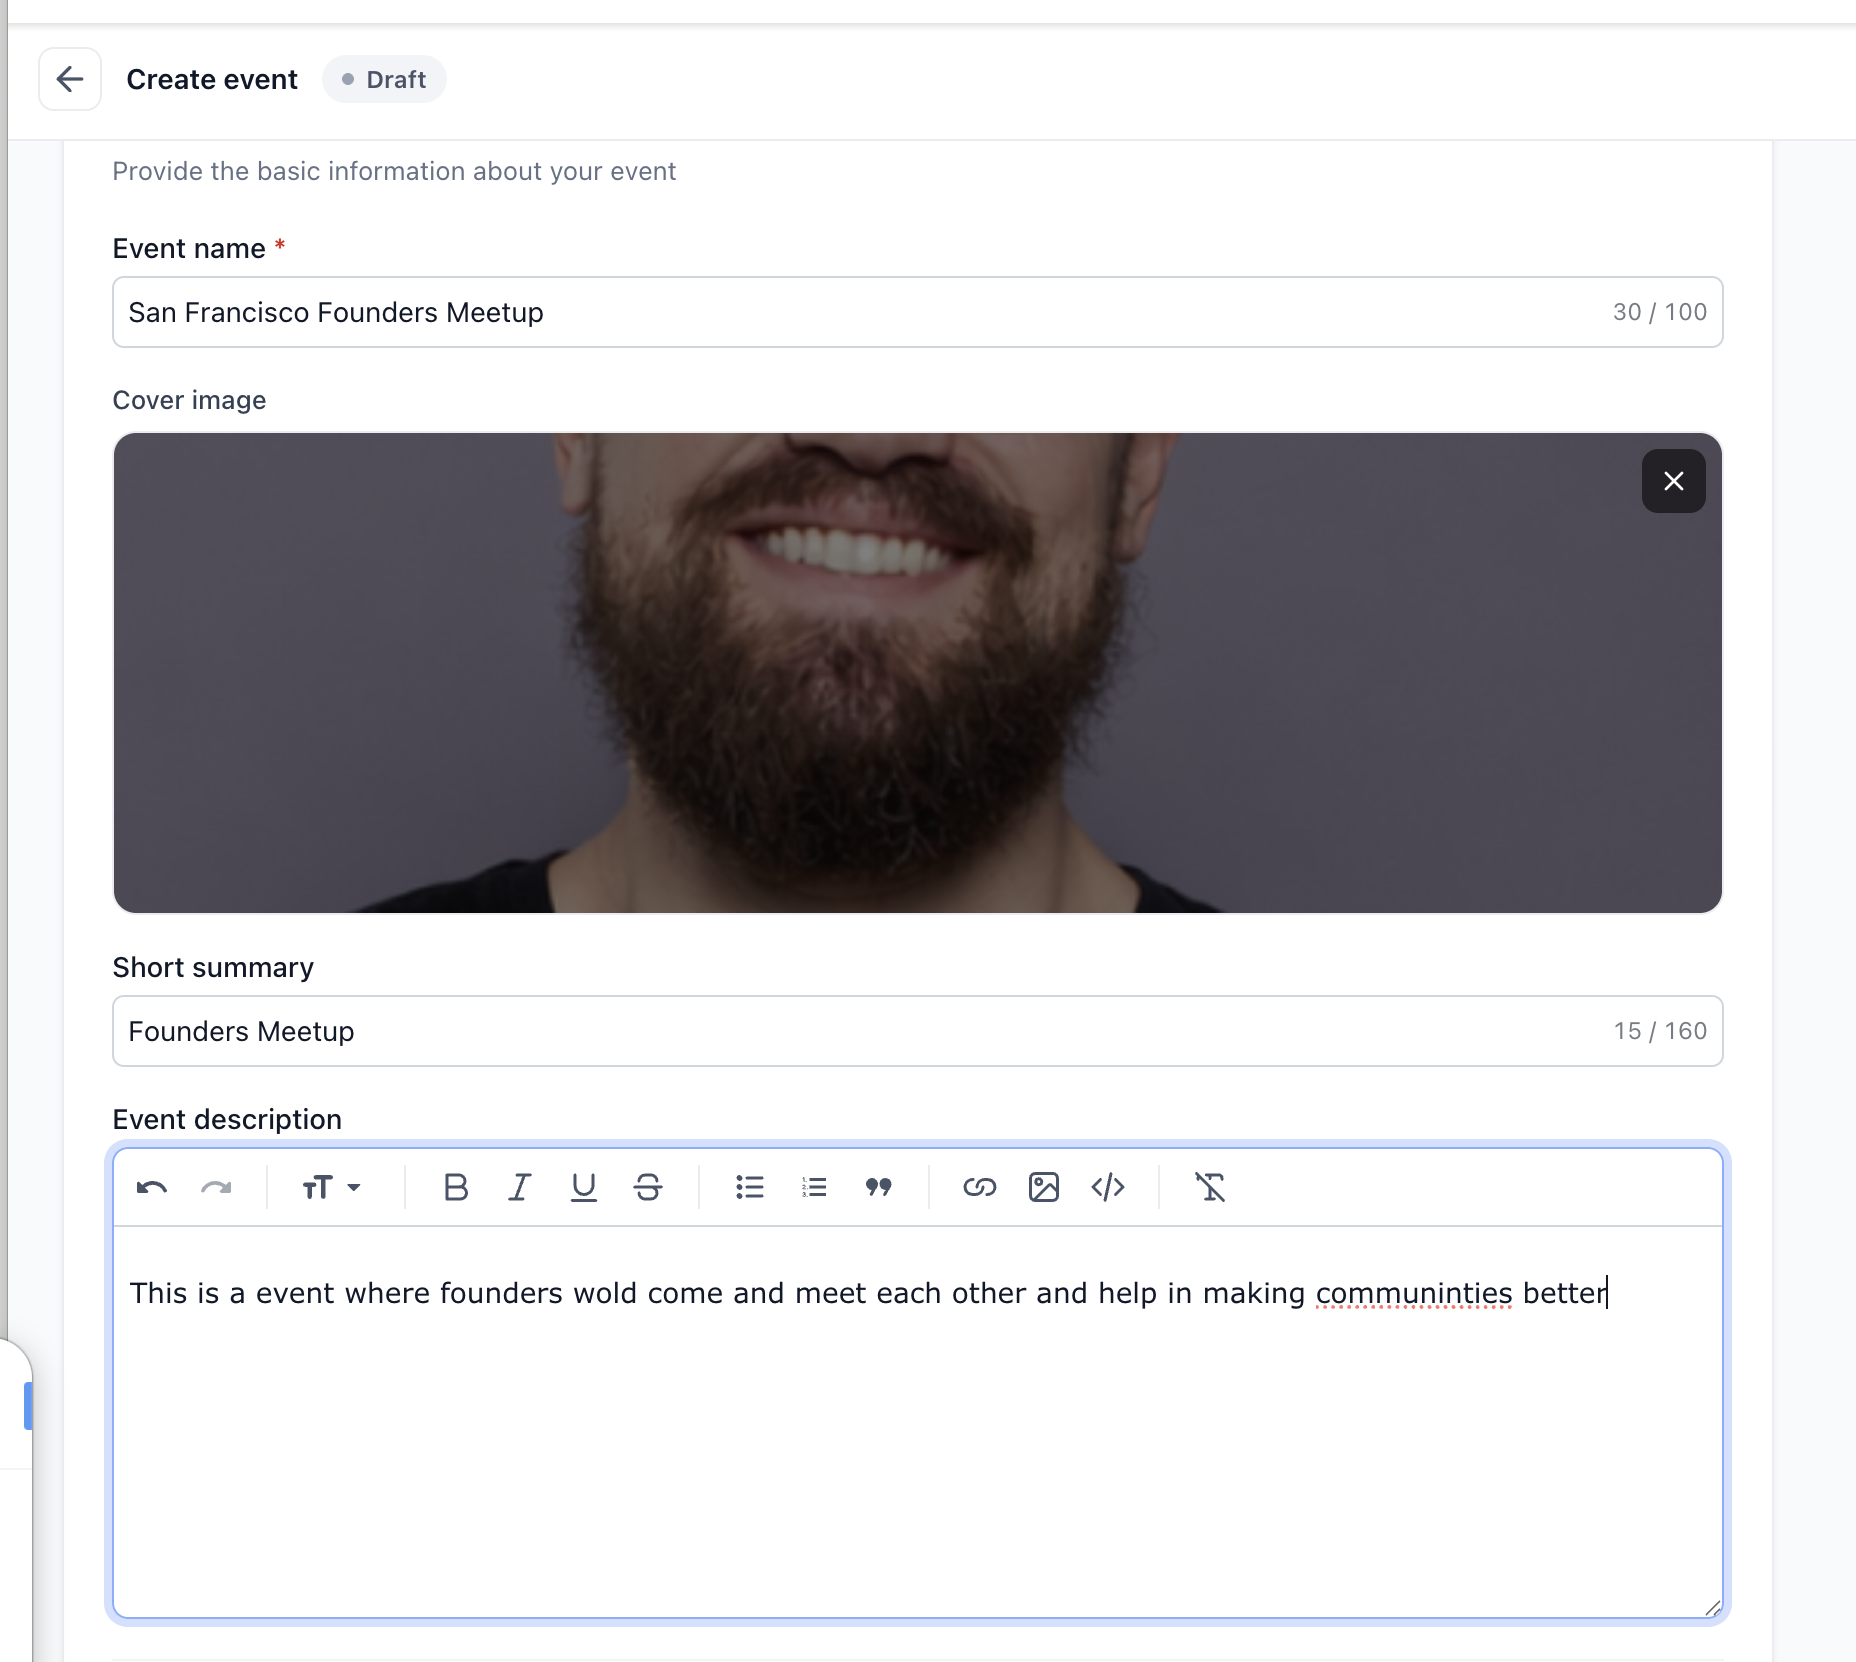
Fill in the basic information about your event:
- Event name: Up to 100 characters. This appears as the headline on your public page.
- Cover image: PNG, JPG, or GIF. Recommended size is 1920 × 1080 px. Maximum file size is 5 MB.
- Short summary: Up to 160 characters. This appears in the hero area of the public page.
- Event description: Use the rich text editor to add formatted content, including bold text, lists, links, images, and more.
Step 4: Set the date and time
Set when your event starts and ends:
- Enter the Start date and Start time.
- Enter the End date and End time.
- Choose the event Timezone.
- Choose the Display format, either 12 hour or 24 hour.
The display format controls how event times appear on the public page.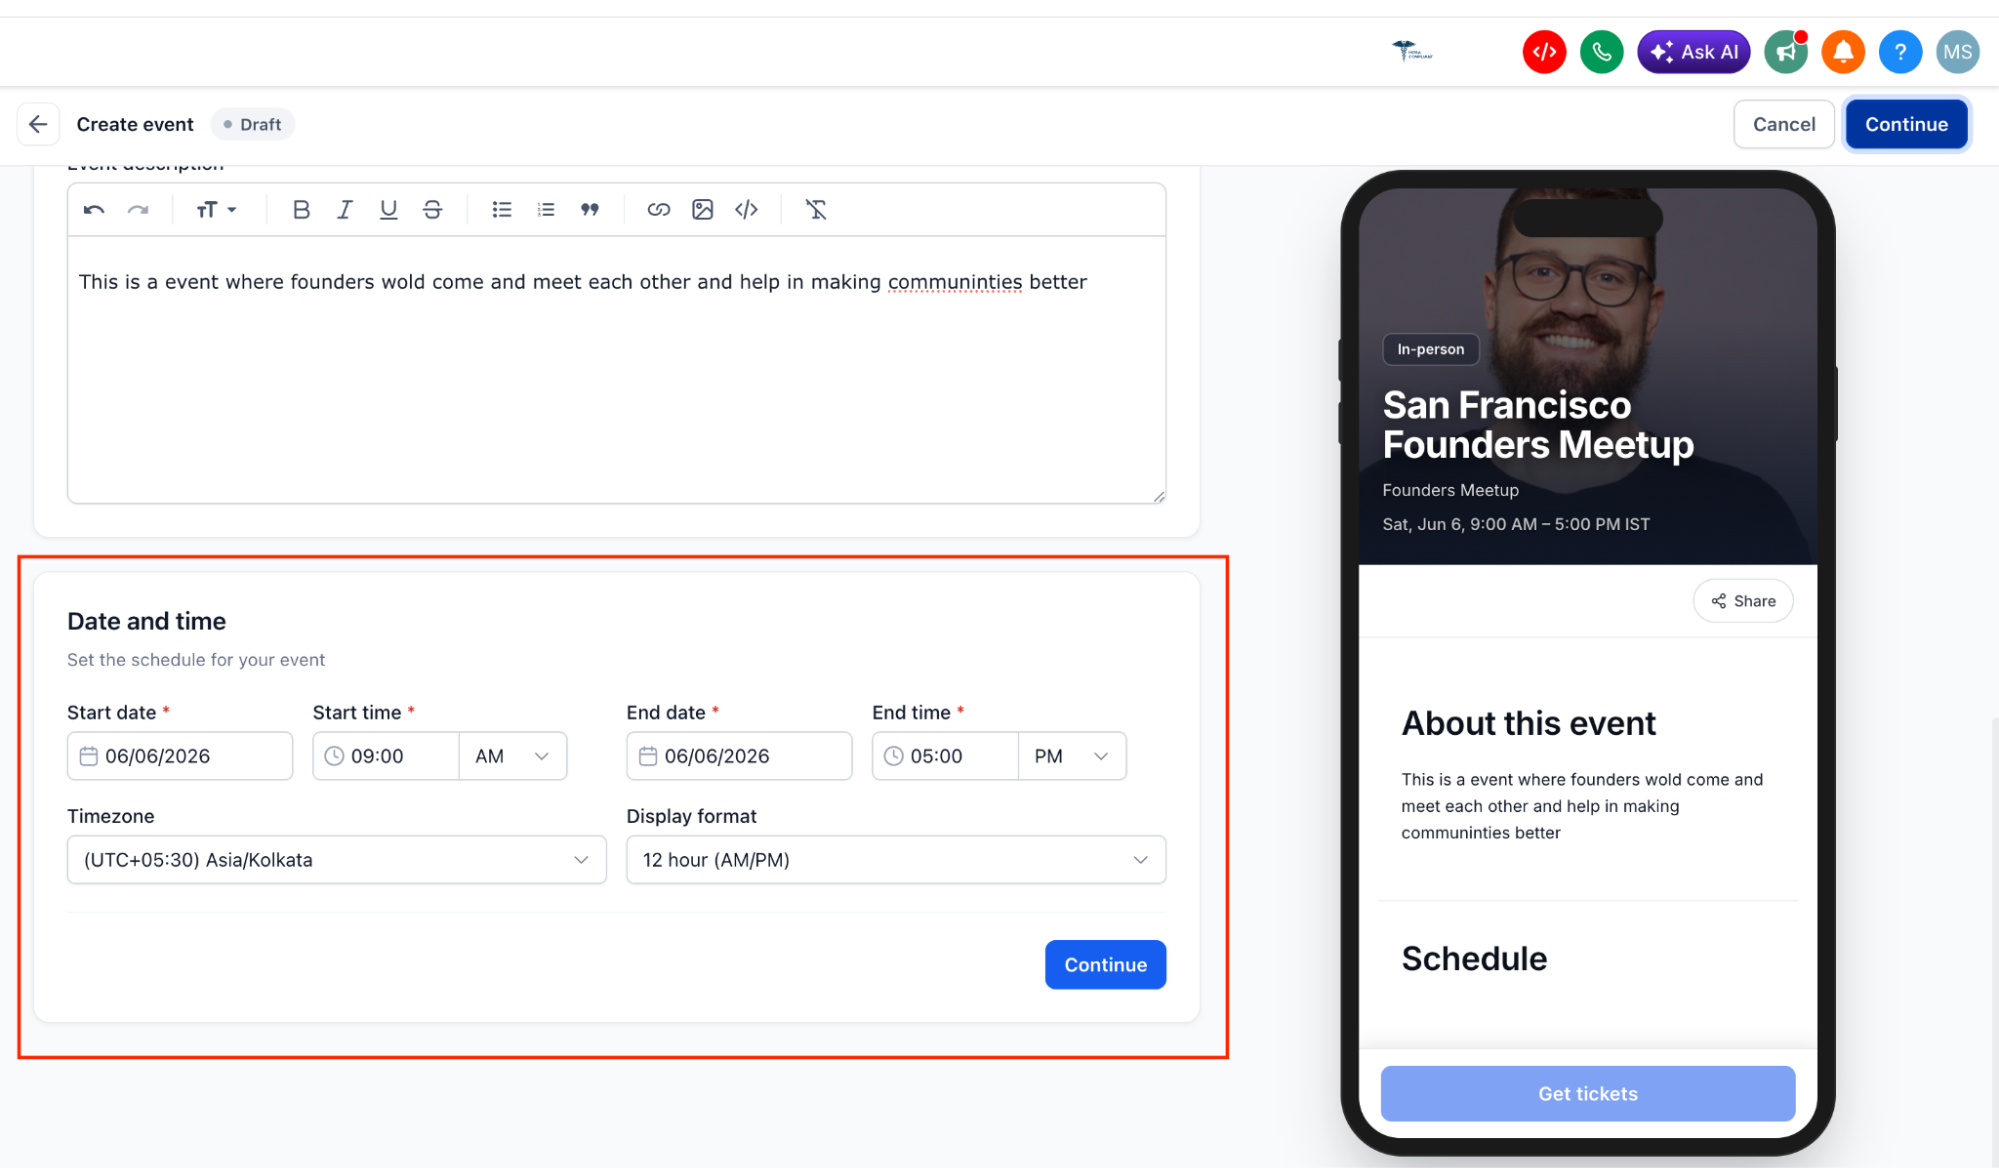
Note: Ticket sale periods, session times, and coupon active periods use the timezone selected here.
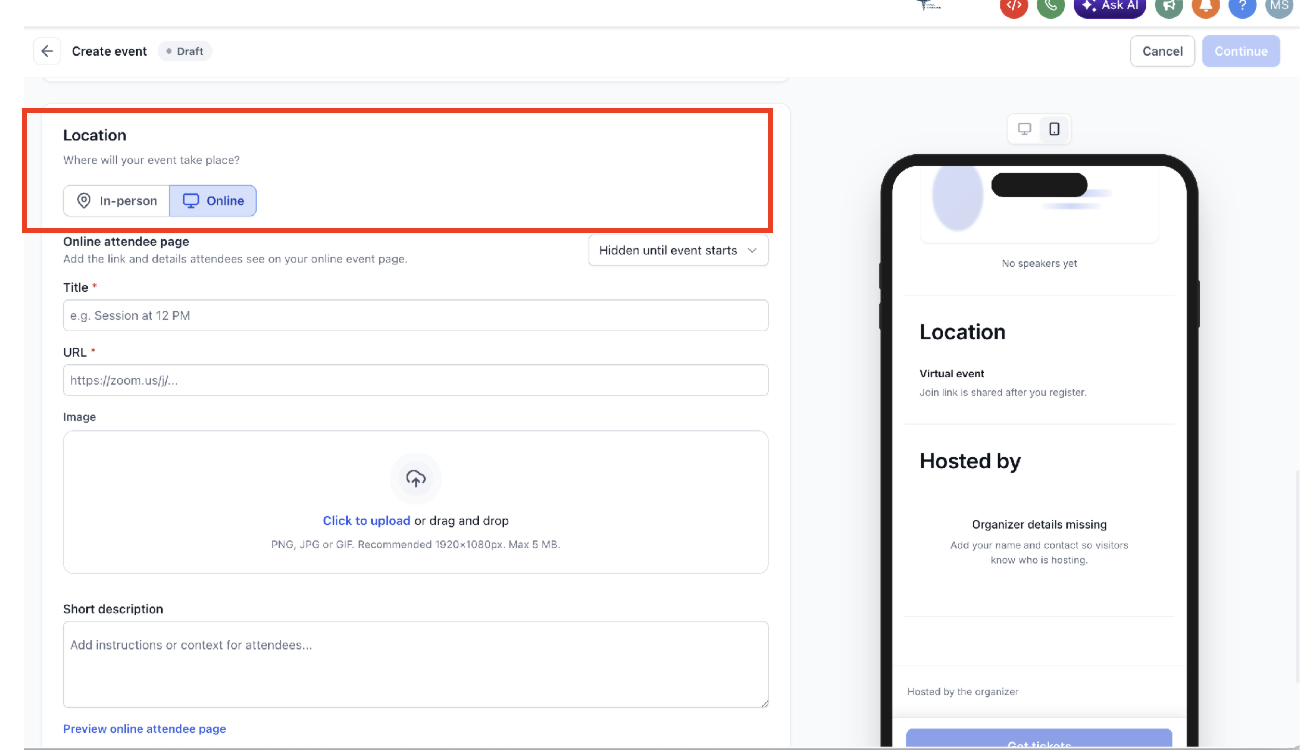
Step 5: Set the location
Choose where your event will take place:
- In-person: Enter a physical address. A map and Get directions link appear on the public page.
- Online: Add a title for the online attendee page, meeting URL, optional image, and short joining instructions.
For online events, configure when the meeting link becomes visible:
- Hidden until event starts: The join link is not shown until the event begins. Attendees see that the join link is shared after they register.
- Custom schedule: Control exactly when the link appears and disappears using minute-level timing.
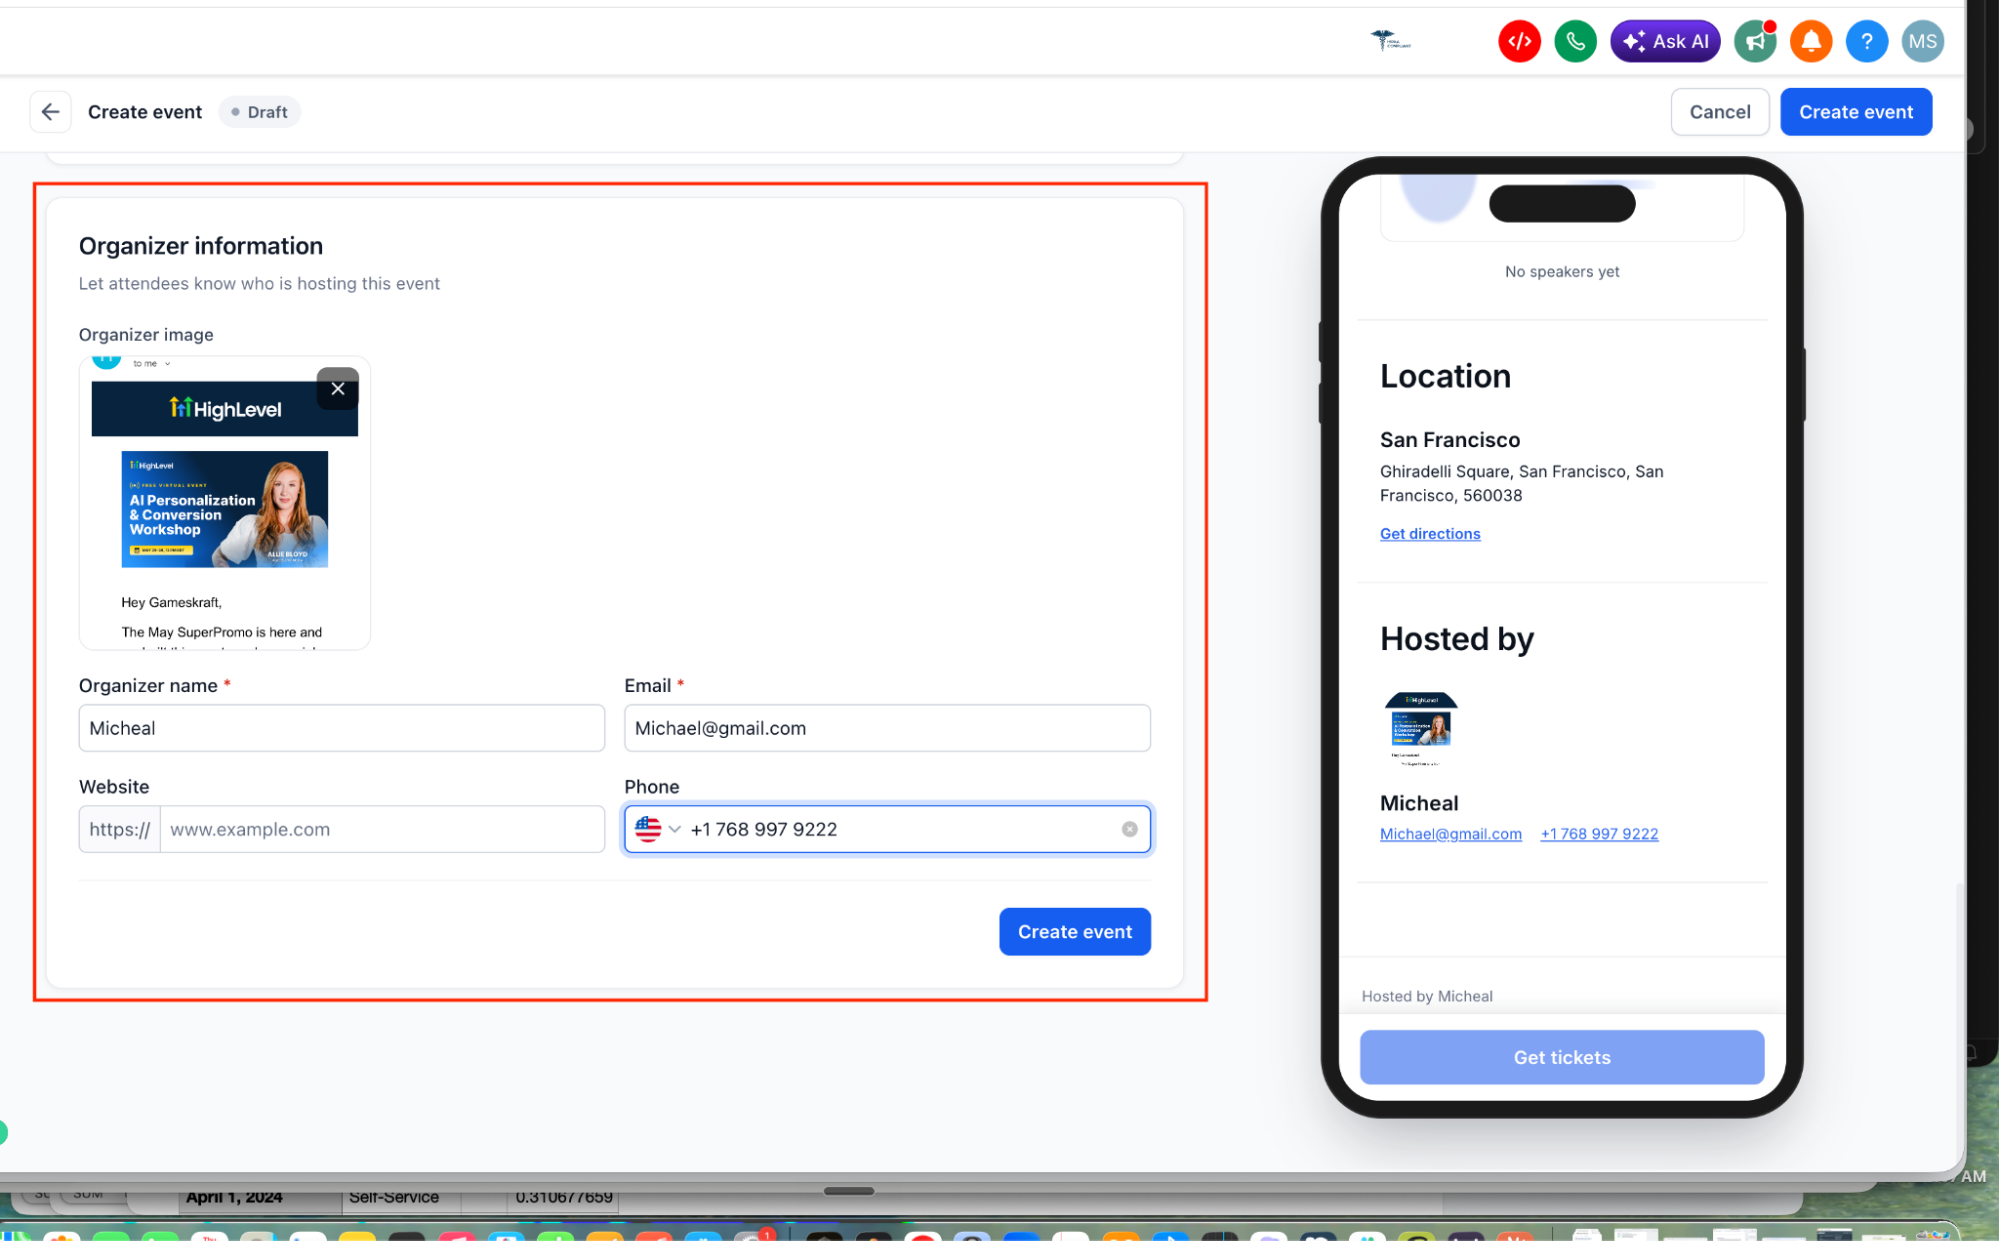
Step 6: Add organizer information
Add organizer details so attendees know who is hosting the event. This information appears in the Hosted by section of the public event page.
Add the following details:
- Organizer image: PNG, JPG, or GIF. Recommended size is 400 × 400 px. Maximum file size is 5 MB.
- Organizer name: Required.
- Email address: Required.
- Website URL: Optional.
- Phone number: Optional.
Click Create event to save. Your event is now in Draft status and is not visible to the public until published.
Configure the Event
After the event is created, the event dashboard lets you configure tickets, coupons, schedules, speakers, public pages, registration settings, notifications, and publishing options. These settings control how attendees register and what they see before and after checkout.
Step 7: Create ticket types
Go to the Tickets tab and click + Add Ticket Type. For each ticket type, configure:
- Ticket name: Up to 100 characters, such as General Admission or VIP.
- Pricing method: Choose Fixed price or Free.
- Price: Set the ticket price when Fixed price is selected.
- Quantity: Set the number of seats available for this ticket type.
- Sale period: Set the start and end date/time for when the ticket can be purchased.
You can create as many ticket types as needed and mix free and paid tiers on the same event.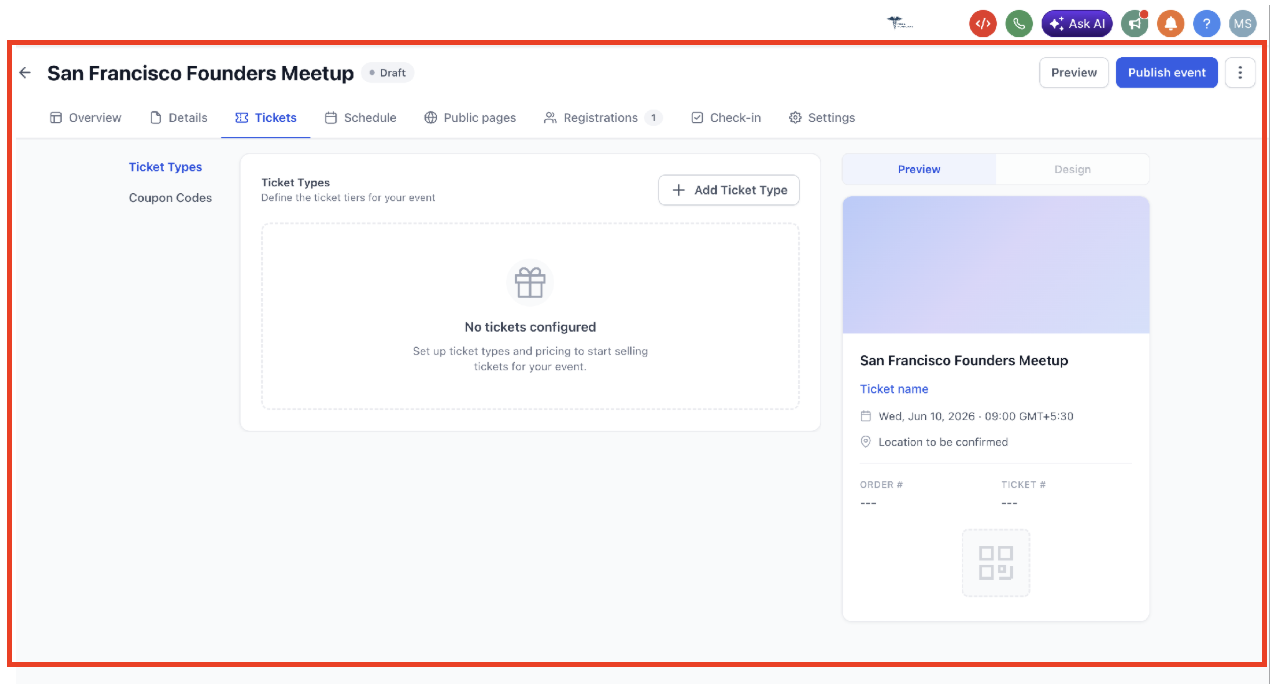
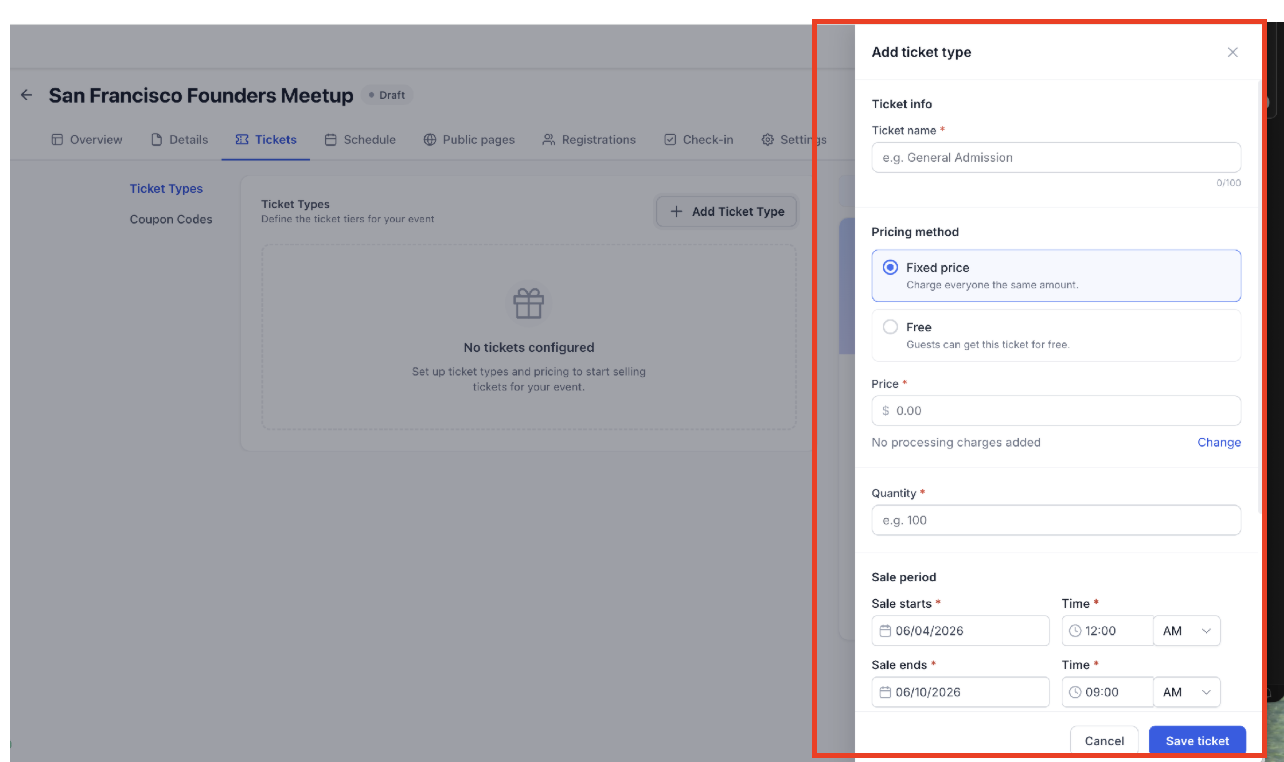
Note: Sale period times use the event timezone. Check the timezone shown at the bottom of the ticket panel.
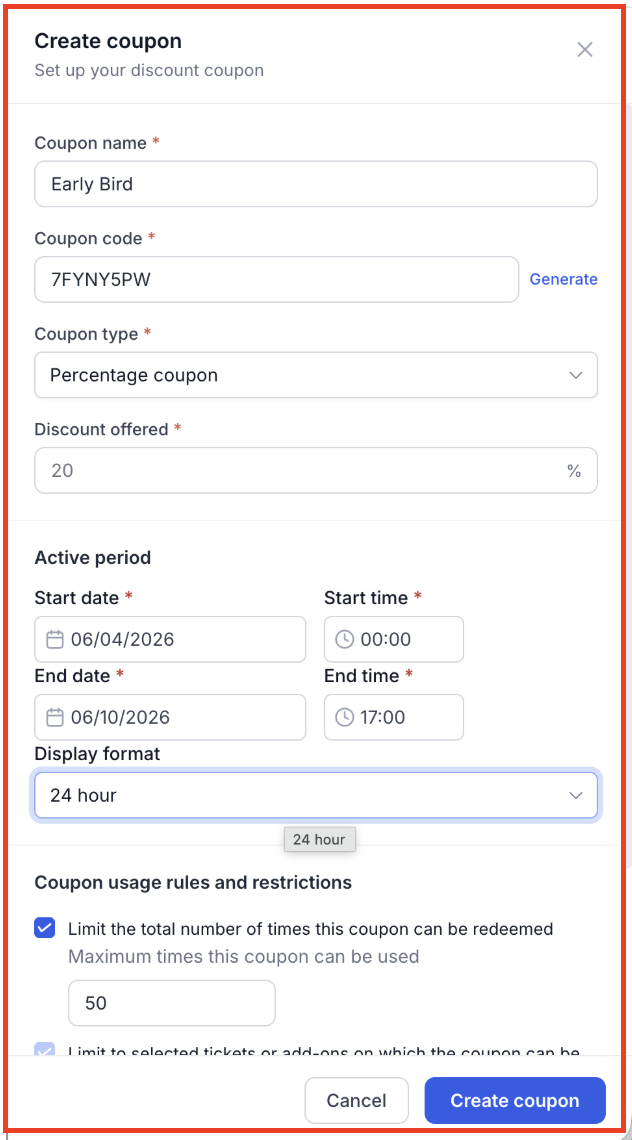
Step 8: Add coupon codes (Optional)
Go to Tickets → Coupon Codes to create discount codes for your event.
Configure the coupon:
- Coupon name: Internal label, such as Early Bird.
- Coupon code: The code attendees enter at checkout. Type a custom code or click Generate.
- Coupon type: Currently supports Percentage coupon.
- Discount: Percentage off, such as 20 for 20%.
- Active period: Date range during which the code is valid.
- Usage limits: Optionally limit total redemptions or restrict the coupon to specific ticket types.
Attendees apply the code by clicking Have a coupon code? on the ticket selection screen.
Note: Event coupon codes are only for Events and do not apply to other SourCherry products.
Step 9: Add schedule and speakers (Optional)
Go to the Schedule tab to build your event agenda.
To add a session, click Add schedule and enter:
- Title: For example, Main lecture or Workshop A.
- Day and time slot: Must fall within the event window.
- Stage / Location: For example, MainStage or Room 2.
- Description
- Assigned speakers
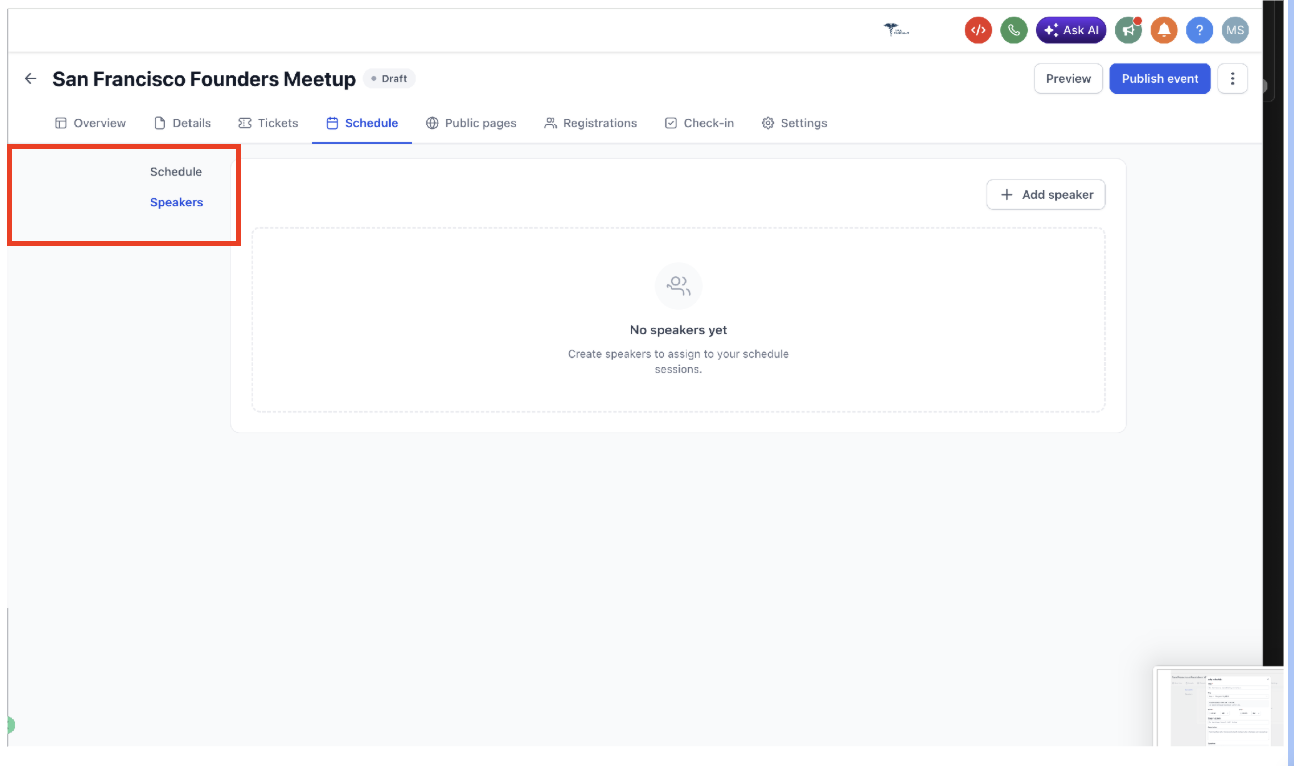
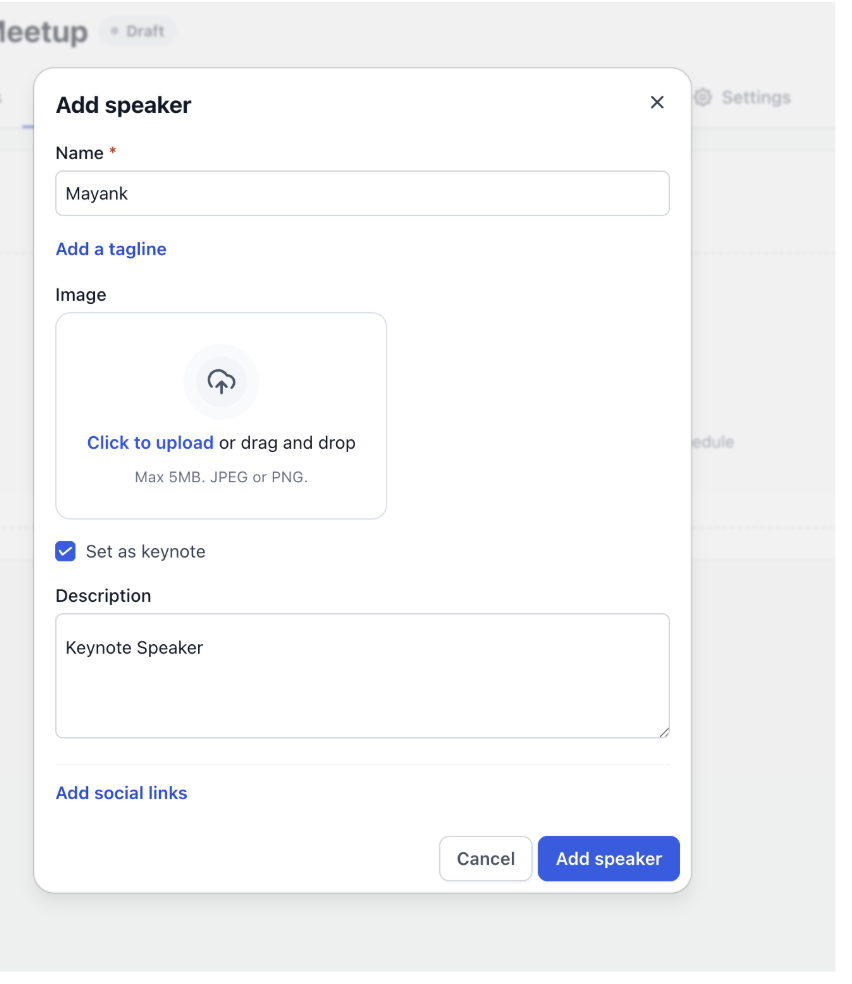
To add a speaker, click Speakers in the sub-navigation, then click + Add speaker. Add the speaker’s name, tagline, photo, description, keynote status, and social links.
Step 10: Customize your public event page
Go to the Public pages tab. Three sub-tabs control different parts of the attendee experience:
- Details: Toggle and reorder page sections, including About this event, Tickets, Schedule, Speakers, Location, Hosted by, and Frequently asked questions. Enable attendee count display if desired.
- Schedule: Customize how the schedule appears on the public page.
- Checkout: Set the checkout title and form fields. First name, last name, and email are locked as required. Add custom fields and optionally require attendees to accept terms and conditions.
Style changes, such as colors, typography, and template, apply across all three pages. Use the real-time preview on the right side of the editor to review desktop and mobile views.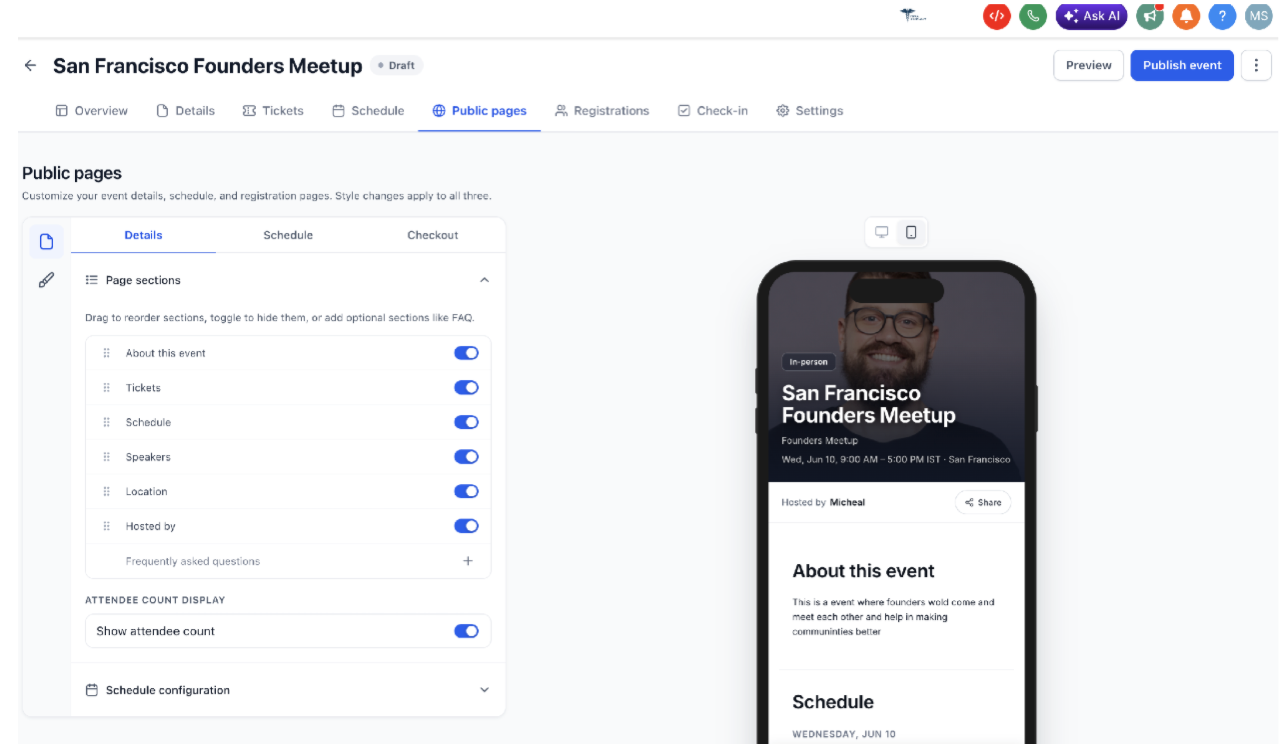
Step 11: Configure registration settings and notifications
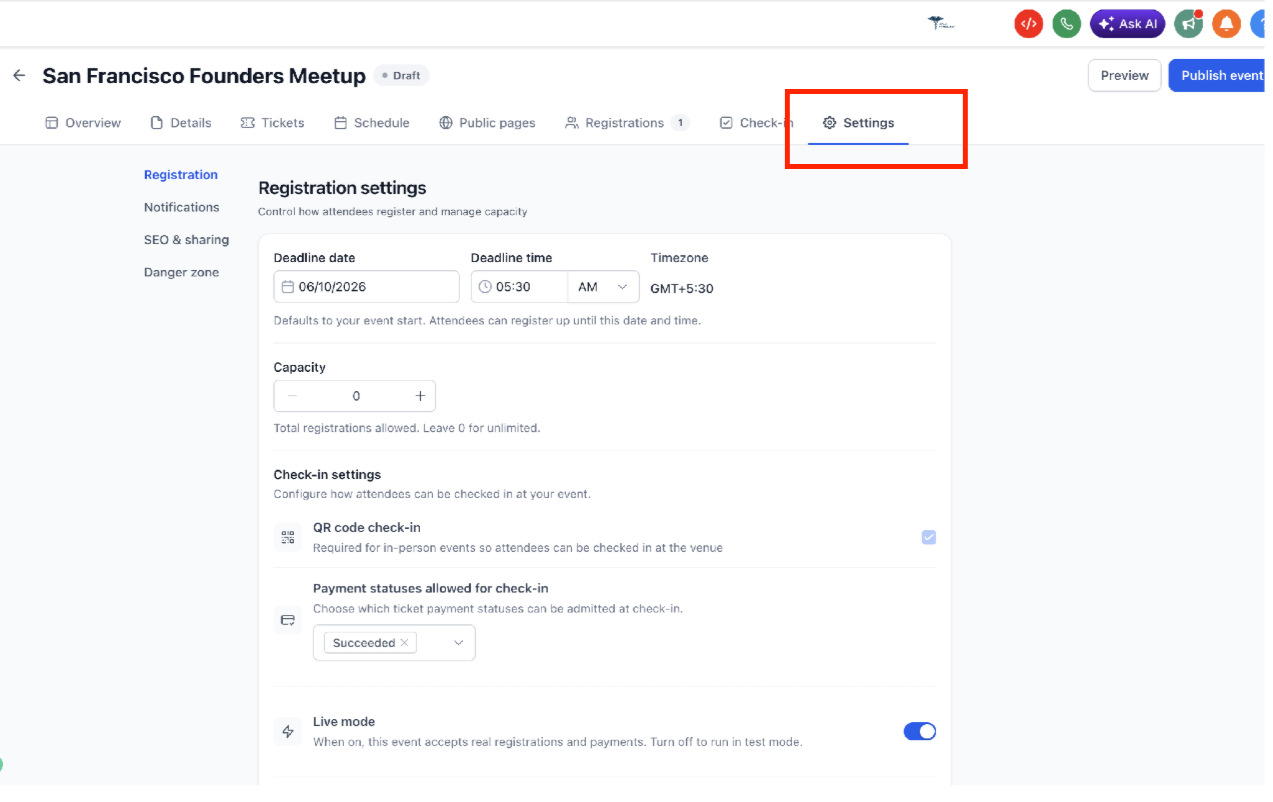
Go to the Settings tab. Under registration settings, configure:
- Deadline: Date and time after which registrations close. By default, this is set to the event start time.
- Capacity: Maximum total registrations across all ticket types. Set to 0 for unlimited.
- Check-in: QR code check-in is enabled by default for in-person events. Choose which payment statuses allow entry.
- Live mode: Turn on before going live. When Live mode is off, the event runs in test mode and no real payments are processed.
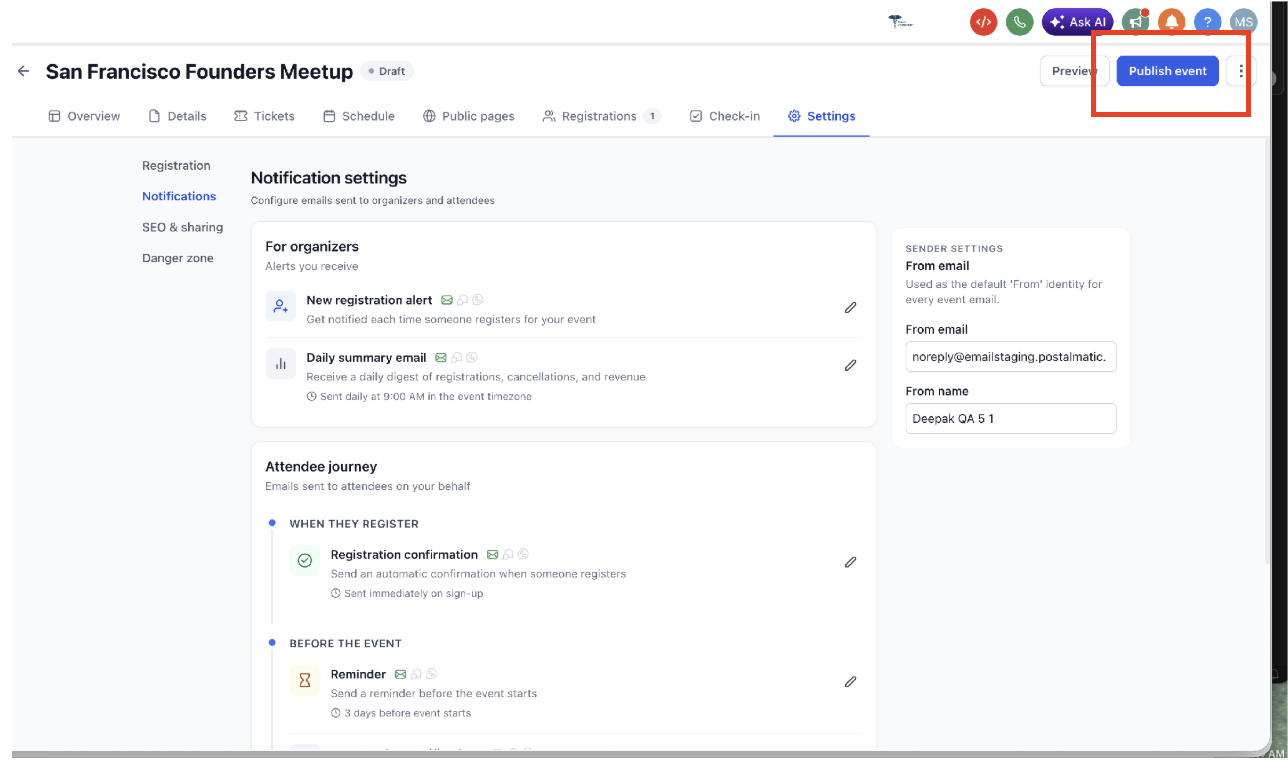
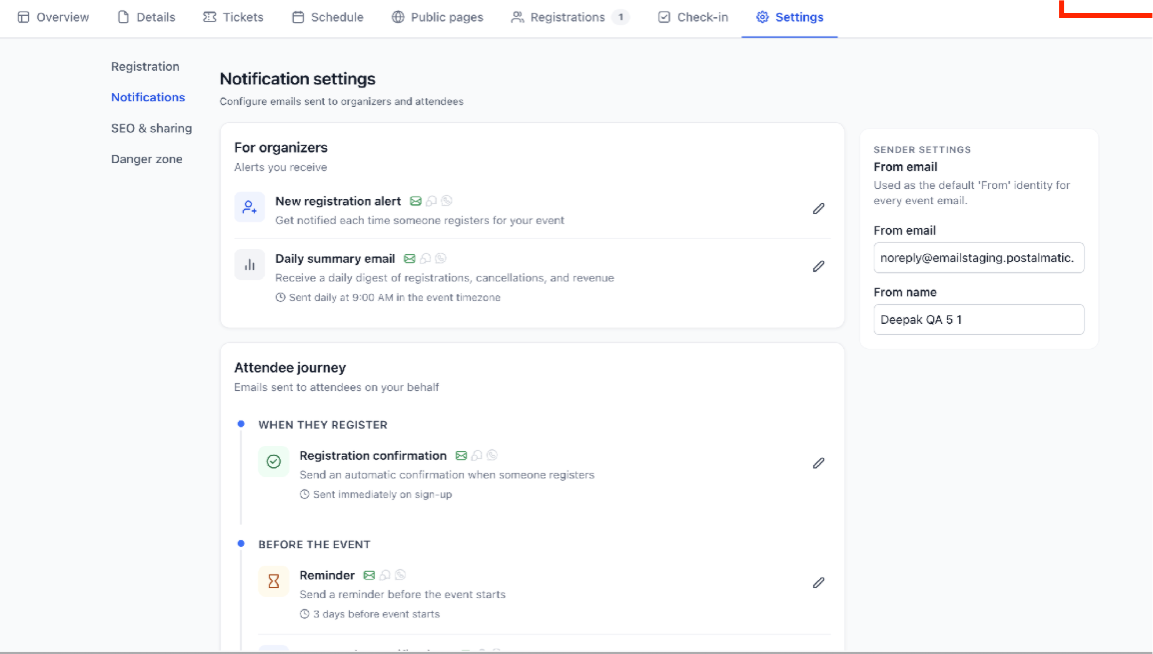
Under notification settings, configure:
- For organizers: New registration alert and daily summary email.
- For attendees: Registration confirmation and reminder email.
- Sender settings: From email and From name used on event emails.
Step 12: Publish your event
Once setup is complete, click Publish event in the top-right corner. Your event goes live with a public URL attendees can visit to register.
After publishing, you can:
- Share the event link from the three-dot menu.
- Duplicate the event for future use.
- Unpublish the event to take it offline while preserving registrations.
- Archive the event to remove it from the active list while keeping it restorable.
- Delete the event permanently.
Manage the Event
Event management begins after the event is created or published. These controls help organizers monitor registrations, add attendees, process refunds, check in guests, share the event, duplicate the setup, or remove the event when needed.
Step 13: Manage registrations and check in attendees
Once your event is live, use the following tabs to manage attendees:
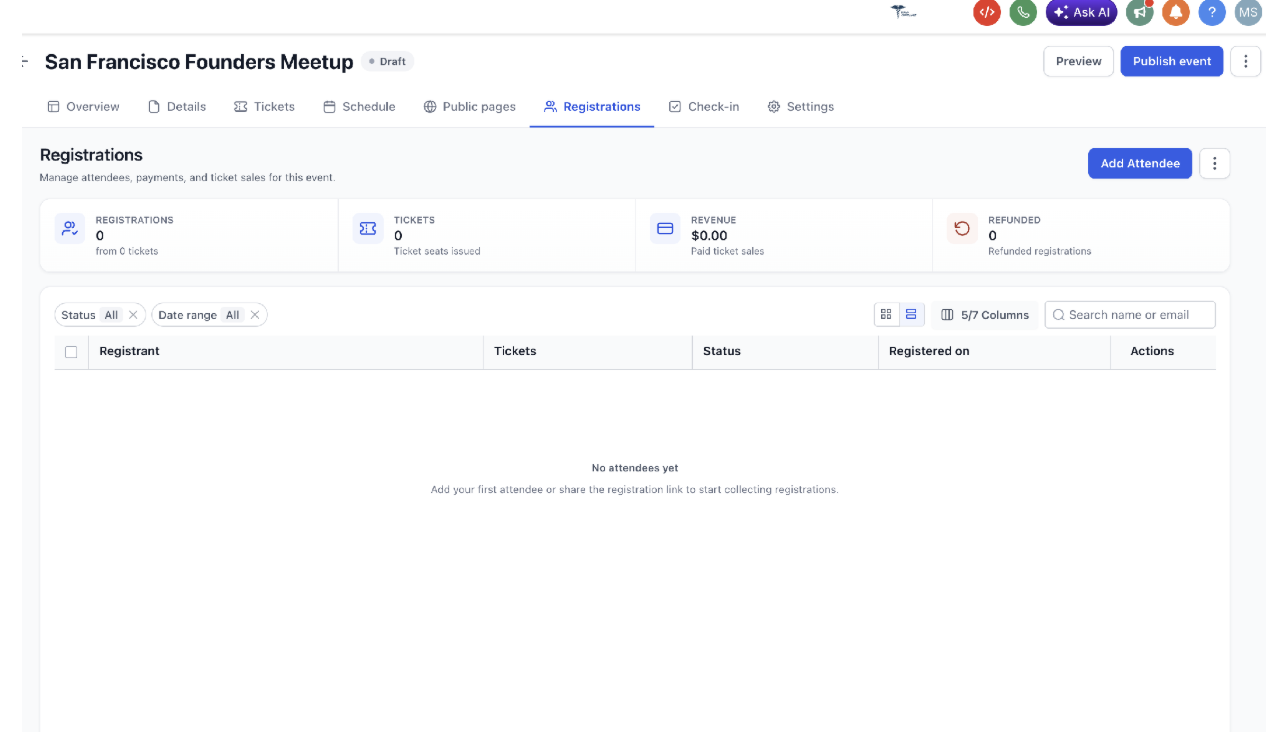
- Registrations tab: View registrants, total tickets issued, revenue, and refunded registrations. Search by name or email, filter by status or date range, and manually add attendees with the Add Attendee button.
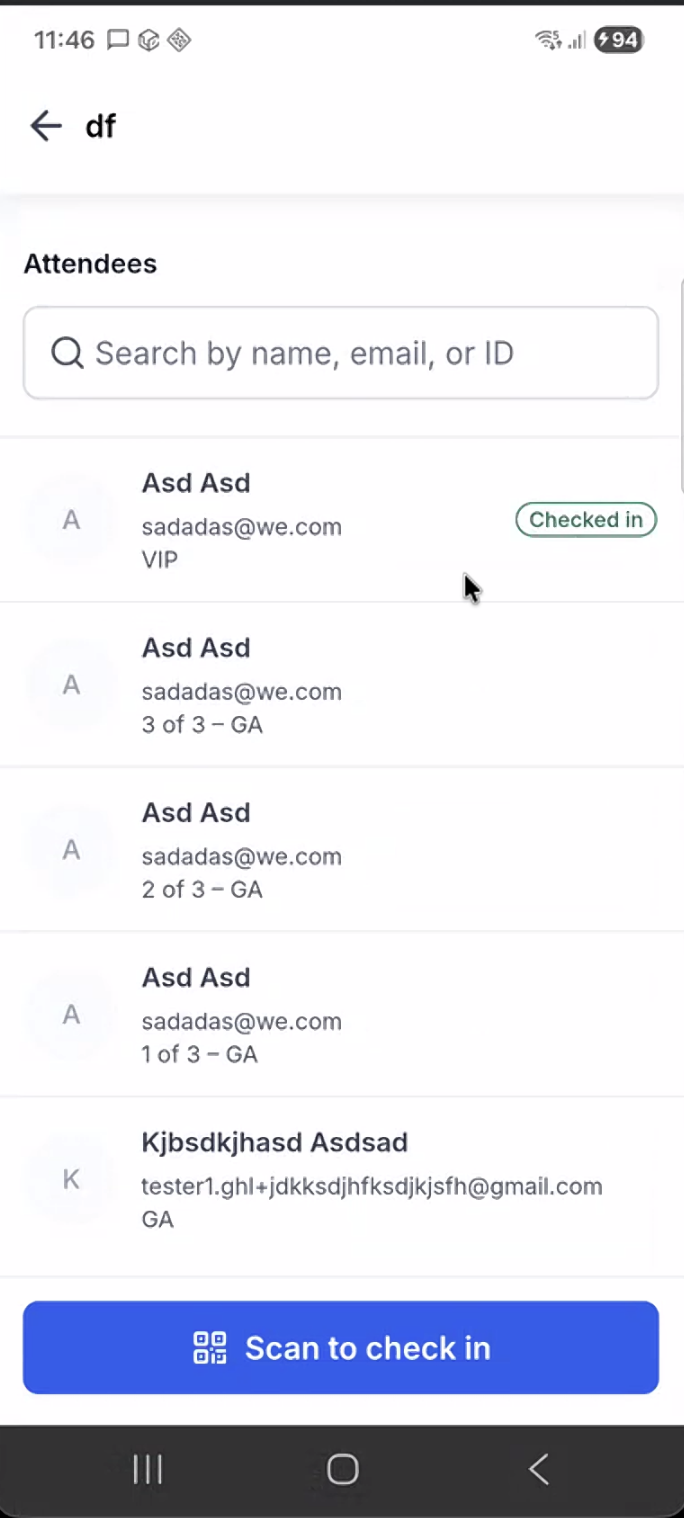
- Check-in tab: Use QR code scanning to check attendees in at the venue in real time. Only registrants with an allowed payment status, such as Succeeded, can be checked in.
Danger Zone
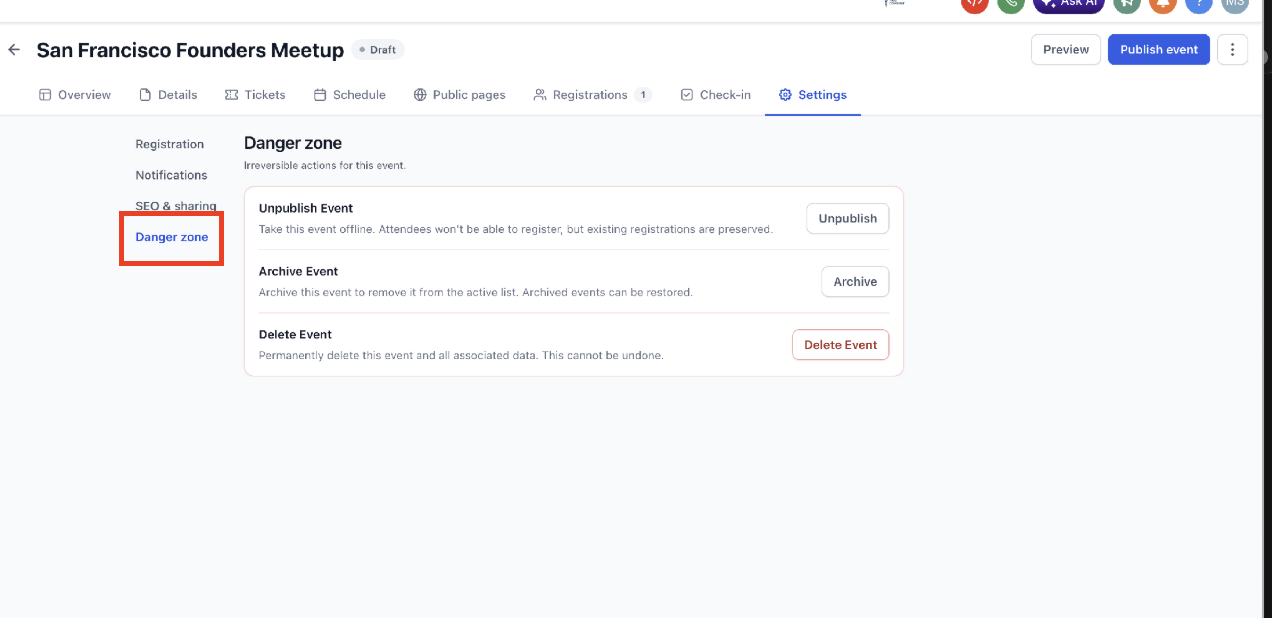
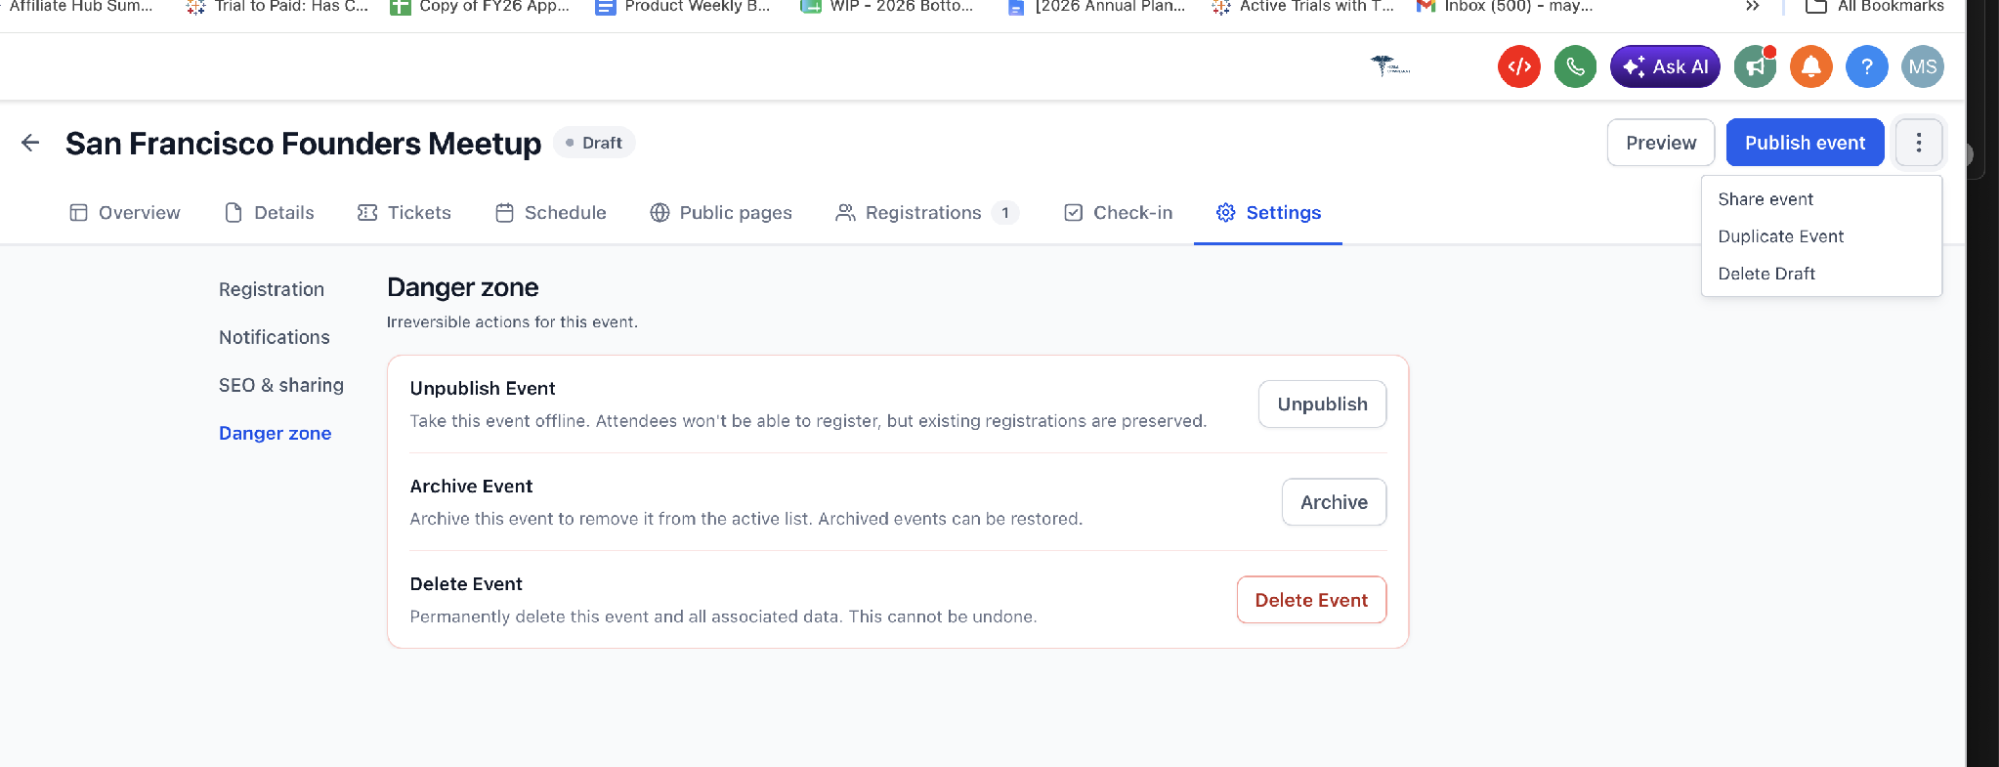
Under Settings → Danger zone, you will find actions that affect event availability or event data:
- Unpublish Event: Takes the event offline. Existing registrations are preserved.
- Archive Event: Removes the event from the active list. Archived events can be restored.
- Delete Event: Permanently deletes the event and associated data. This action cannot be undone.
Event Overflow Menu
The three-dot menu at the top right of the event gives quick access to common event actions:
- Share event
- Duplicate Event
- Delete Draft
Attendee Experience
The attendee experience starts on the public event page and continues through ticket selection, checkout, and confirmation. Reviewing this flow before sharing your event helps ensure the page, tickets, coupons, and payment settings work as expected.
Selecting Tickets
Attendees choose their ticket type and quantity. They can enter a coupon code for a discount, and the order summary updates in real time.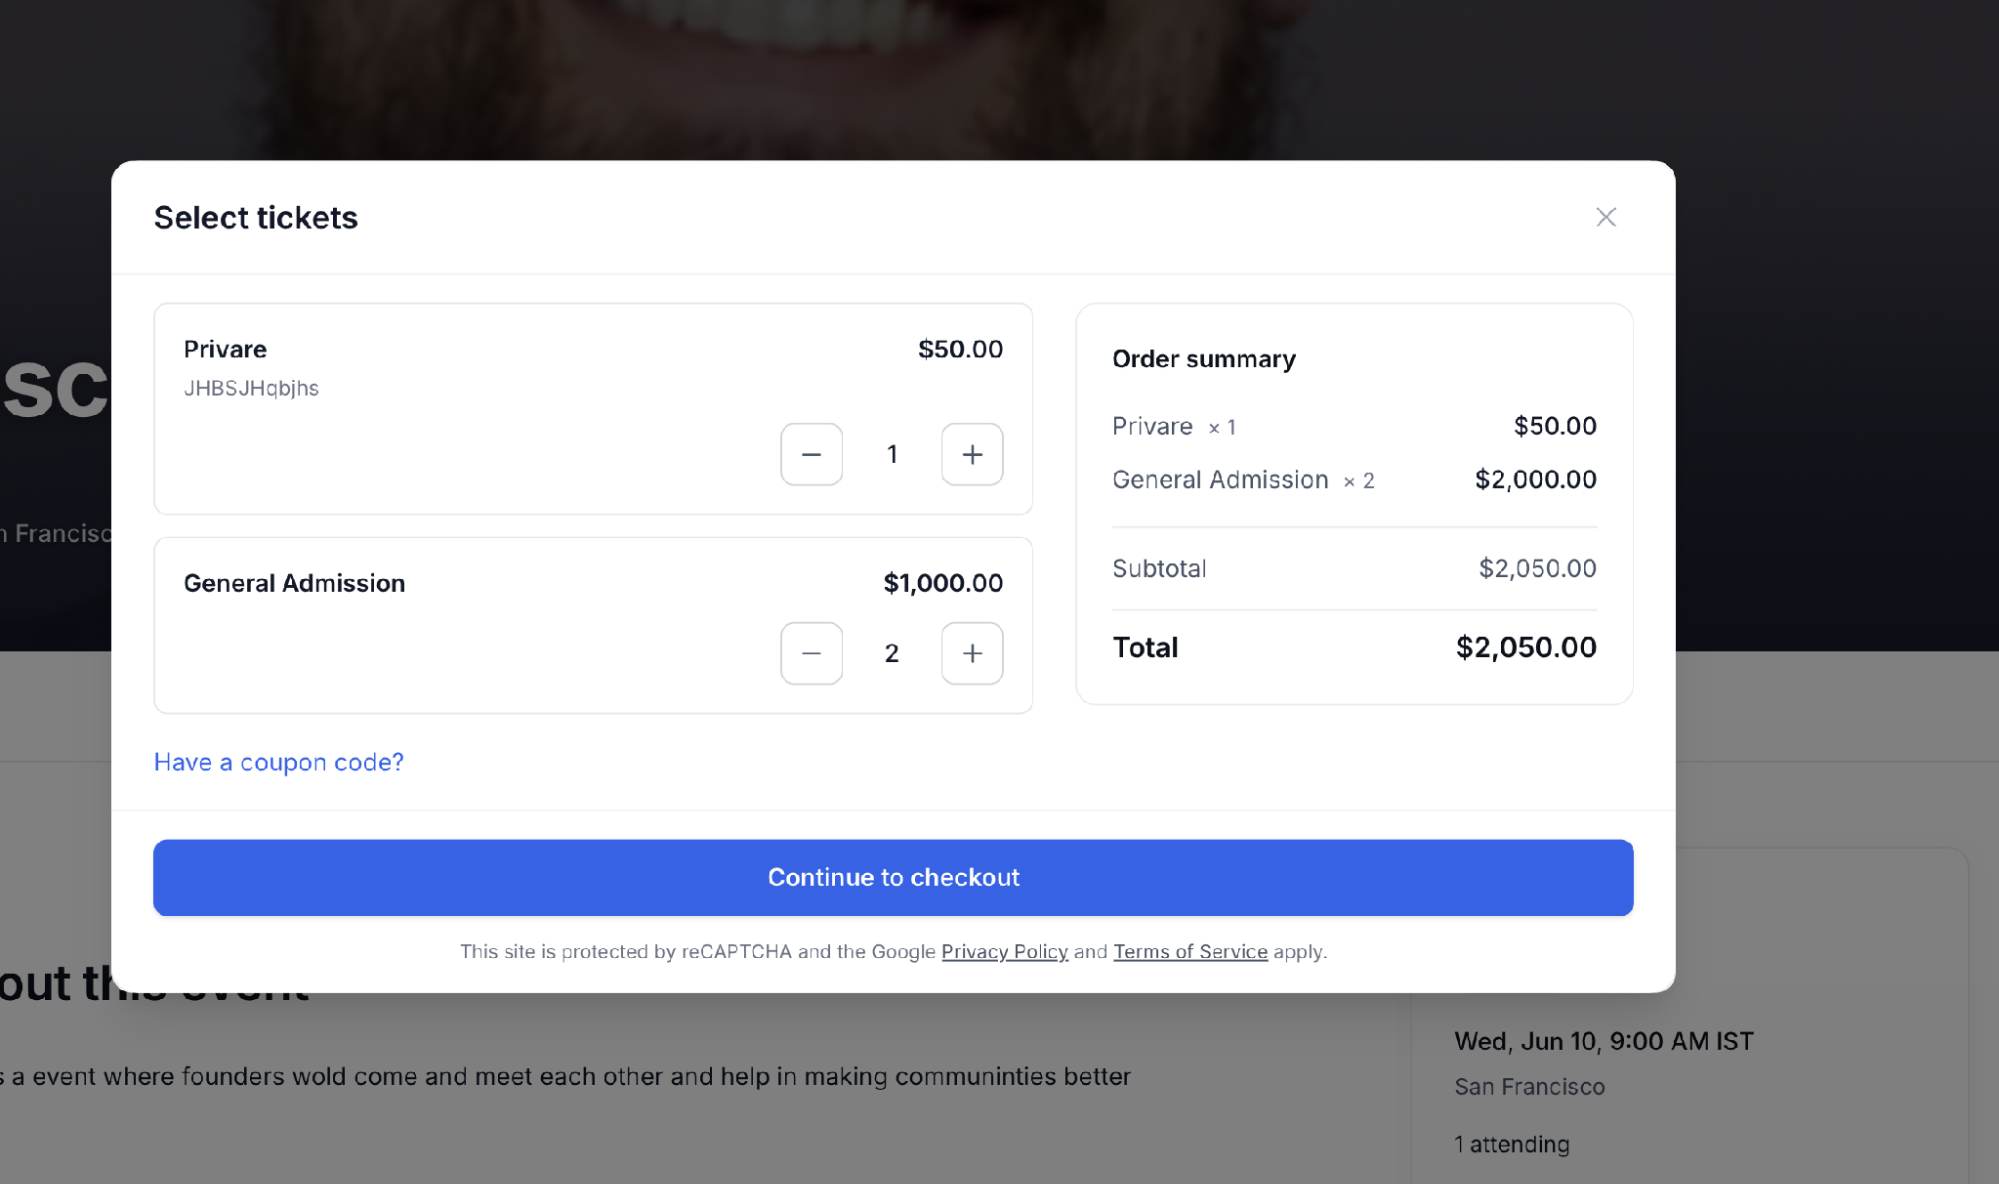
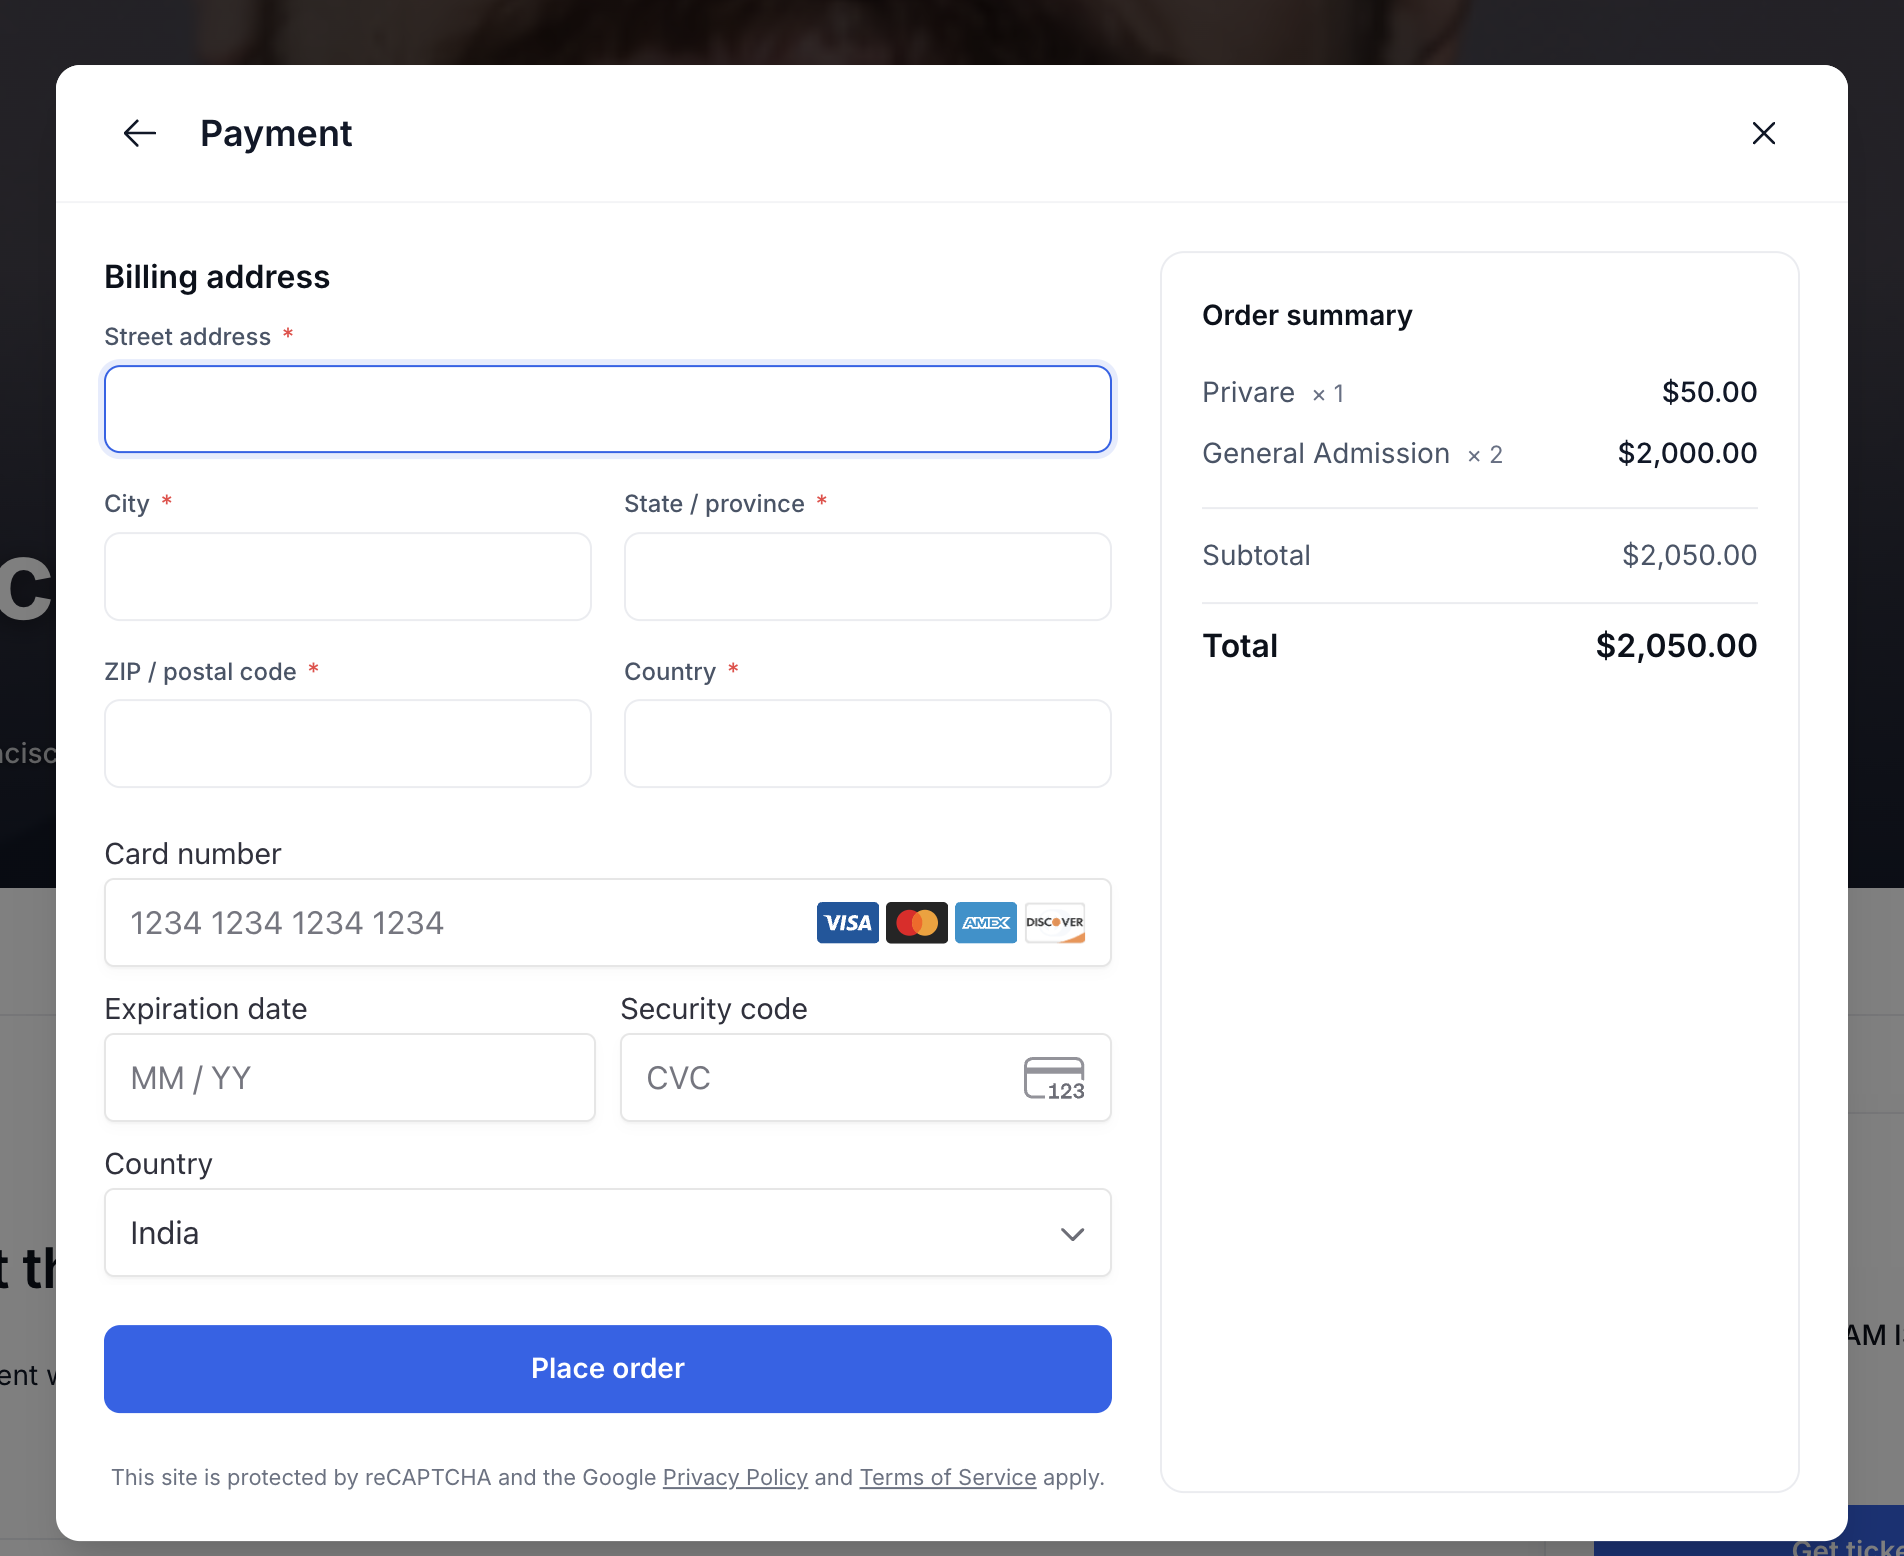
Checkout and Payment
After selecting tickets, attendees enter their details, billing address, and card information when payment is required. The order summary remains visible during the checkout flow.
Check-in by Scanning QR Code
You can scan the QR code and check-in from mobile
Event Notifications
Notifications keep attendees and organizers informed before and after registration. They help reduce missed registrations, improve attendance, and give organizers visibility into event activity. The daily summary email is sent at 9:00 AM in the event timezone.
Event notification settings include:
- For attendees: Registration confirmation and event reminder emails.
- For organizers: New registration alerts and daily summary emails.
- Sender settings: From email and From name used for event-related emails.
Frequently Asked Questions
Q: Can I switch an event from Ticketed to RSVP after creating it?
No. Ticketed and RSVP event types cannot be switched after the event is created. If you selected the wrong type, create a new event with the correct type.
Q: Can I offer free and paid tickets on the same event?
Yes. Ticketed events can include both free and paid ticket types.
Q: Can I control when an online event link is visible?
Yes. You can keep the join link hidden until the event starts or use a custom schedule to control when it appears and disappears.
Q: How do refunds work for event tickets?
Refunds are initiated by the organizer from the Registrations tab. Attendees cannot request refunds directly through the event platform. Refund timelines follow standard payment processor windows.
Q: Does canceling or unpublishing an event automatically refund attendees?
No. Canceling or unpublishing an event does not automatically trigger refunds. Organizers must process refunds manually from the Registrations tab.
Q: Are recurring or multi-date events supported?
Currently, not supported in the beta.
Q: How do organizer payouts work?
Ticket revenue is processed through the connected payment provider, such as Stripe. Payout timing follows the schedule set in that provider’s account. SourCherry does not charge additional platform fees on top of standard credit card processing charges.
Q: Can attendees transfer tickets to someone else?
There is no self-serve ticket transfer option for attendees. If a ticket needs to be transferred, the organizer must manually update the attendee details in the Registrations tab or cancel the original registration and manually add the new attendee.
Q: Can staff manually add attendees?
Yes. Use the Add Attendee button from the Registrations tab to manually add someone without requiring them to complete public checkout.