
Connect your Shopify store to SourCherry to bring ecommerce data into your sub-account and support follow-up, automation, and customer management. The Shopify integration helps sync supported Shopify data such as products, collections, contacts, orders, and transactions, making it easier to manage ecommerce activity from SourCherry. Use this guide to connect Shopify, choose what data to import, configure ongoing sync settings, and understand important limitations before setup.
TABLE OF CONTENTS
- What is the Shopify Integration?
- Key Benefits of the Shopify Integration
- Shopify Connection Methods
- Import Elements
- Sync Settings
- Important Notes and Limitations
- How To Setup the Shopify Integration
- Frequently Asked Questions
- Related Articles
What is the Shopify Integration?
The Shopify integration connects your Shopify store to a SourCherry sub-account so supported ecommerce data and events can be used inside SourCherry. Once connected, Shopify data can support ecommerce workflows, customer follow-up, product visibility, and order-related automation.
The current Shopify connection experience uses an OAuth App method, which allows users to authorize the connection through Shopify without manually creating a Shopify custom app and copying an Admin API access token. Existing stores connected through the older Custom App method may continue syncing unless the connection is disconnected.
Key Benefits of the Shopify Integration
The Shopify integration helps ecommerce teams centralize Shopify activity inside SourCherry and use that data for better customer engagement, automation, and sales follow-up.
- Simplified setup: Connect Shopify using an app-based OAuth flow instead of manually creating a custom app and API token.
- Historical data import: Bring supported Shopify data into SourCherry during setup, including available products, collections, contacts, orders, and transactions.
- Ongoing data sync: Keep selected Shopify data syncing into SourCherry after the initial connection.
- Ecommerce automation support: Use synced Shopify activity with supported ecommerce workflow triggers, such as abandoned checkout and order-related automation.
- Better customer follow-up: Use Shopify customer and order activity to create more relevant email, SMS, and workflow experiences.
- Centralized ecommerce visibility: View and use supported Shopify information from inside the connected SourCherry sub-account.
Shopify Connection Methods
Shopify can be connected using the newer OAuth App method or the older Custom App method. Understanding the difference helps users choose the right path and avoid creating unnecessary duplicate connections.
| Connection Method | Best For | Setup Experience | Notes |
|---|---|---|---|
| OAuth App Method | New Shopify connections | Authorize Shopify through the app connection flow | Recommended for new connections because it reduces manual setup steps. |
| Custom App Method | Existing legacy Shopify connections | Create a Shopify custom app and use an Admin API access token | Older setup method documented in existing Shopify integration guidance. |
Important: If your Shopify store is already connected using the Custom App method, the existing connection may continue syncing historical data unless it is disconnected. Once disconnected, reconnecting may require using the current OAuth App connection flow.Import Elements
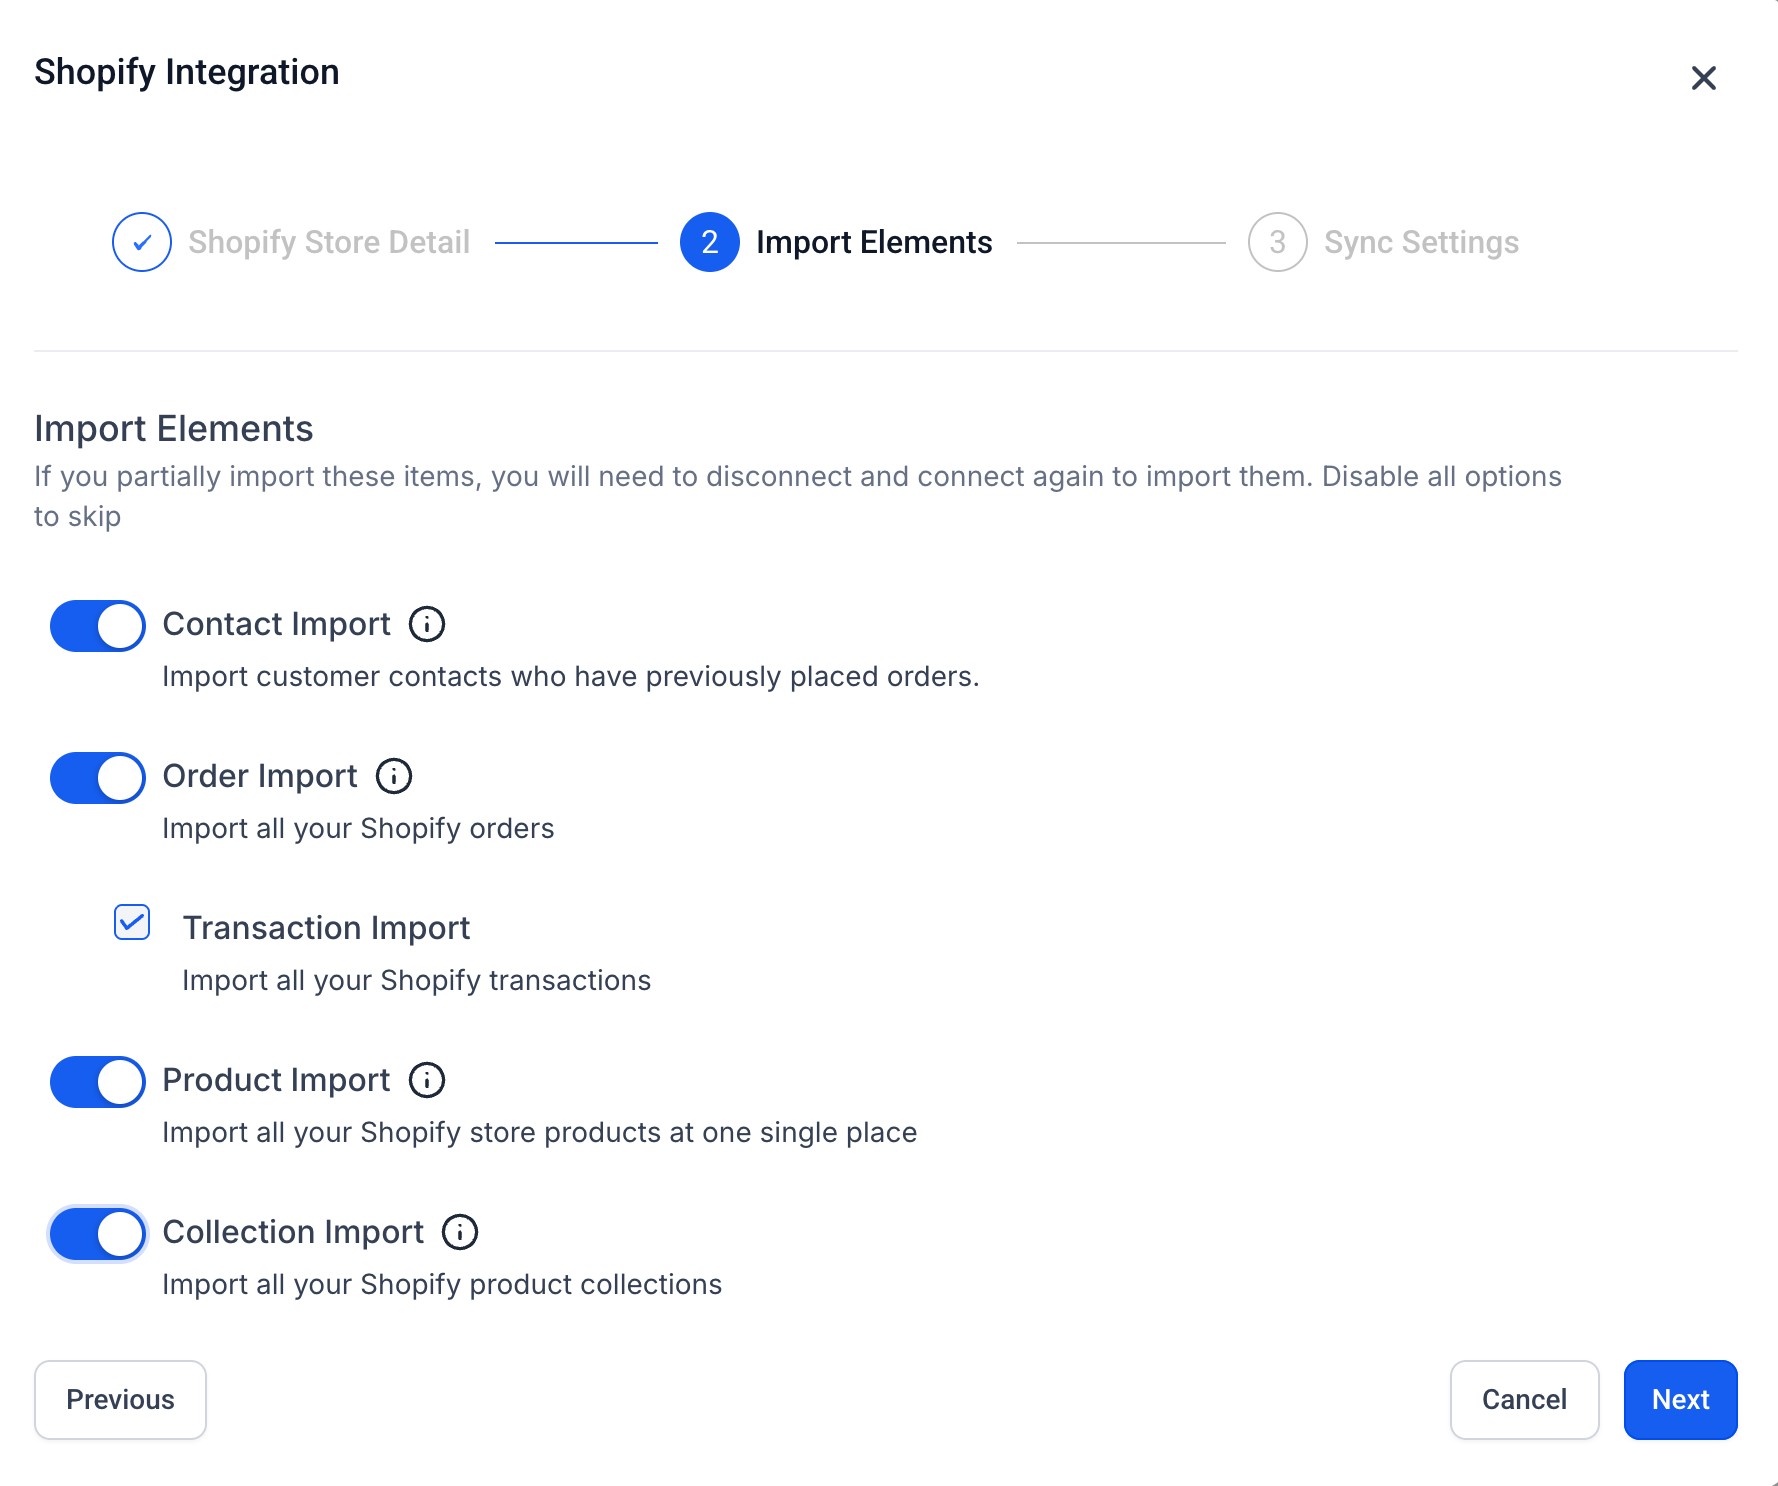
Import Elements control which supported Shopify records are brought into SourCherry during the initial connection process. This is typically used for historical Shopify data that already exists before the integration is connected.
Available import options may include:
- Products
- Collections
- Contacts
- Orders
- Transactions
Choose the data types that are useful for your SourCherry workflows and customer management needs. For example, importing products and collections can help make Shopify catalog information available, while importing contacts and orders can support customer follow-up and ecommerce reporting workflows. SourCherry’s Shopify migration guidance confirms support for importing and syncing products, collections, contacts, orders, and transactions.
Sync Settings
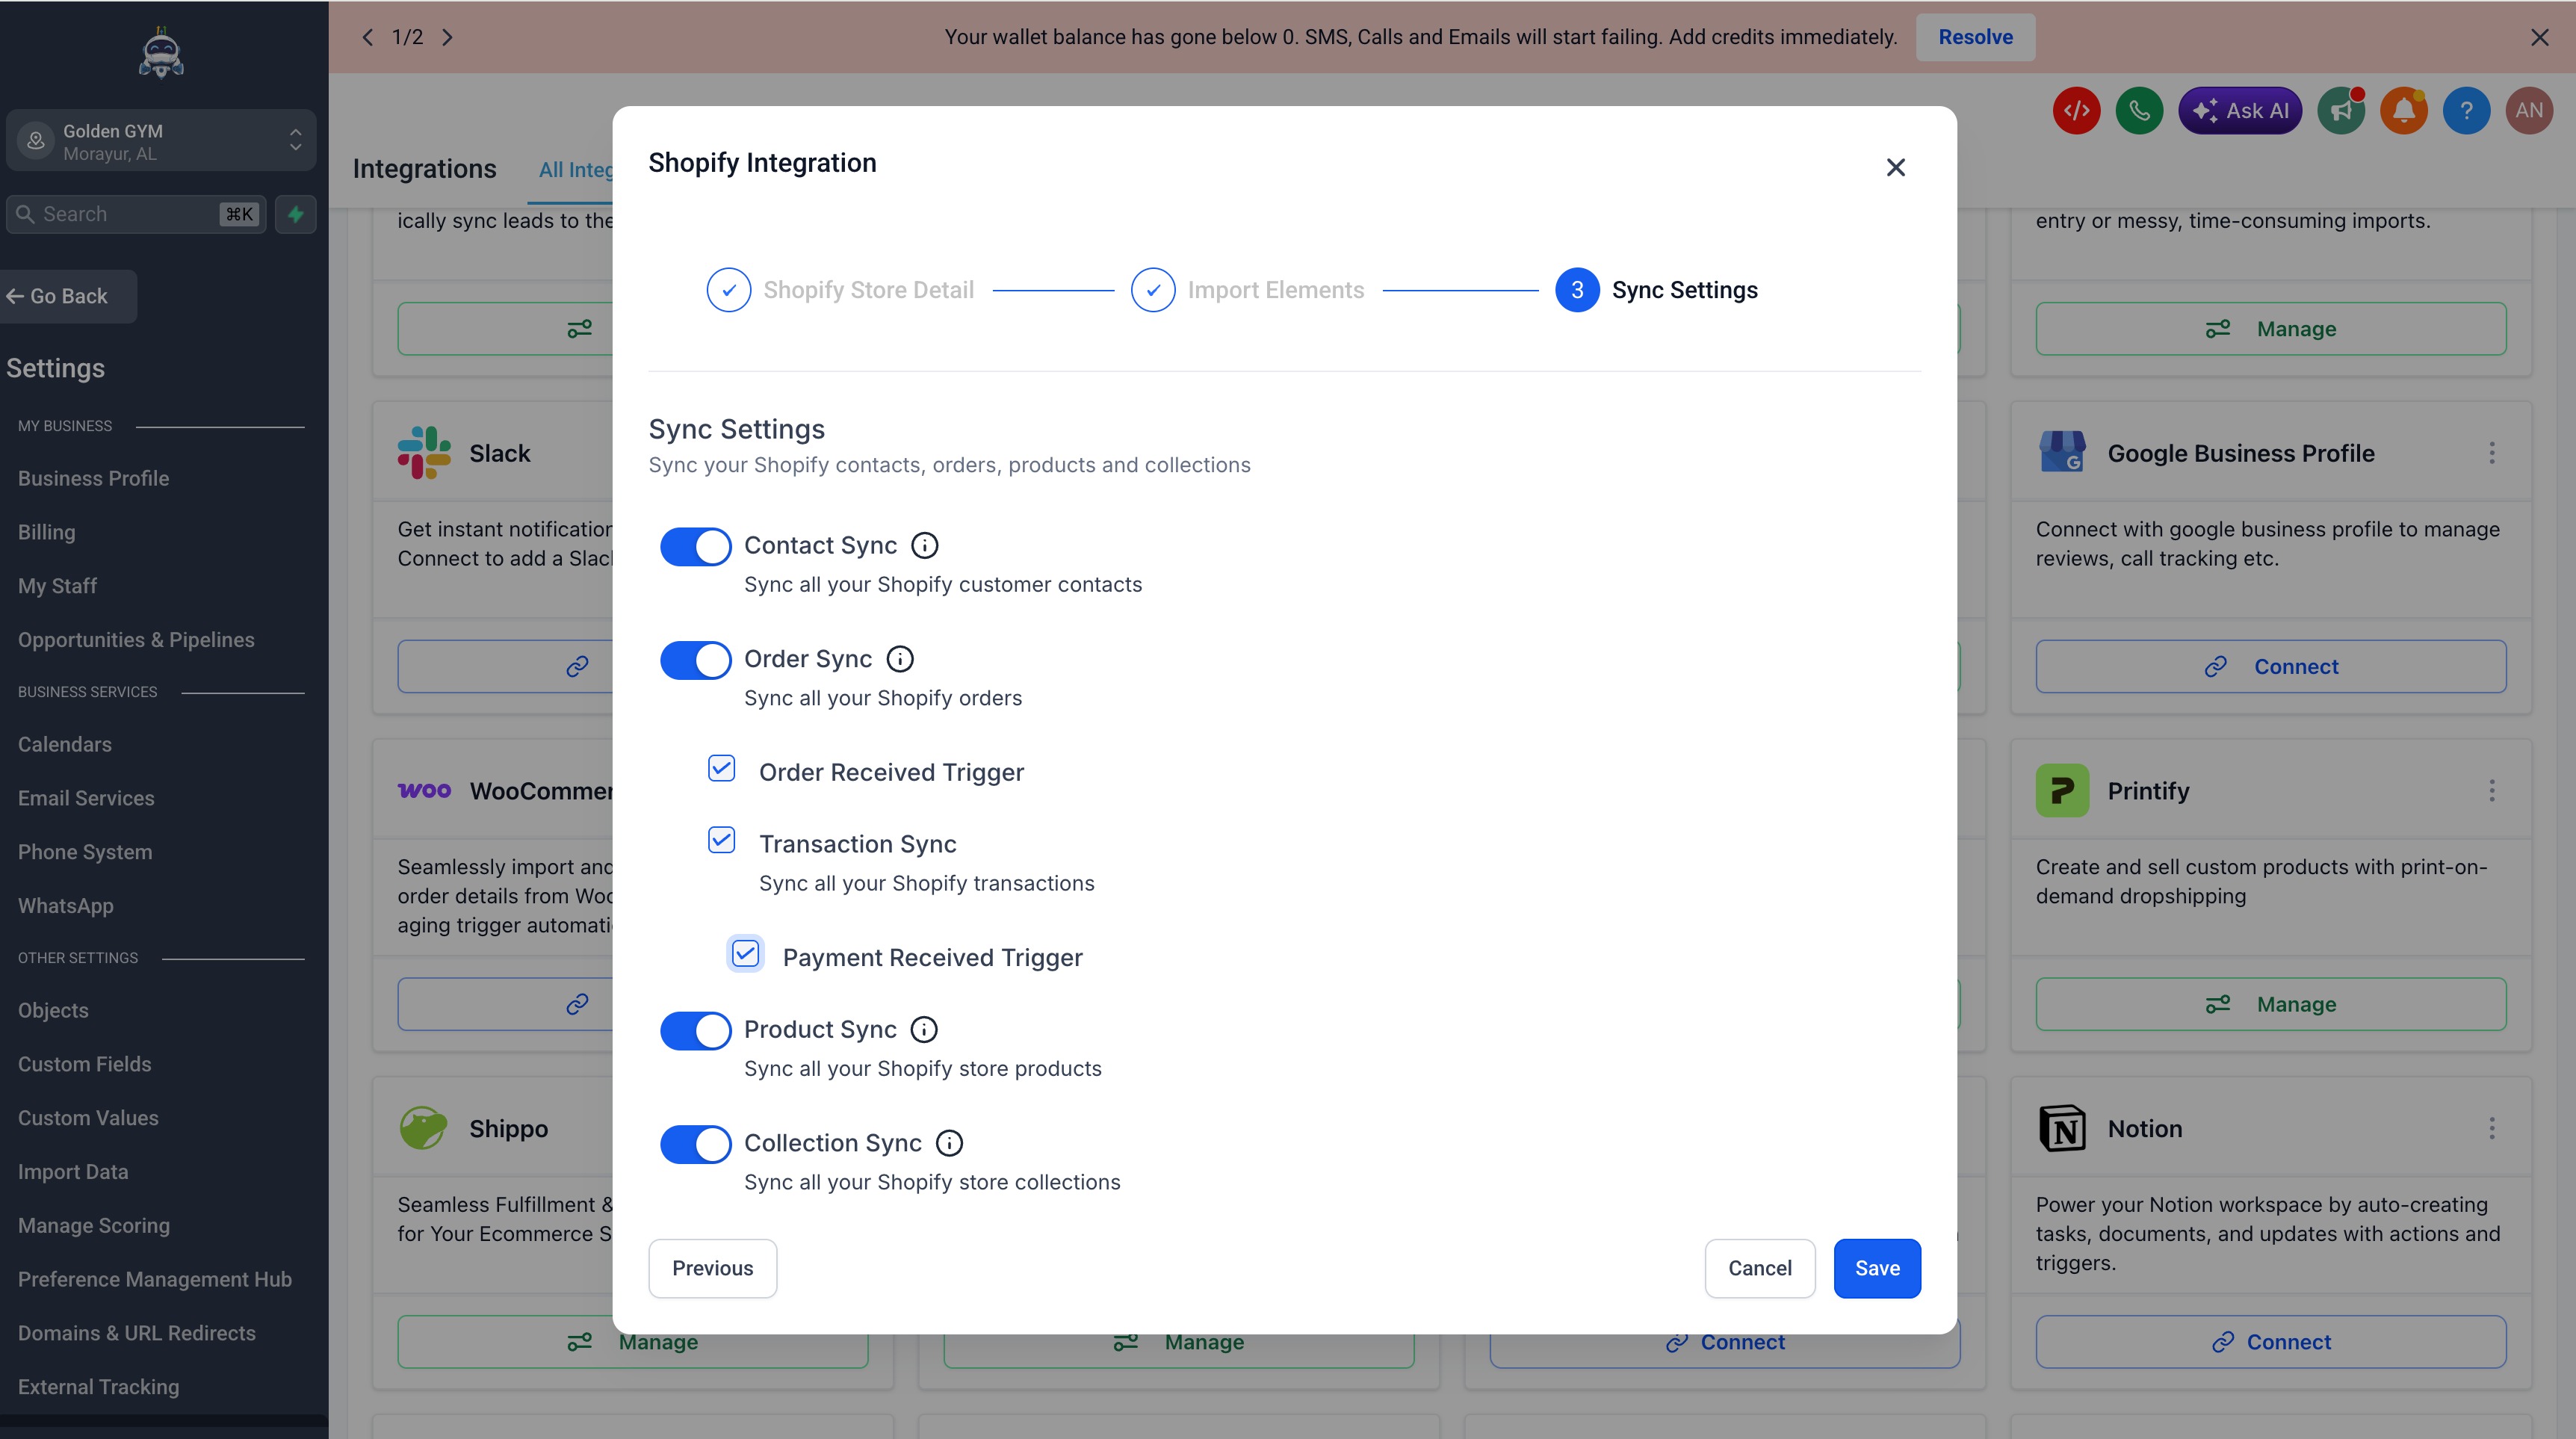
Sync Settings control which Shopify data continues syncing into SourCherry after the connection is active. These settings are different from the initial import because they apply to ongoing activity after setup.
Use Sync Settings to keep selected Shopify data updated in SourCherry. For example, enabling order sync can help new Shopify order activity become available for supported ecommerce workflows and follow-up actions.
Before selecting sync options, confirm which Shopify data your team needs in SourCherry. Turning off a sync option later may stop future syncing, but it may not remove records that were already imported or synced.
Important Notes and Limitations
Shopify sync behavior may vary depending on Shopify plan access, selected settings, and the type of data being synced. Reviewing these notes before setup helps prevent confusion after the connection is active.
- Shopify data that has already been imported or synced into SourCherry may remain in SourCherry even if the related sync setting is turned off later.
- Shopify Basic plan users may experience limitations with certain data types depending on Shopify API access and plan restrictions.
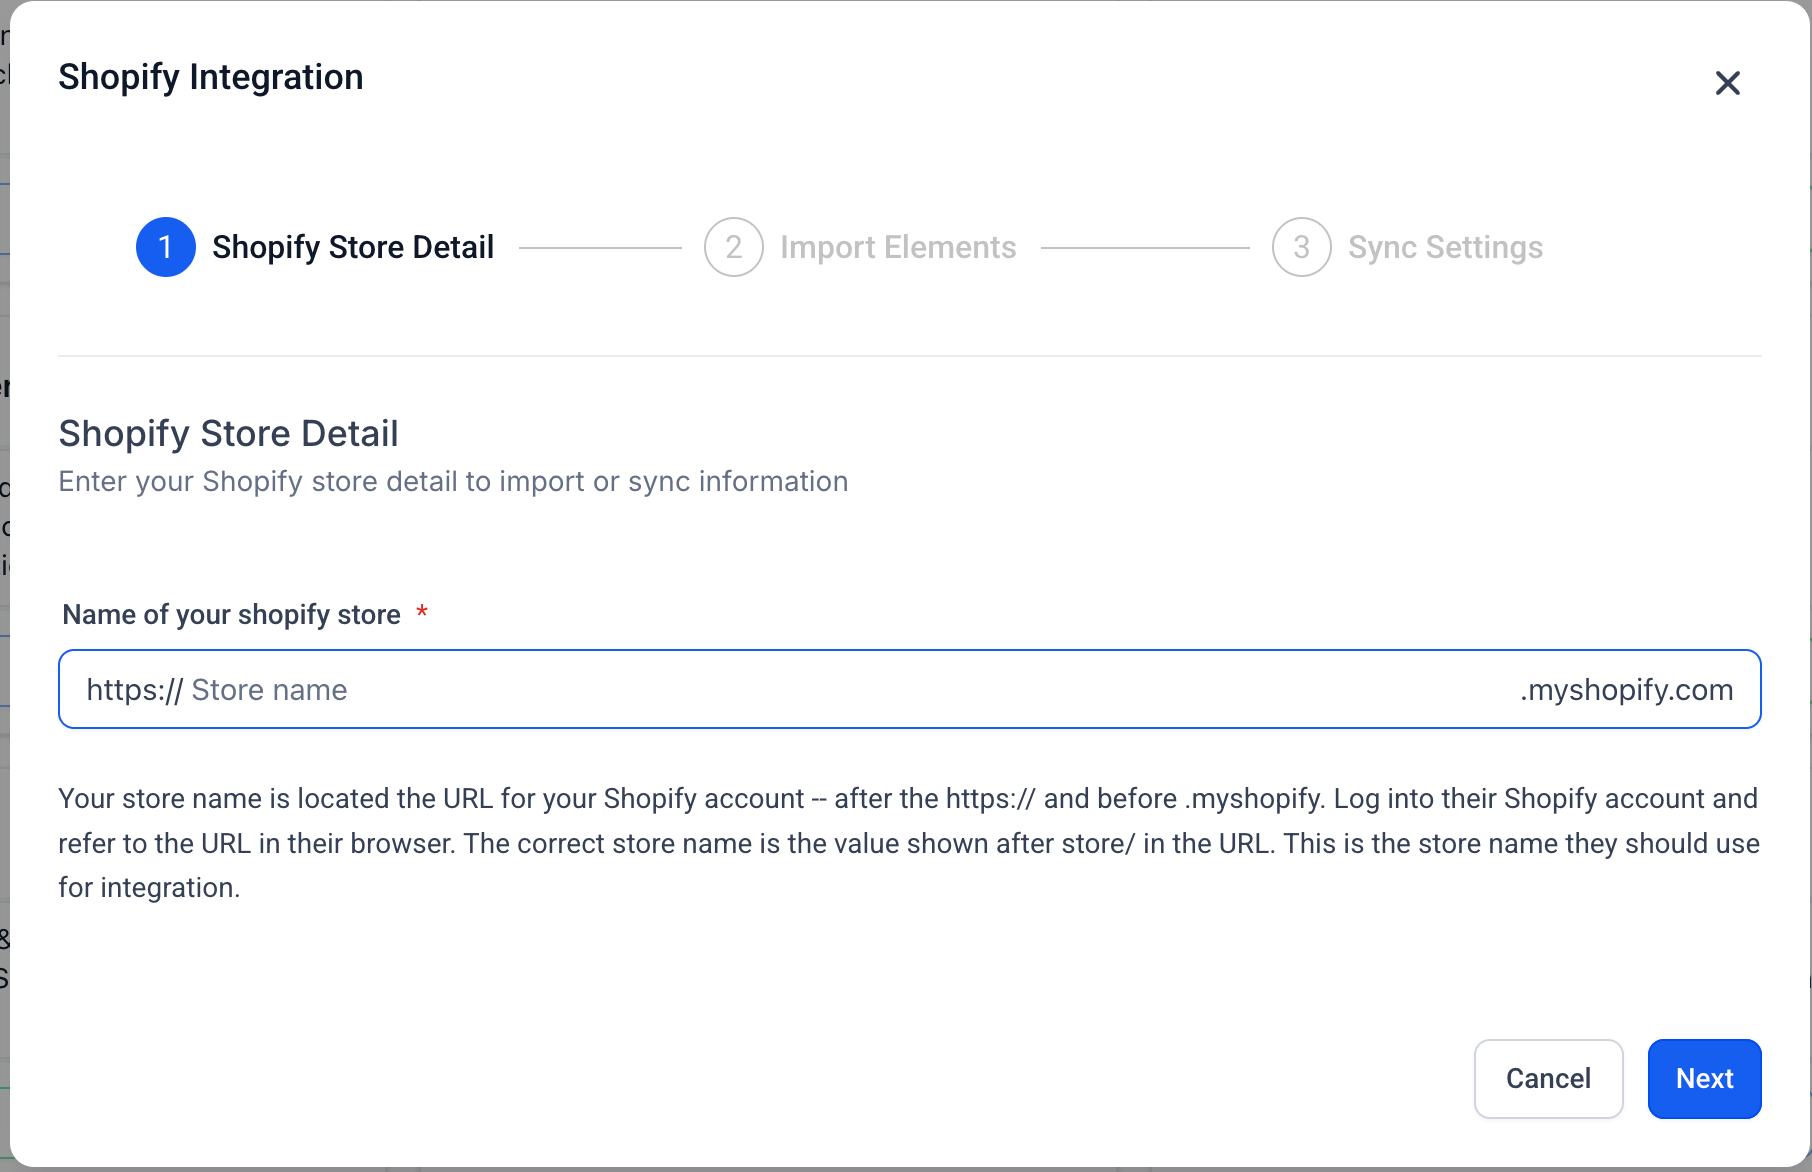
- Use the exact Shopify store name or store URL when prompted during setup.
- Existing Custom App method connections should not be disconnected unless the user is ready to reconnect using the current supported connection flow.
- Shopify workflow triggers may change over time. SourCherry’s workflow trigger list currently identifies some older Shopify-specific triggers as deprecating soon, including Shopify Abandoned Cart and Shopify Order Fulfilled, while newer ecommerce store triggers are available for current store connections.
How To Setup the Shopify Integration
A proper Shopify setup ensures SourCherry receives the correct ecommerce data and keeps the right records syncing after connection. Review your import and sync choices before completing setup so your store data supports the workflows, reporting, and follow-up processes your team needs.
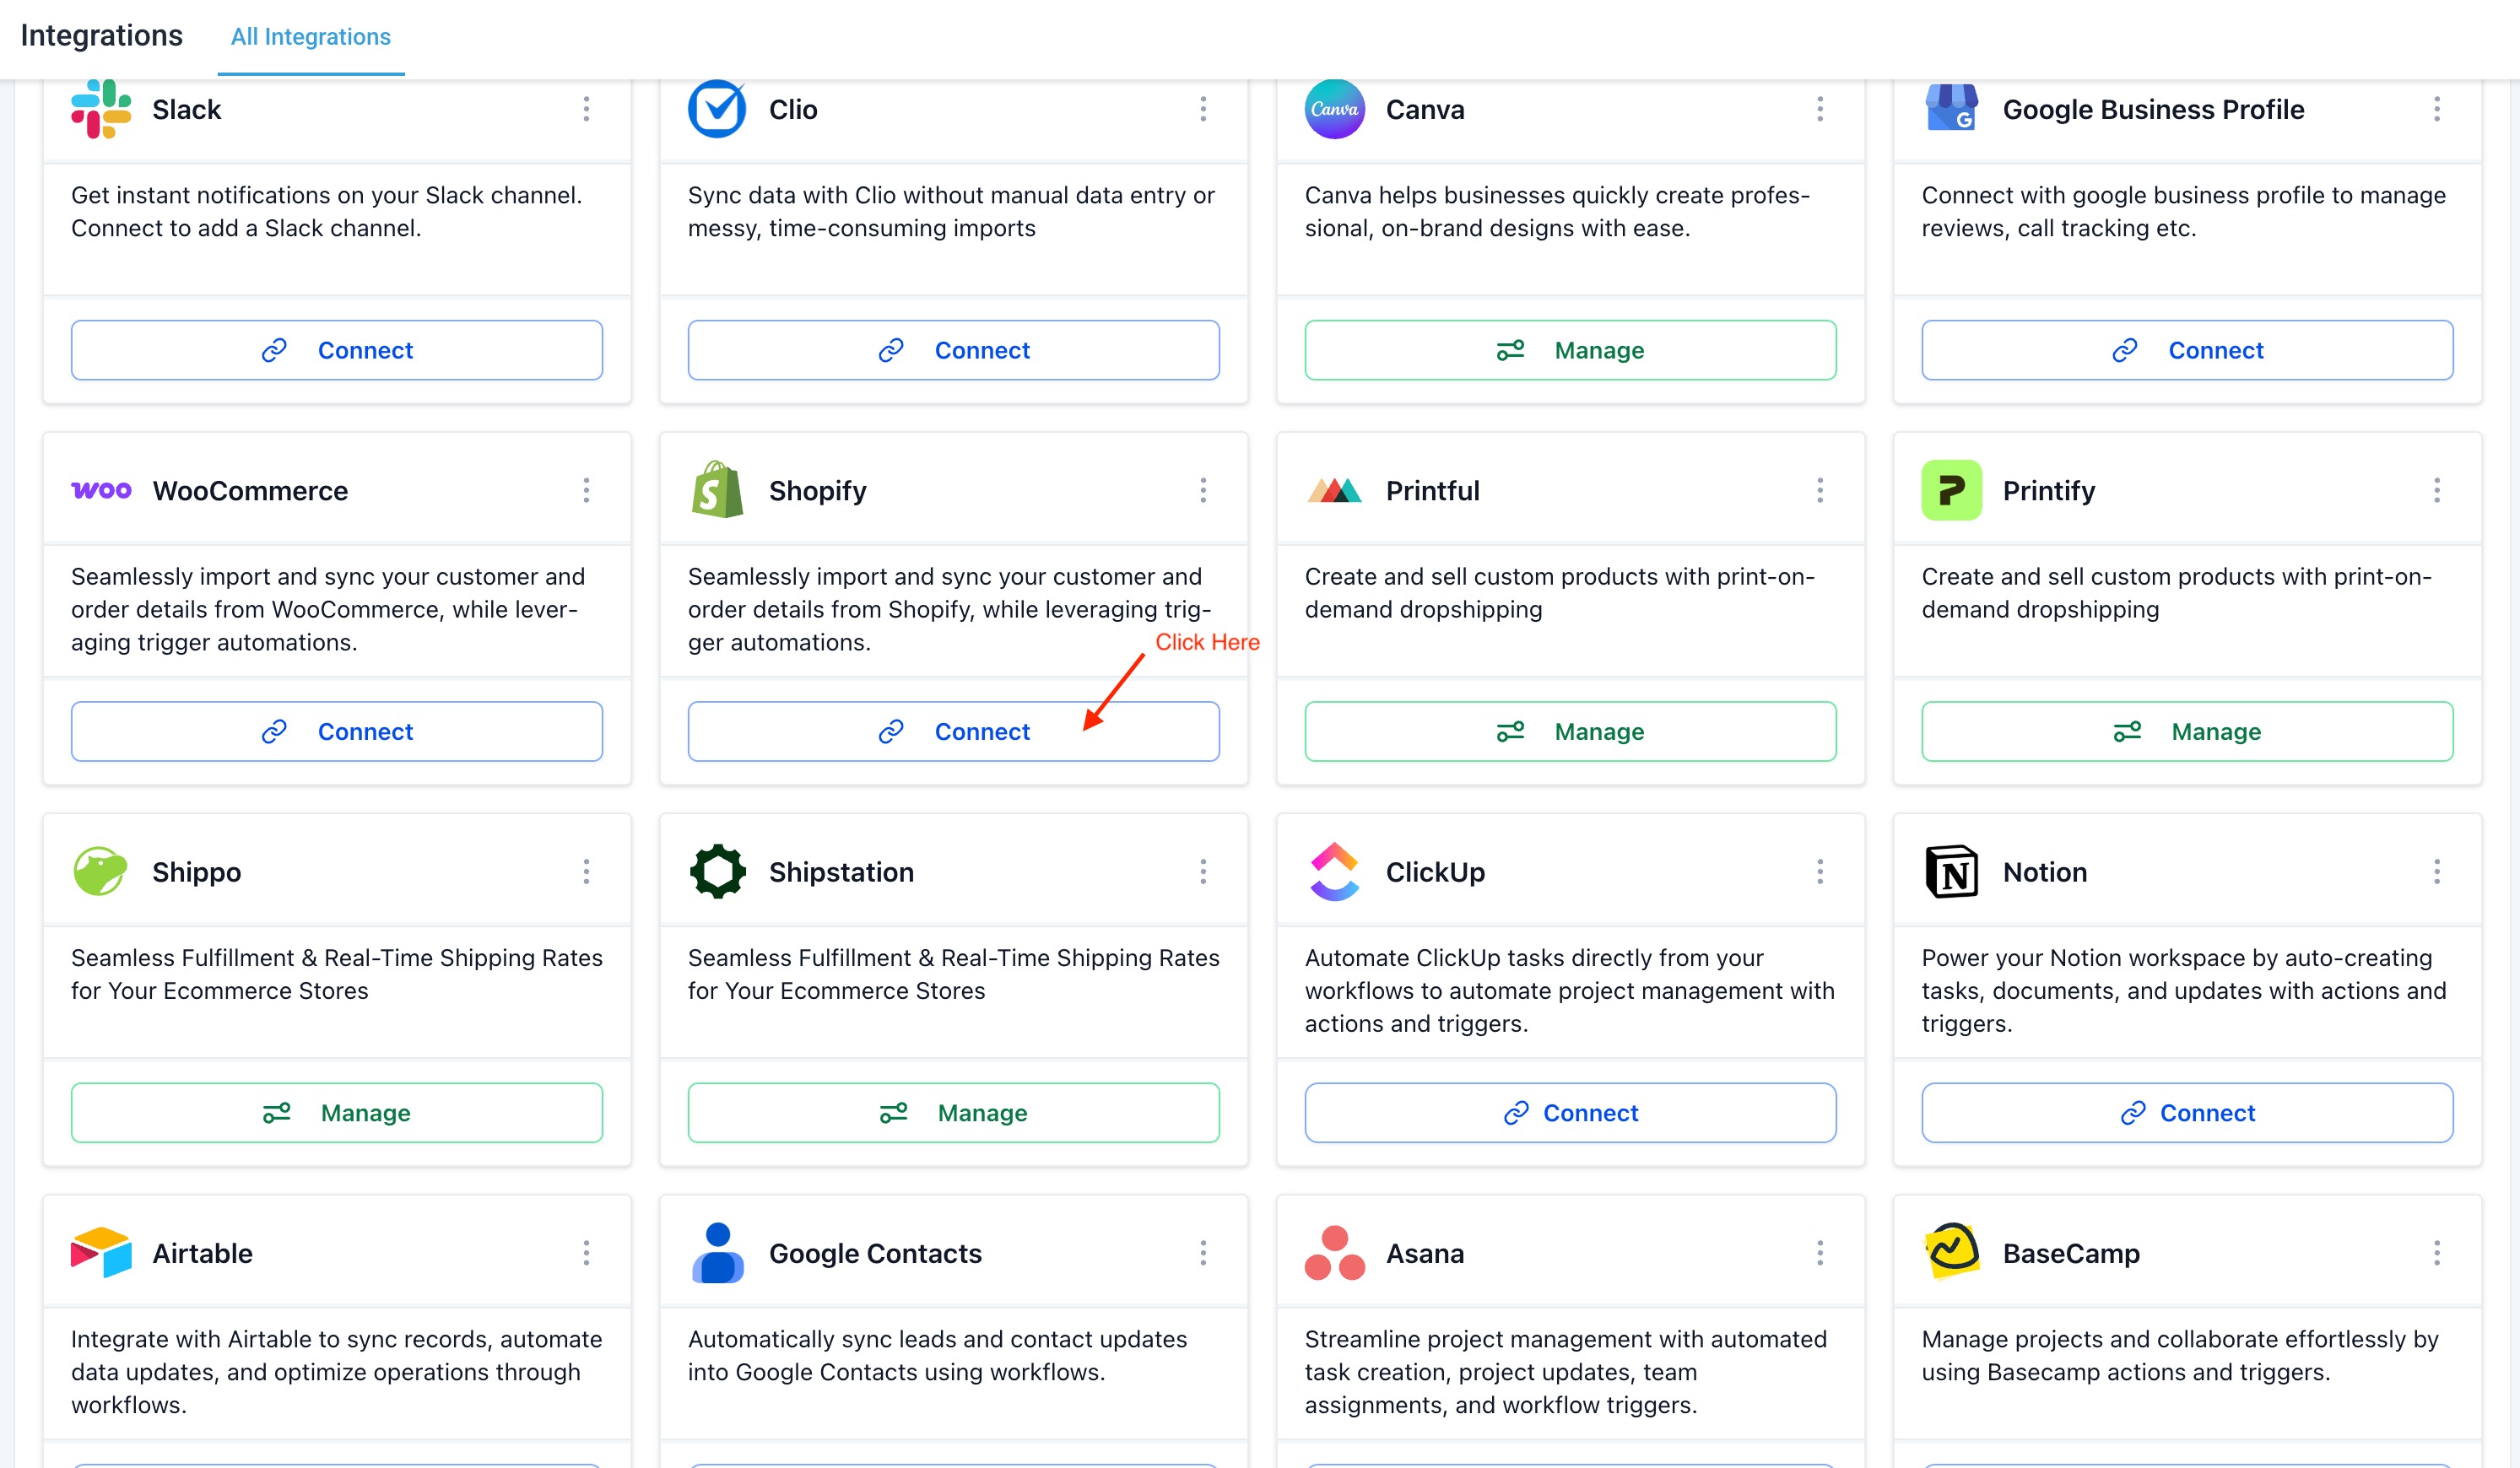
- Open the sub-account and go to Settings > Integrations > Shopify.
- Click Connect.
- Enter your Shopify store URL or store name and click Next.
- On the Import Elements screen, select the Shopify data you want to import as a one-time historical import:
- Contact Import
- Order Import
- Transaction Import
- Product Import
- Collection Import
- Contact Import
- Click Next to proceed to the Sync Settings screen. Select the data and triggers you want to keep syncing going forward:
- Contact Sync
- Order Sync
- Order Received Trigger
- Transaction Sync
- Payment Received Trigger
- Product Sync
- Collection Sync
- Contact Sync
- Click Save. This will initiate the OAuth authorization flow and redirect you to Shopify.
On the Shopify Install app screen, review the permissions requested and click Install.
Once approved, you will be redirected back and your Shopify store will be connected.
Tip: For a full Shopify store migration, select all available import and sync options unless your migration plan requires only specific data types. This helps ensure supported historical data is imported and future Shopify activity continues syncing.
Notes:

Taxes are not mapped in Products while importing or syncing the Products.

For each order, only one transaction is created in your sub-account.

Order statuses are marked as "Completed" or "Cancelled" when synced with Shopify.

Merged contacts in Shopify will have the primary contact updated in Sub-account.

If there are no changes to the SEO details in Shopify (default SEO settings), the data will be received as null in Sub-account.
Frequently Asked Questions
Q: Do I need to create a Shopify custom app to connect Shopify?
A: New Shopify connections should use the OAuth App method when available. The older Custom App method requires creating a Shopify custom app and using an Admin API access token, but this should be treated as a legacy setup path unless specifically required.
Q: What is the difference between Import Elements and Sync Settings?
A: Import Elements bring selected historical Shopify records into SourCherry during setup. Sync Settings control which selected Shopify data continues syncing into SourCherry after the connection is active.
Q: Can I change my Shopify sync settings later?
A: Sync settings may be adjustable after setup, but changing them generally affects future syncing. Data that was already imported or synced may remain in SourCherry.
Q: What Shopify data can be imported or synced?
A: SourCherry’s Shopify migration guidance lists supported Shopify data such as products, collections, contacts, orders, and transactions. Availability may depend on the connection flow, Shopify access, and selected settings.
Q: Can Shopify data be used in workflows?
A: Yes. Synced Shopify activity can support ecommerce-related automation in SourCherry. For example, SourCherry supports an Abandoned Checkout trigger for native SourCherry ecommerce stores and connected external stores such as Shopify.
Q: Should I use the Shopify Abandoned Cart trigger?
A: Use the newer ecommerce abandoned checkout trigger when building new abandoned checkout automations. SourCherry’s workflow trigger guidance identifies the Shopify Abandoned Cart trigger as deprecating soon.
Q: What happens if I disconnect my existing Custom App Shopify connection?
A: Existing legacy Custom App connections may continue working while connected. If disconnected, users may need to reconnect using the current OAuth App flow.
Q: Where do I find my Shopify store name?
A: Use the store name or Shopify store URL associated with the Shopify admin account you want to connect. Confirm the store details in Shopify before authorizing the connection.