
This article will show you how to create professional document or contract templates — such as proposals, estimates, or service agreements — and send them automatically using workflows in SourCherry. You’ll learn how to build templates, insert custom data, trigger documents to send, and track their completion status in your CRM.
More Tutorials From the Community
TABLE OF CONTENTS
- What is the Documents & Contracts Feature?
- Key Benefits of Sending Documents & Contracts Using Workflows
- How to Create a Document or Contract Template
- How to Send the Document Automatically via Workflow
- What the Contact Receives
- How to Track Document Status
- Frequently Asked Questions
- Related Articles
What is the Documents & Contracts Feature?
The Documents & Contracts feature lets you create branded, legally binding templates — such as proposals, estimates, or service agreements — and automatically send them through workflows based on specific triggers like a tag being added or a pipeline stage change. This automation ensures documents are delivered at the right moment in your process, eliminates manual follow-up, and helps streamline your sales or onboarding workflows.
Key Benefits of Sending Documents & Contracts Using Workflows
Document automation helps streamline your service or sales pipeline while keeping interactions polished and compliant.
Send contracts automatically when specific triggers happen
Use reusable templates with dynamic content (custom values)
Collect legally binding e-signatures in seconds
Include pricing/product lists directly inside the document
Track document delivery, signing status, and completion
Set up workflows for follow-up actions once a document is signed
How to Create a Document or Contract Template
Templates are reusable and can include logos, custom values, pricing tables, and more.
Step 1: Open a New Document Template
- Navigate to Payments > Documents & Contracts > Templates.
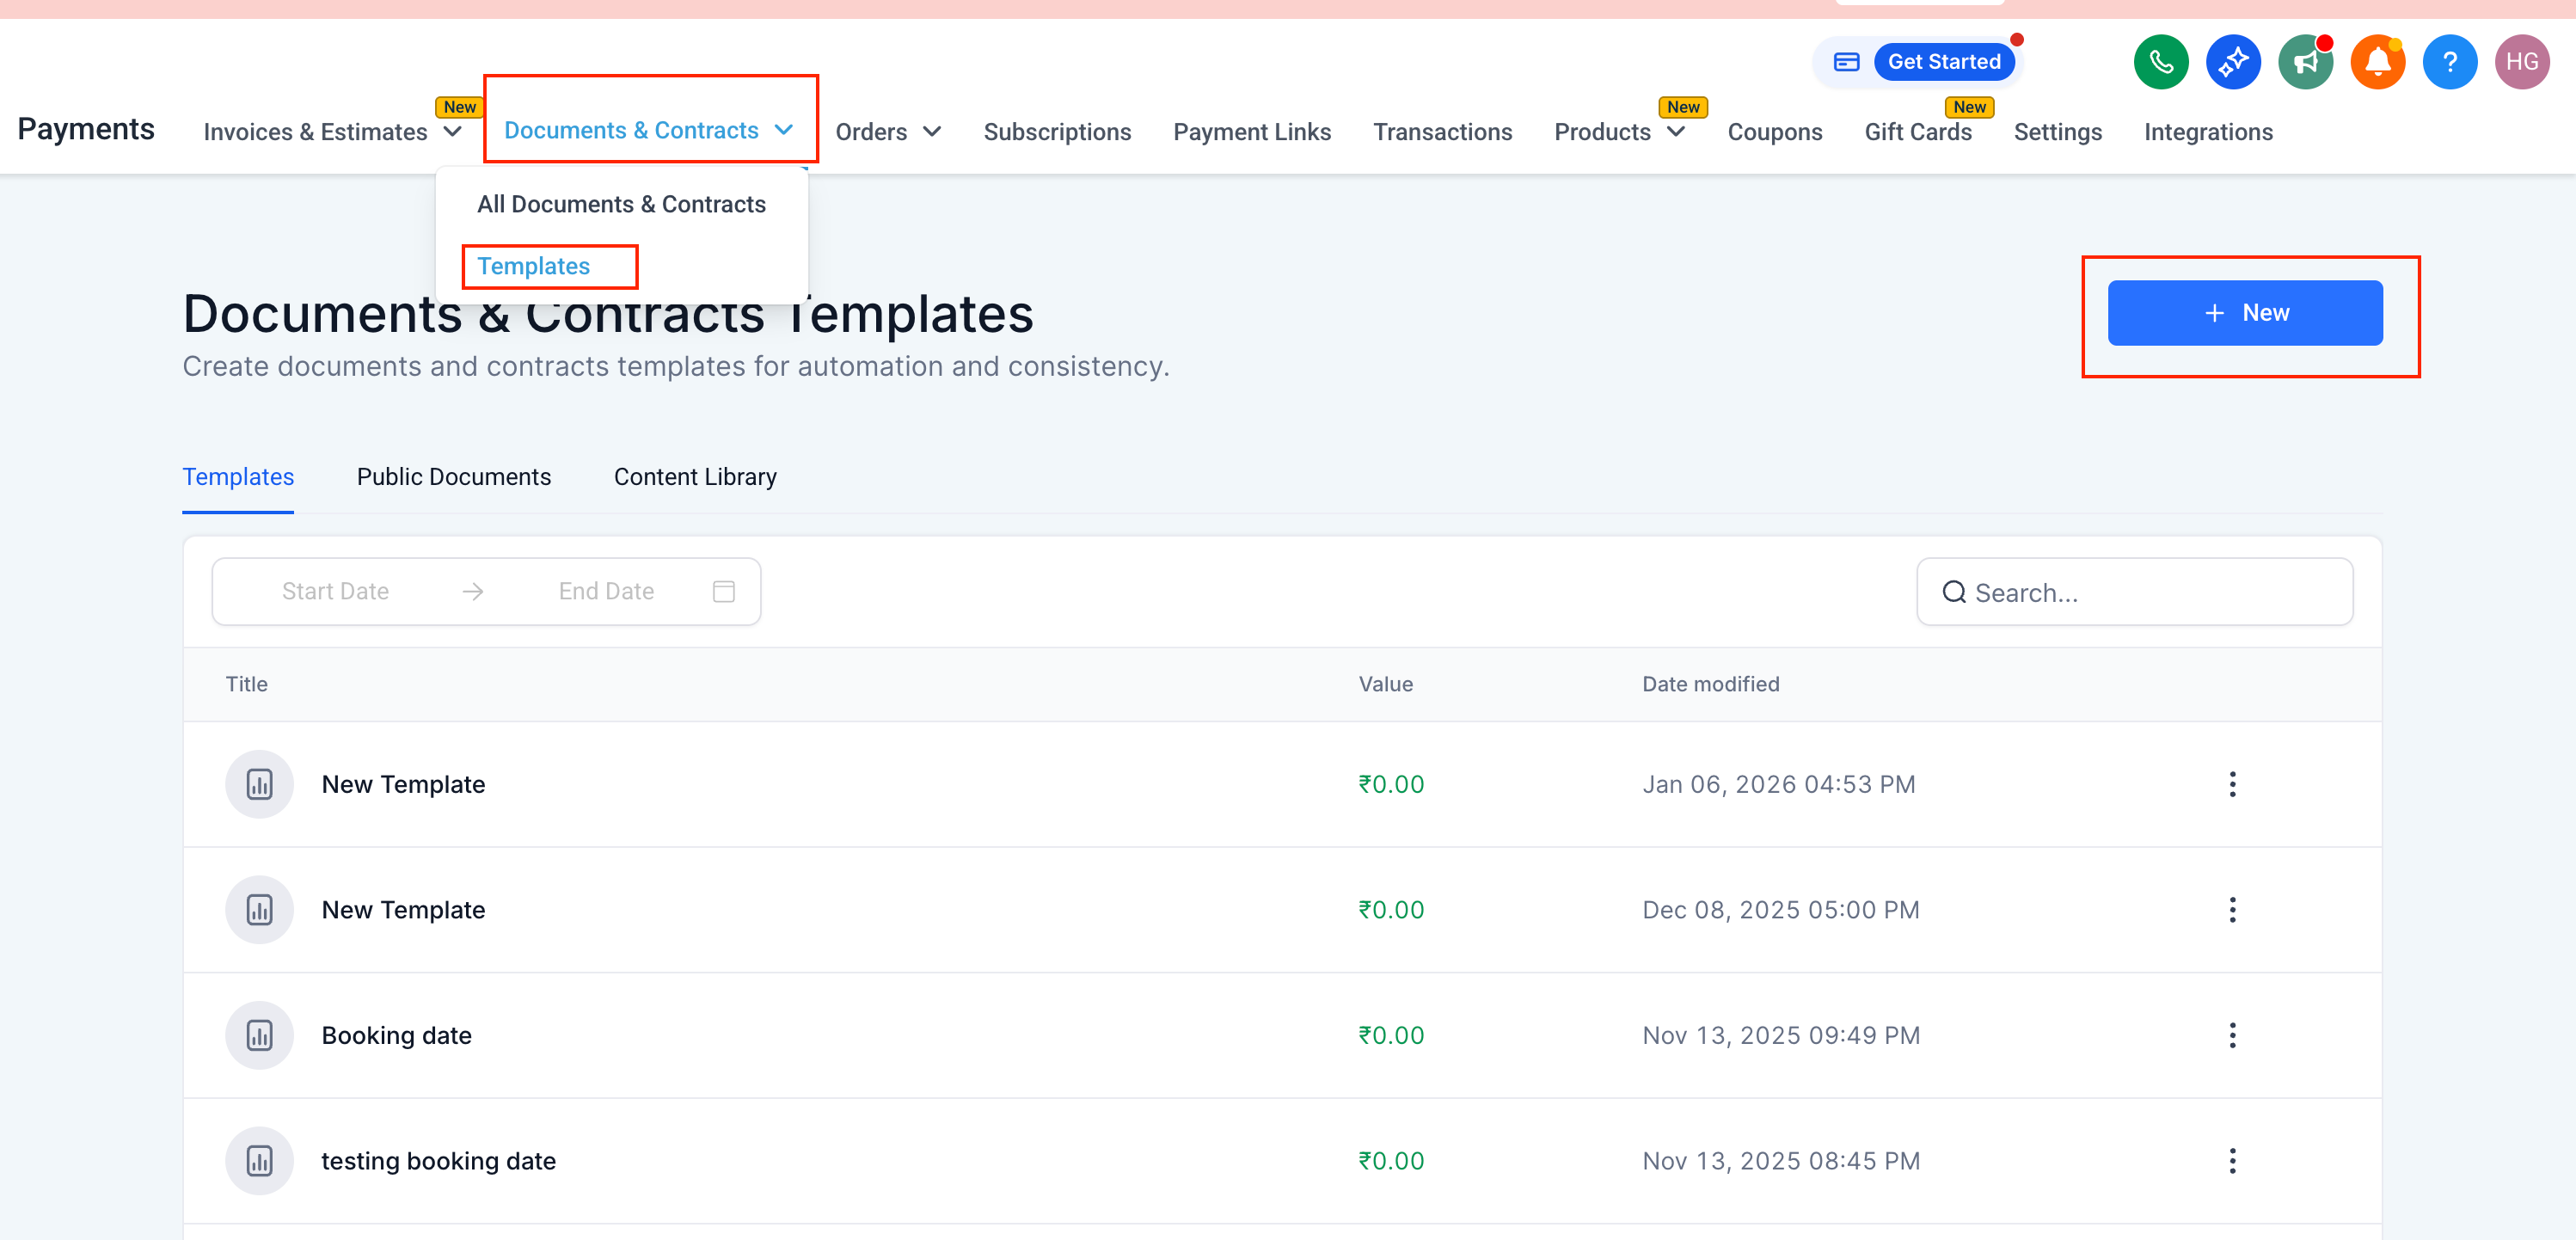
- Click + New → Create New Template.
- Give your template a name (e.g., "Proposal").
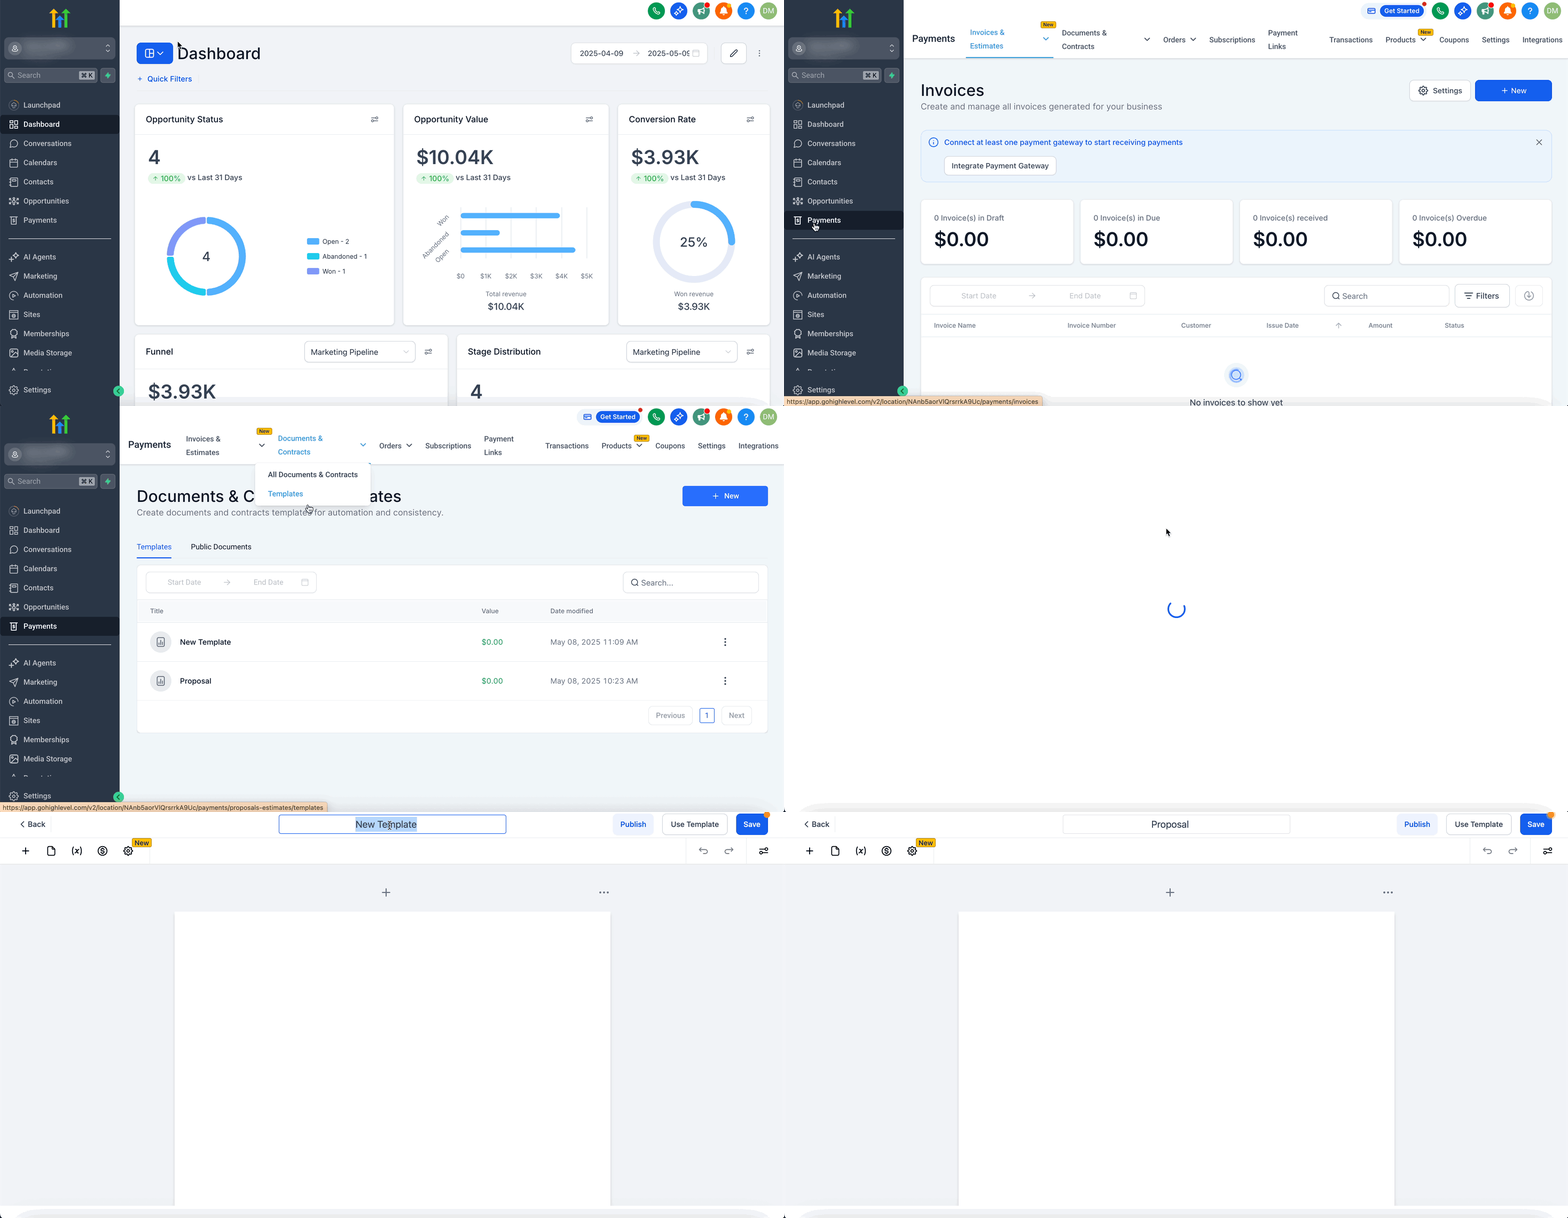
Step 2: Design the Document Template
Use Add Element to build the document:
Image: Upload a logo or branding element.
Text: Add contract terms, service descriptions, etc.
Custom Values: Insert dynamic fields like contact name or email.
Product List: Include services or items with pricing pulled from your catalog.
Signature Box: Add a space for the client to sign.
Click Save to store your template for future use.
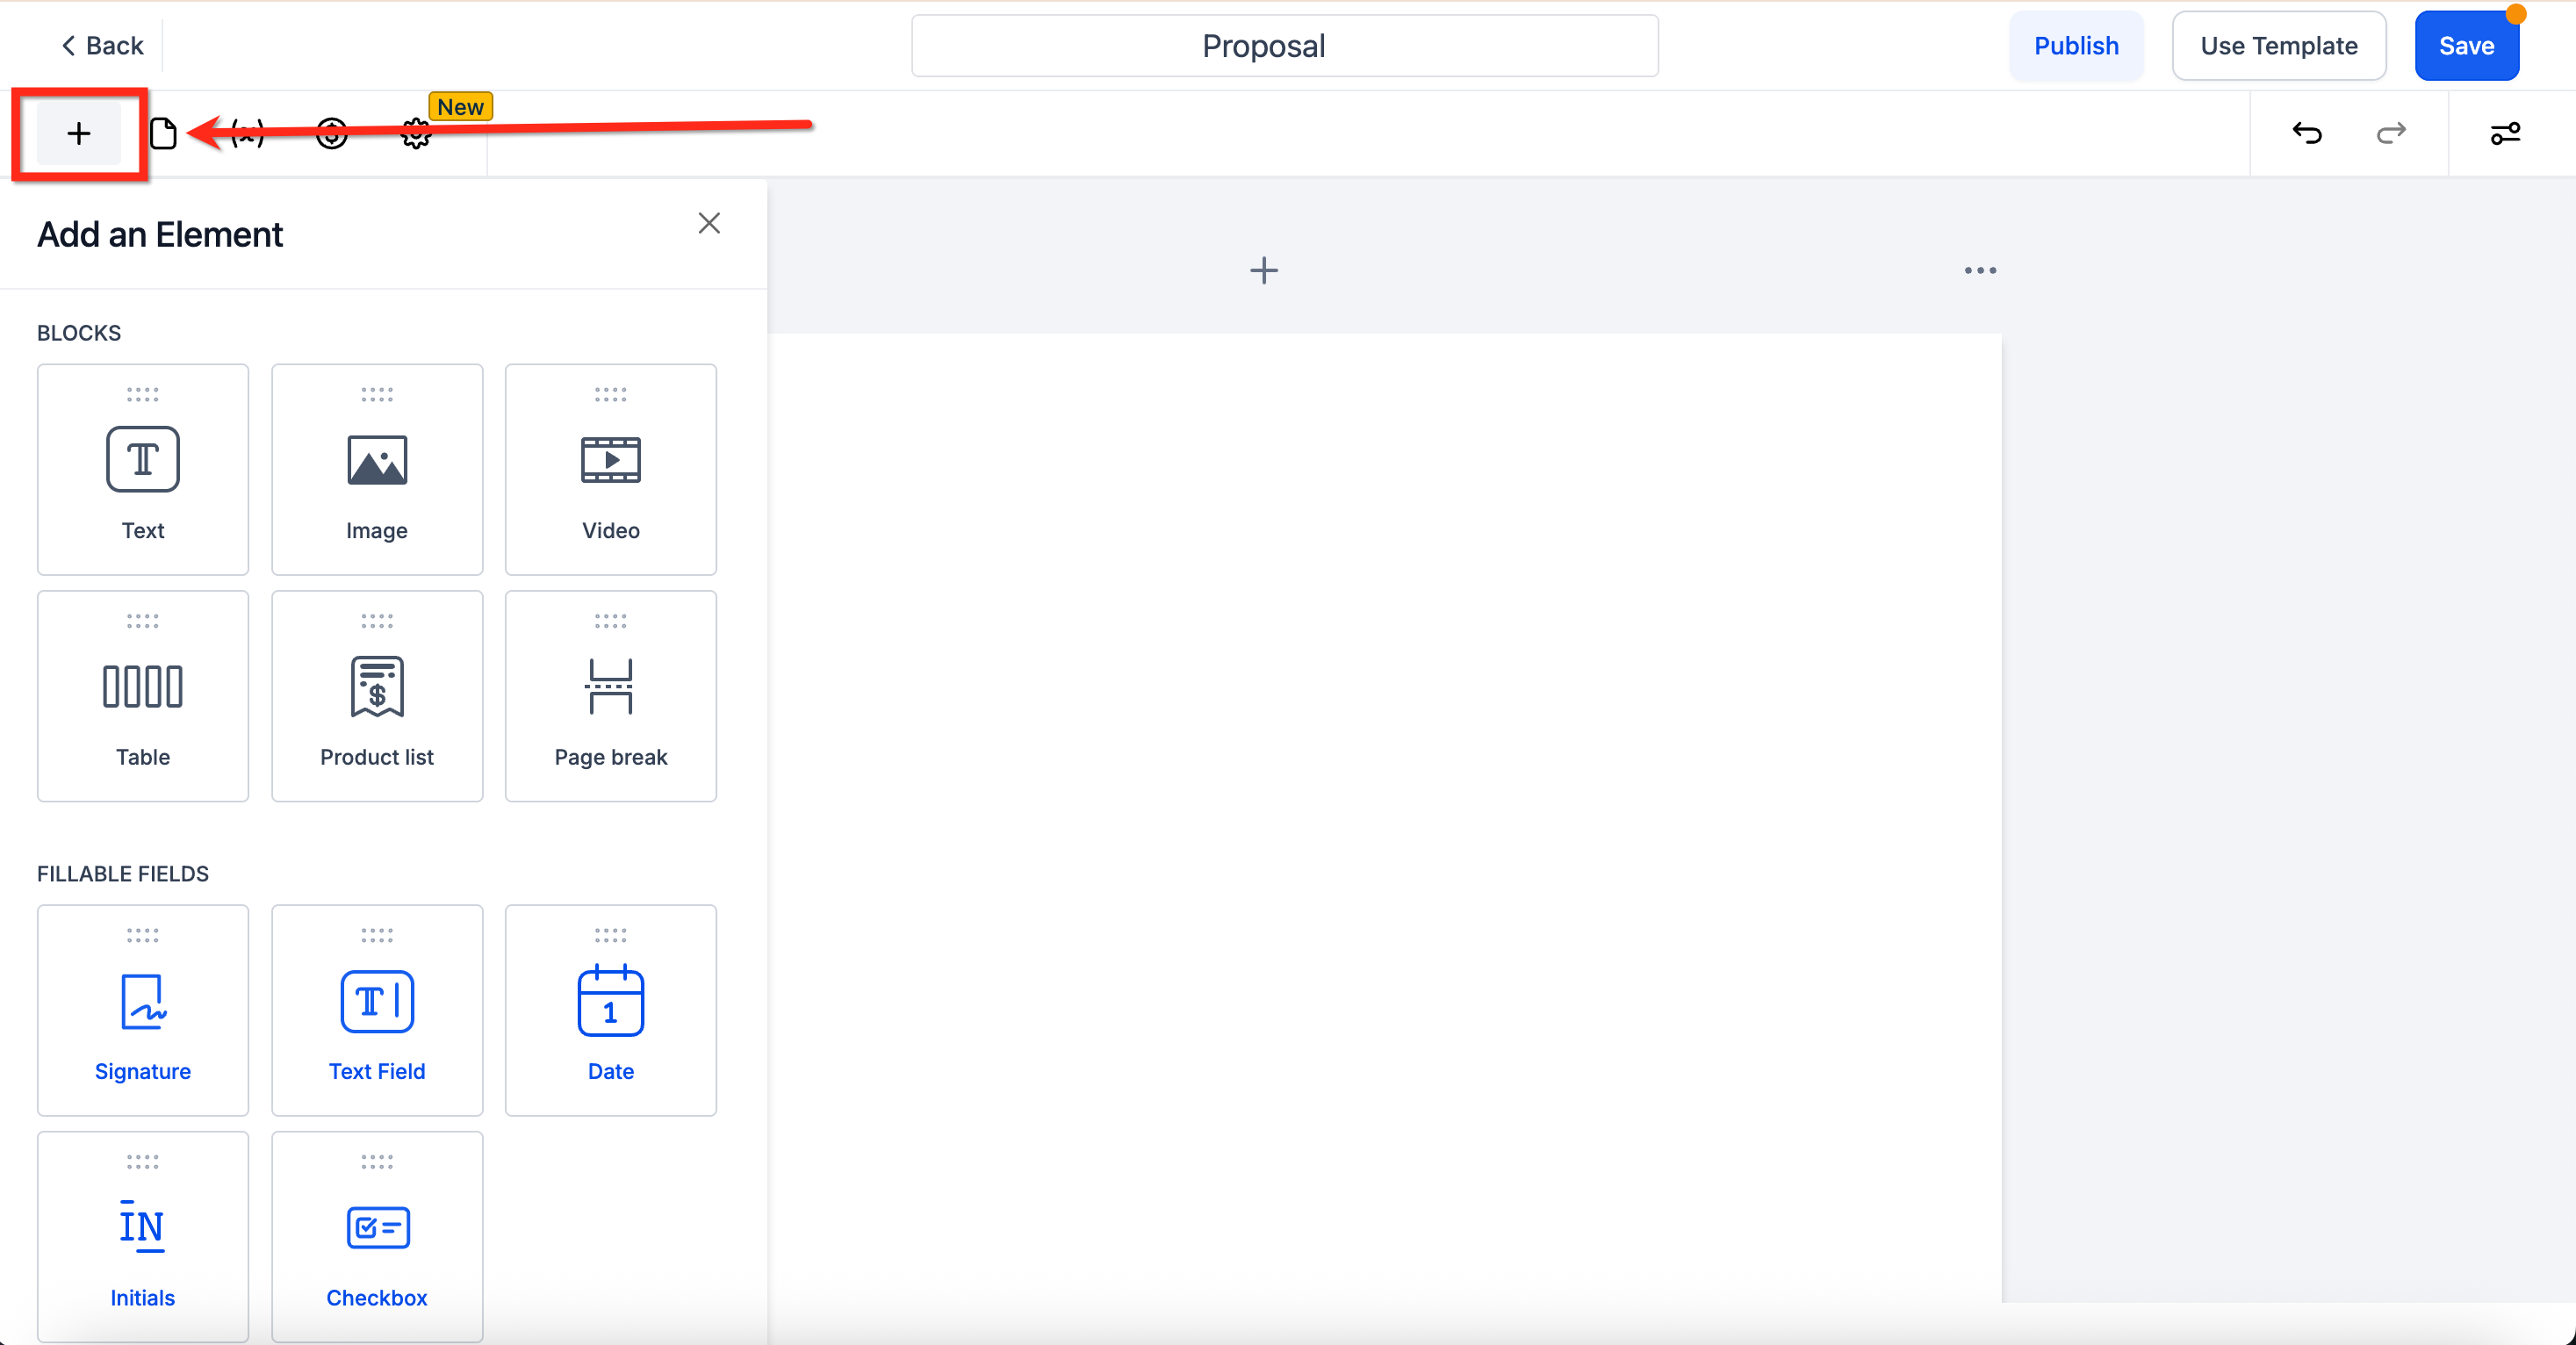
Note: You can edit a saved template anytime from the Templates tab. However, changes won’t apply retroactively to documents already sent or saved as drafts.How to Send the Document Automatically via Workflow
You can automatically send a document template when a specific event happens, such as a tag being added or a pipeline stage change. To use the "Send Documents & Contracts" action, your template must be saved, and the contact must have a valid email address.
Step 1: Create a New Workflow
- Go to Automation > Workflows
- Click + Create Workflow, and choose Start from Scratch.
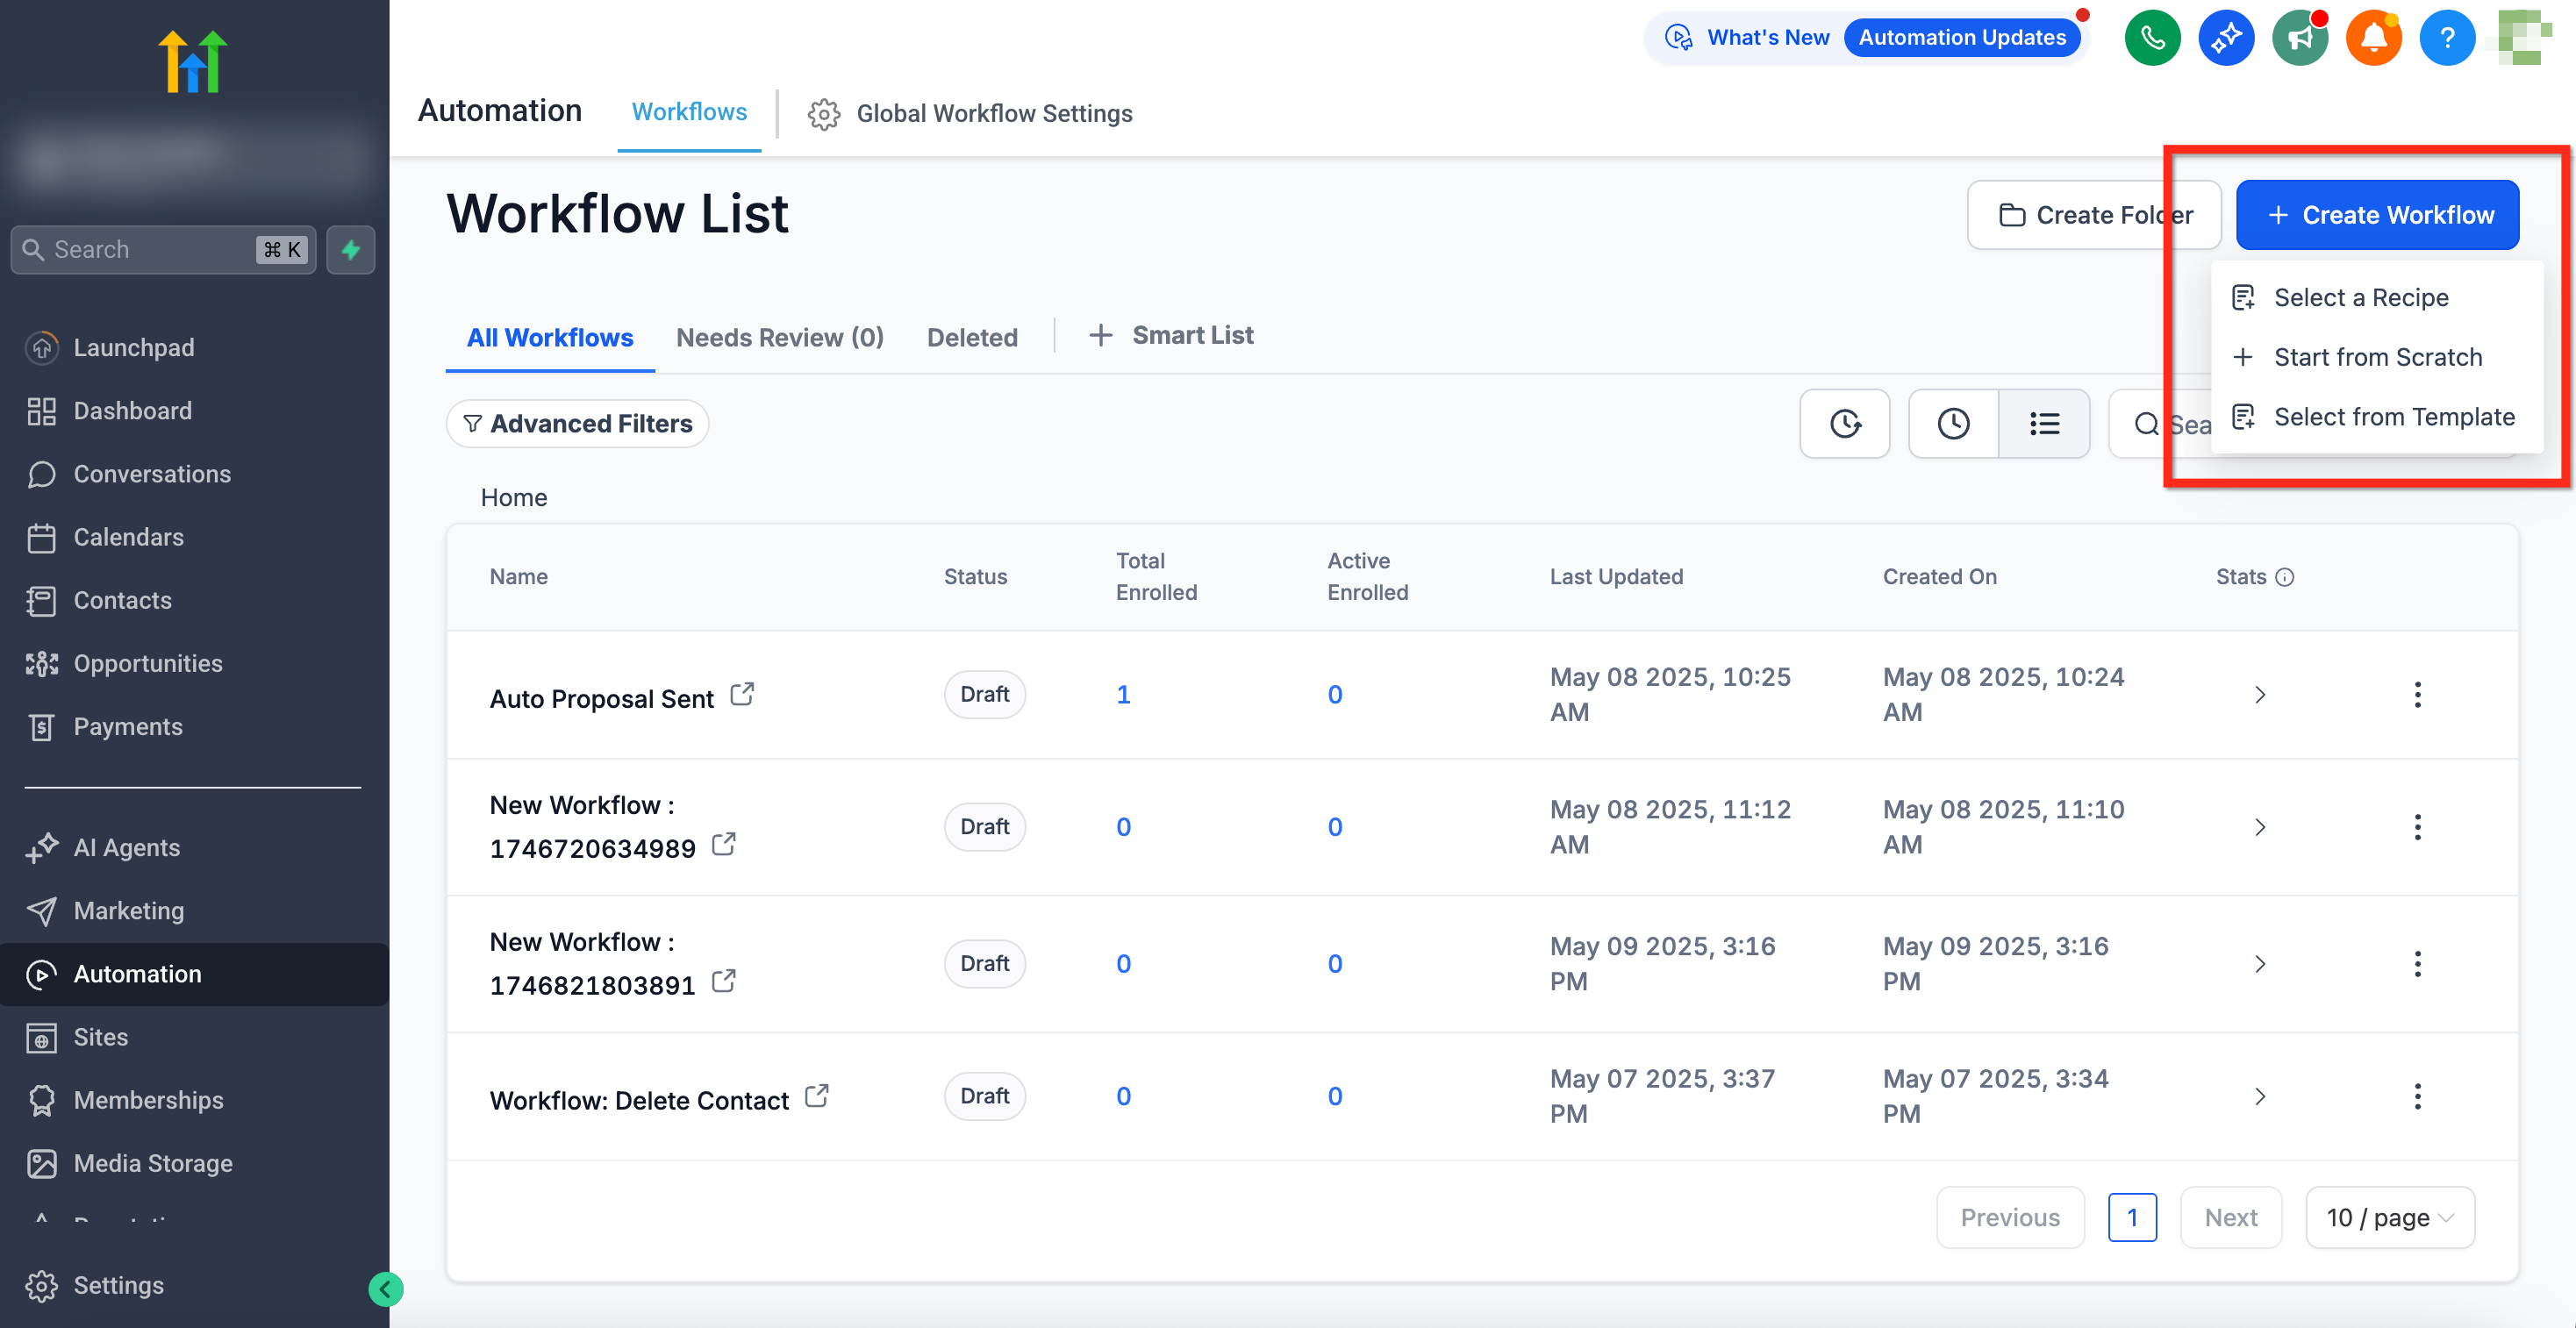
Step 2: Design the Workflow
- Select a trigger (such as Tag Added or Opportunity Updated)
Add the Send Documents & Contracts action:
Give the action a name
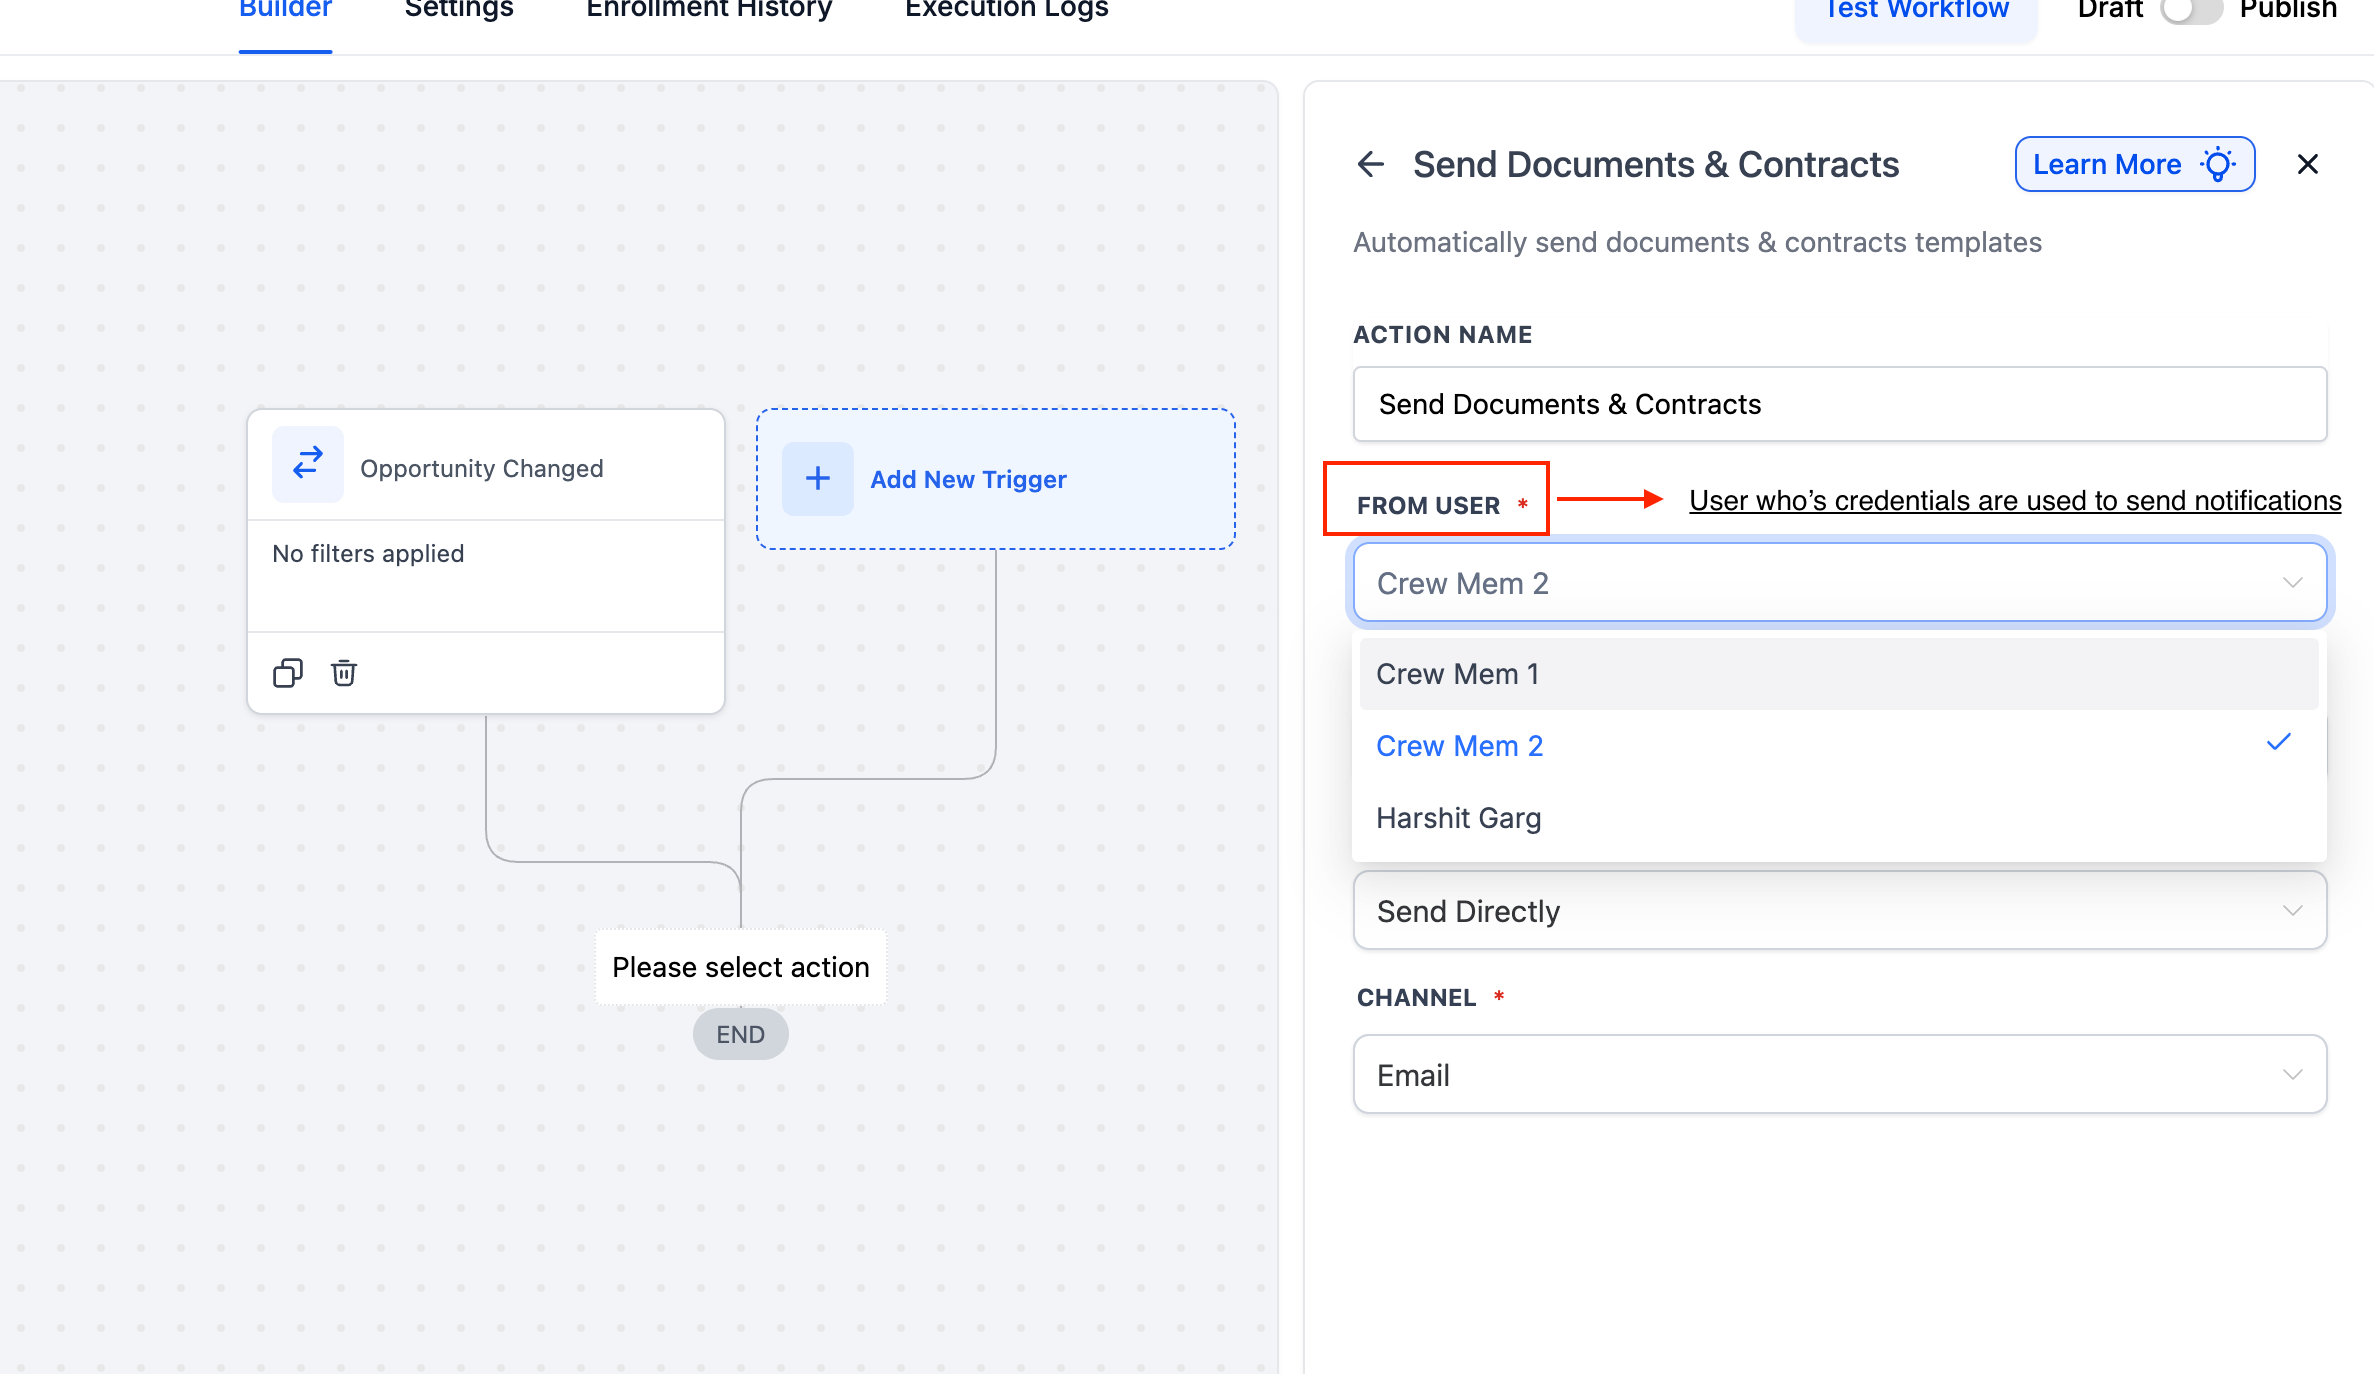
Choose the user the document should be sent “from”
Select the saved template (e.g., "Event Proposal")
Choose whether to Send Directly or Create as Draft
Choose a channel via which you want to send - Email, SMS, or both.
Note: Even when you choose SMS, the system still requires the contact to have an email on file. If the contact does not have an email, the contract can still be generated, but it will remain in Drafts until an email is added.
Click Save and then Publish the workflow.
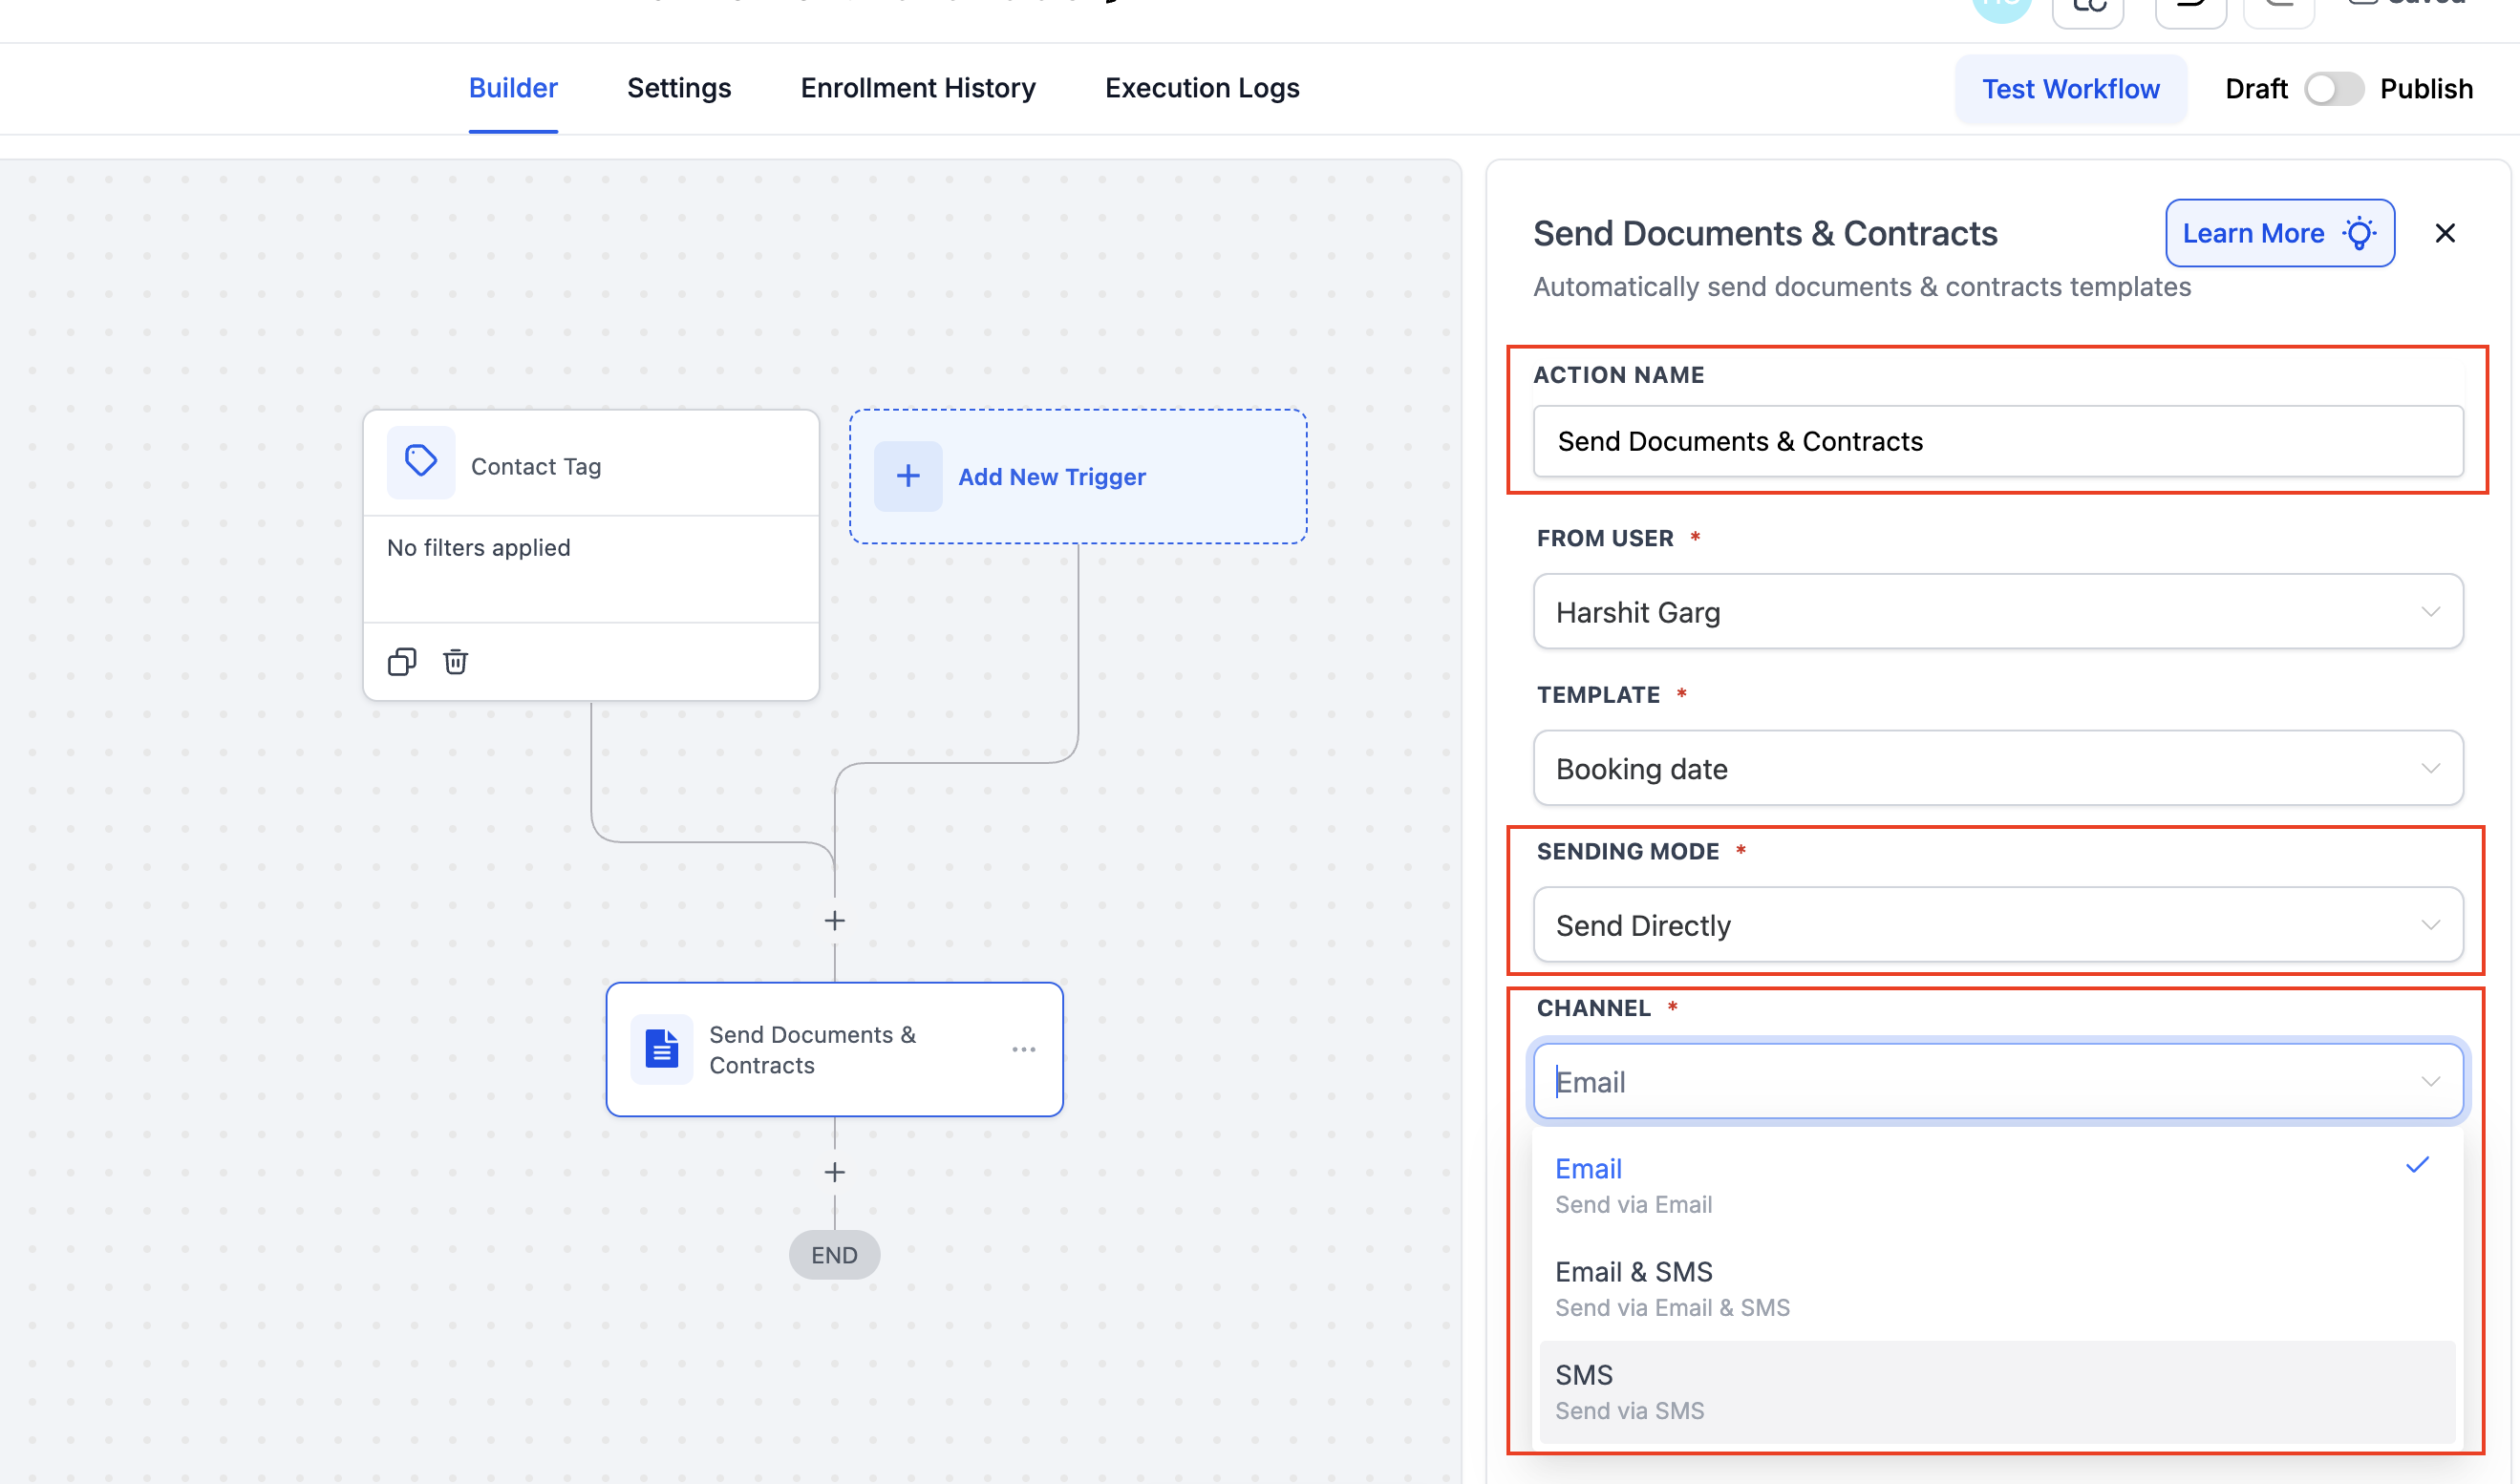
Pro Tip: Use “Create as Draft” if you want to review and manually send documents later.
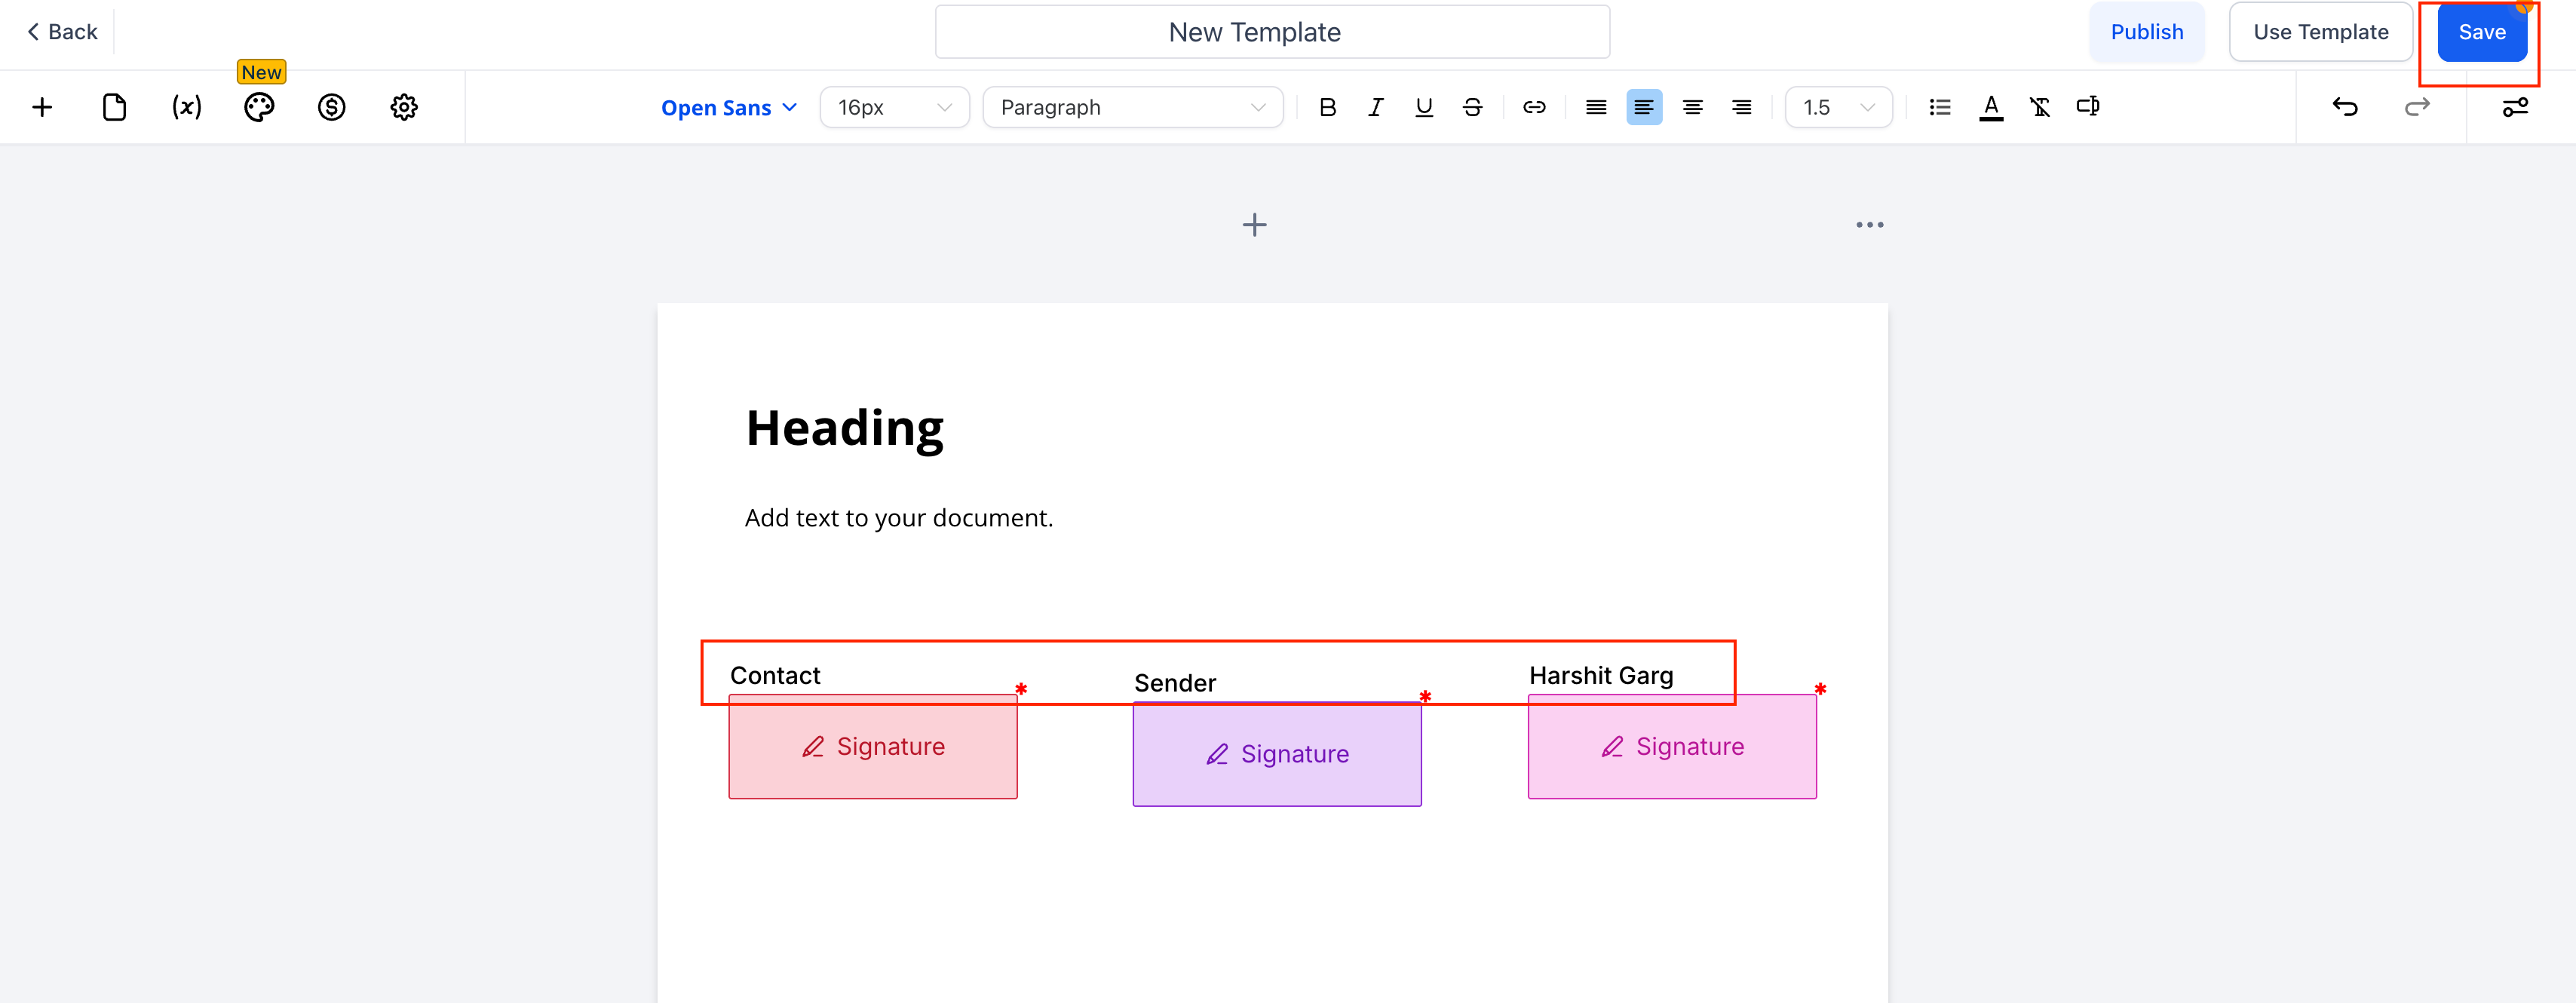
Set Signer to “Sender” in the Template
Designating a signer as Sender lets workflows assign the correct internal user at runtime, so you don’t edit the template for each sender.
Steps (Template Editor)
1. Go to Payments → Documents & Contracts → Templates and click New (or edit an existing template).
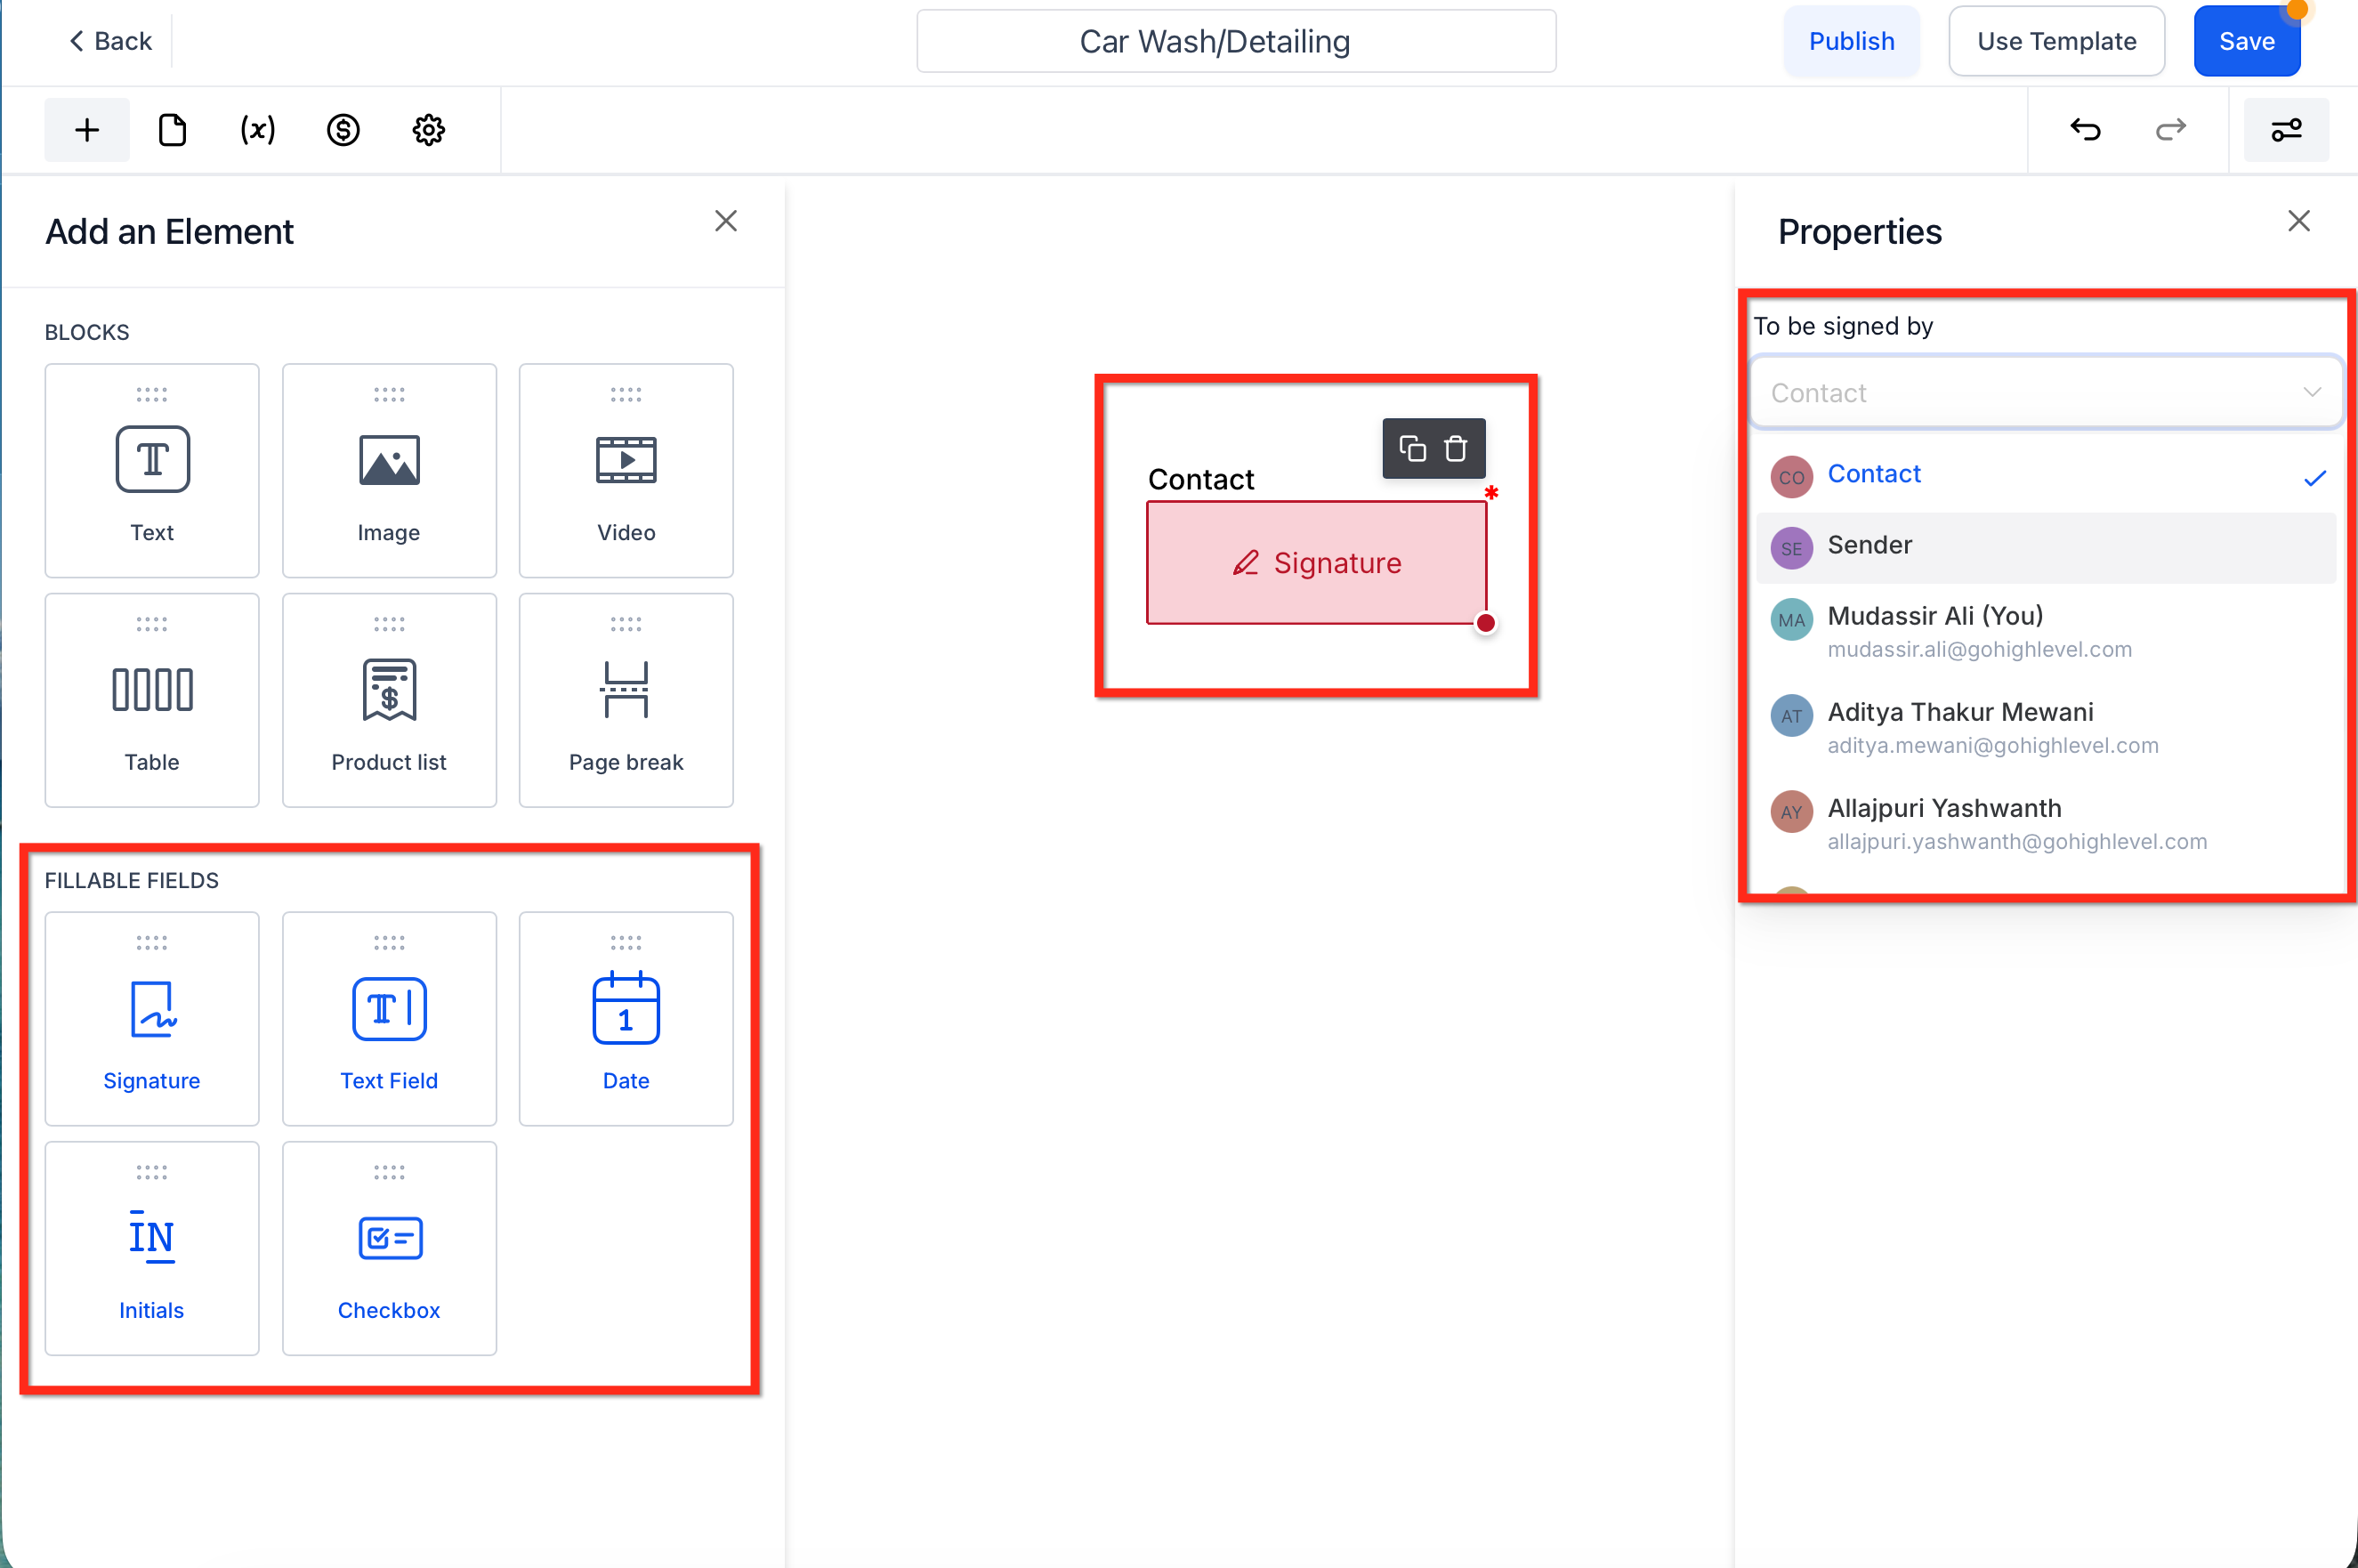
2. Add a Signature (or other fillable) field to the document.
3. In the field Properties, set To be signed by → Sender. “Sender” is the user who sends the document; workflows can map this dynamically.
Assign fillable fields to a specific staff member (template-level)
When you select a fillable field, you can assign it to a specific staff in your sub-account.
1. In the template editor, click a fillable field (for example, Signature).
2. In the right-side Properties panel, open To be signed by
3. Select the required staff member from the staff list.
4. Save the template.
When you use the template to generate a document, the selected staff member is pre-assigned to that field.
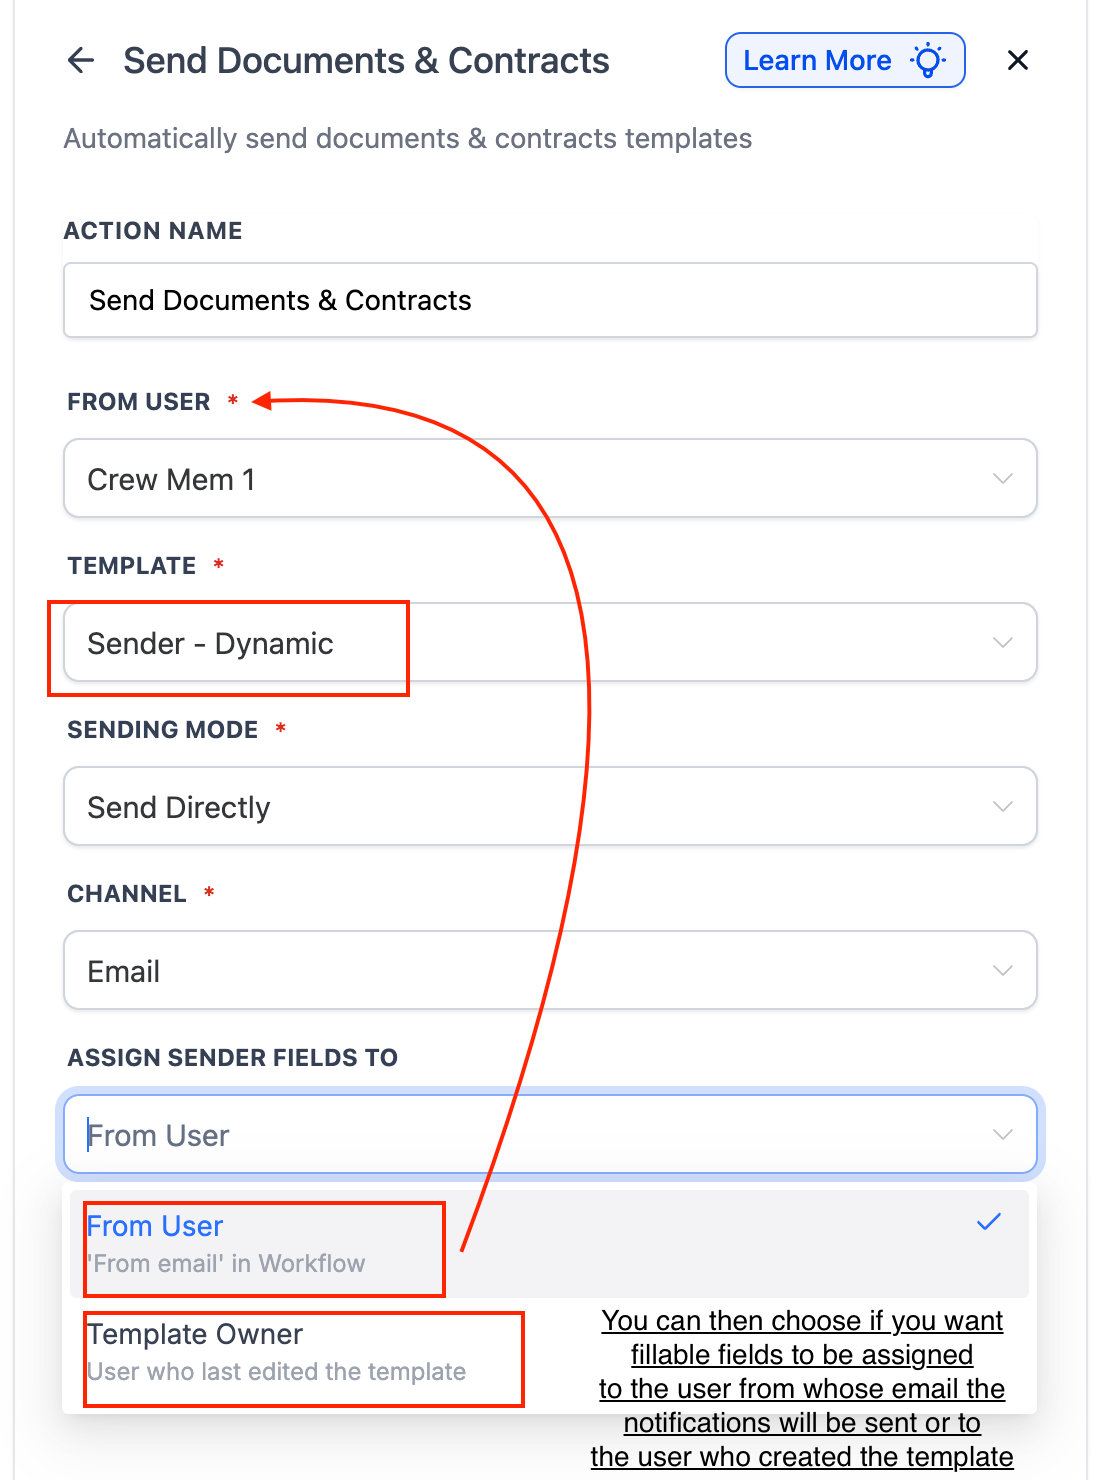
Map Sender Fields (Assign Sender Fields To)
When your template includes Sender fields, the workflow can assign them to the correct internal signer at send time—no manual edits.
Steps (Workflow)
1. Add the Send Documents & Contracts action to your workflow.
2. Select the From user (controls who sends the document and notifications).
3. Choose a Template that includes fields set to To be signed by → Sender.
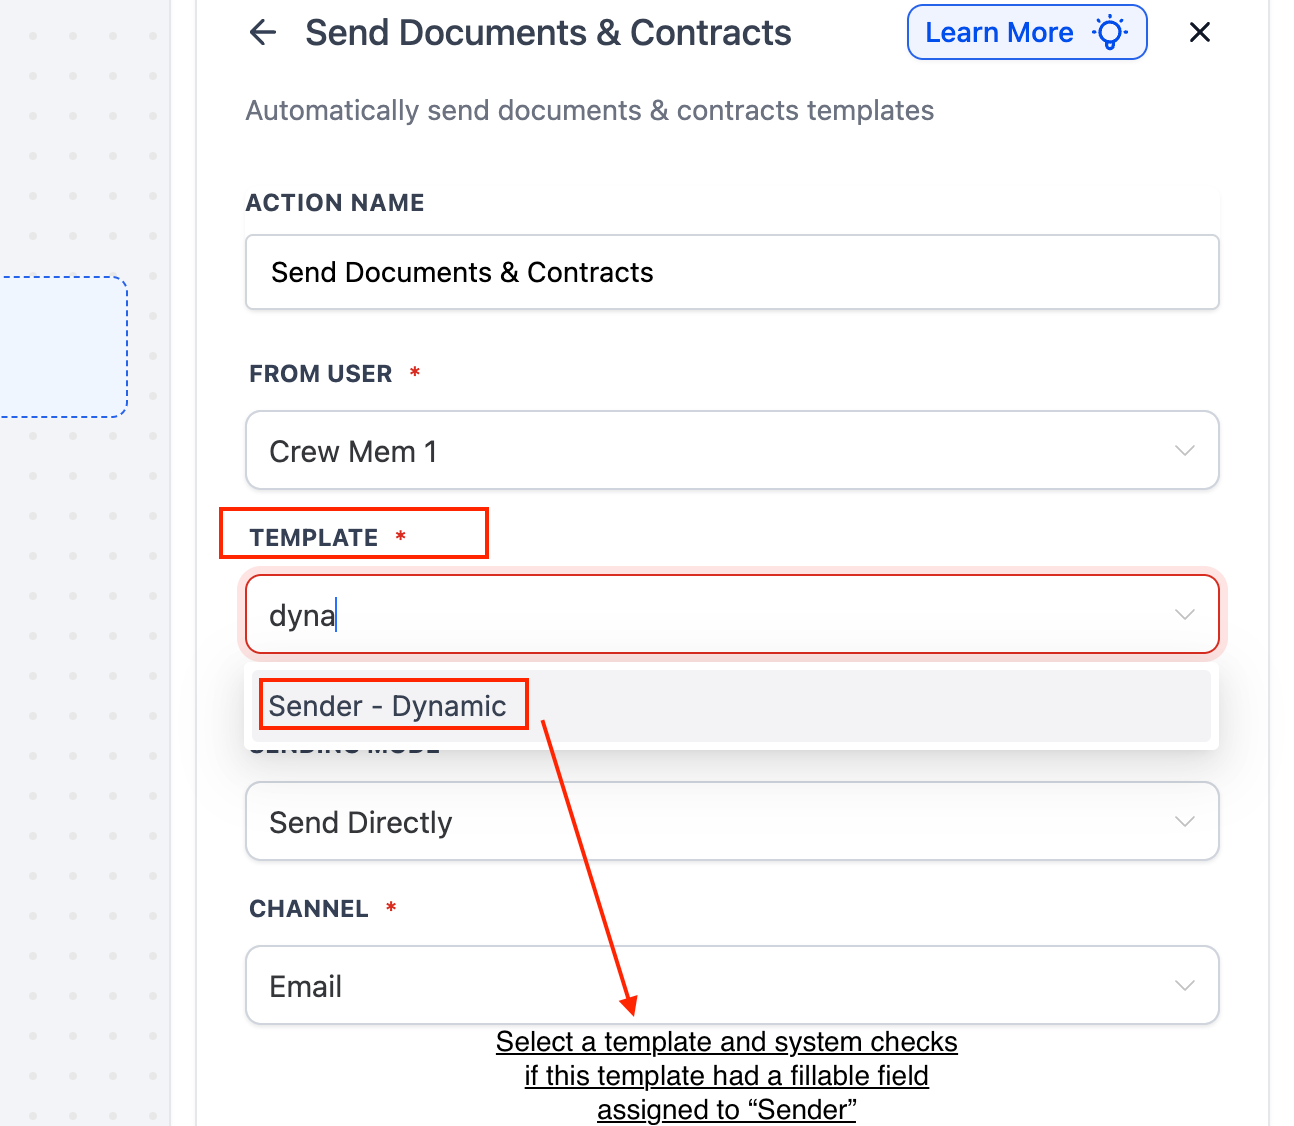
4. Under Assign Sender Fields To, select:
From User — the workflow’s sender signs, or
Template Owner — the user who last updated the template signs.
5. Choose Sending Mode and Channel (Email or Direct), then Save and publish.
Behavior: If the chosen template has Sender fields, they’re assigned before sending.
What the Contact Receives
Once triggered, the contact receives an email with a secure link to the document.
The email includes their name and the proposal or contract details.
They can click the link and complete the signature directly in-browser — no login or downloads required.
How to Track Document Status
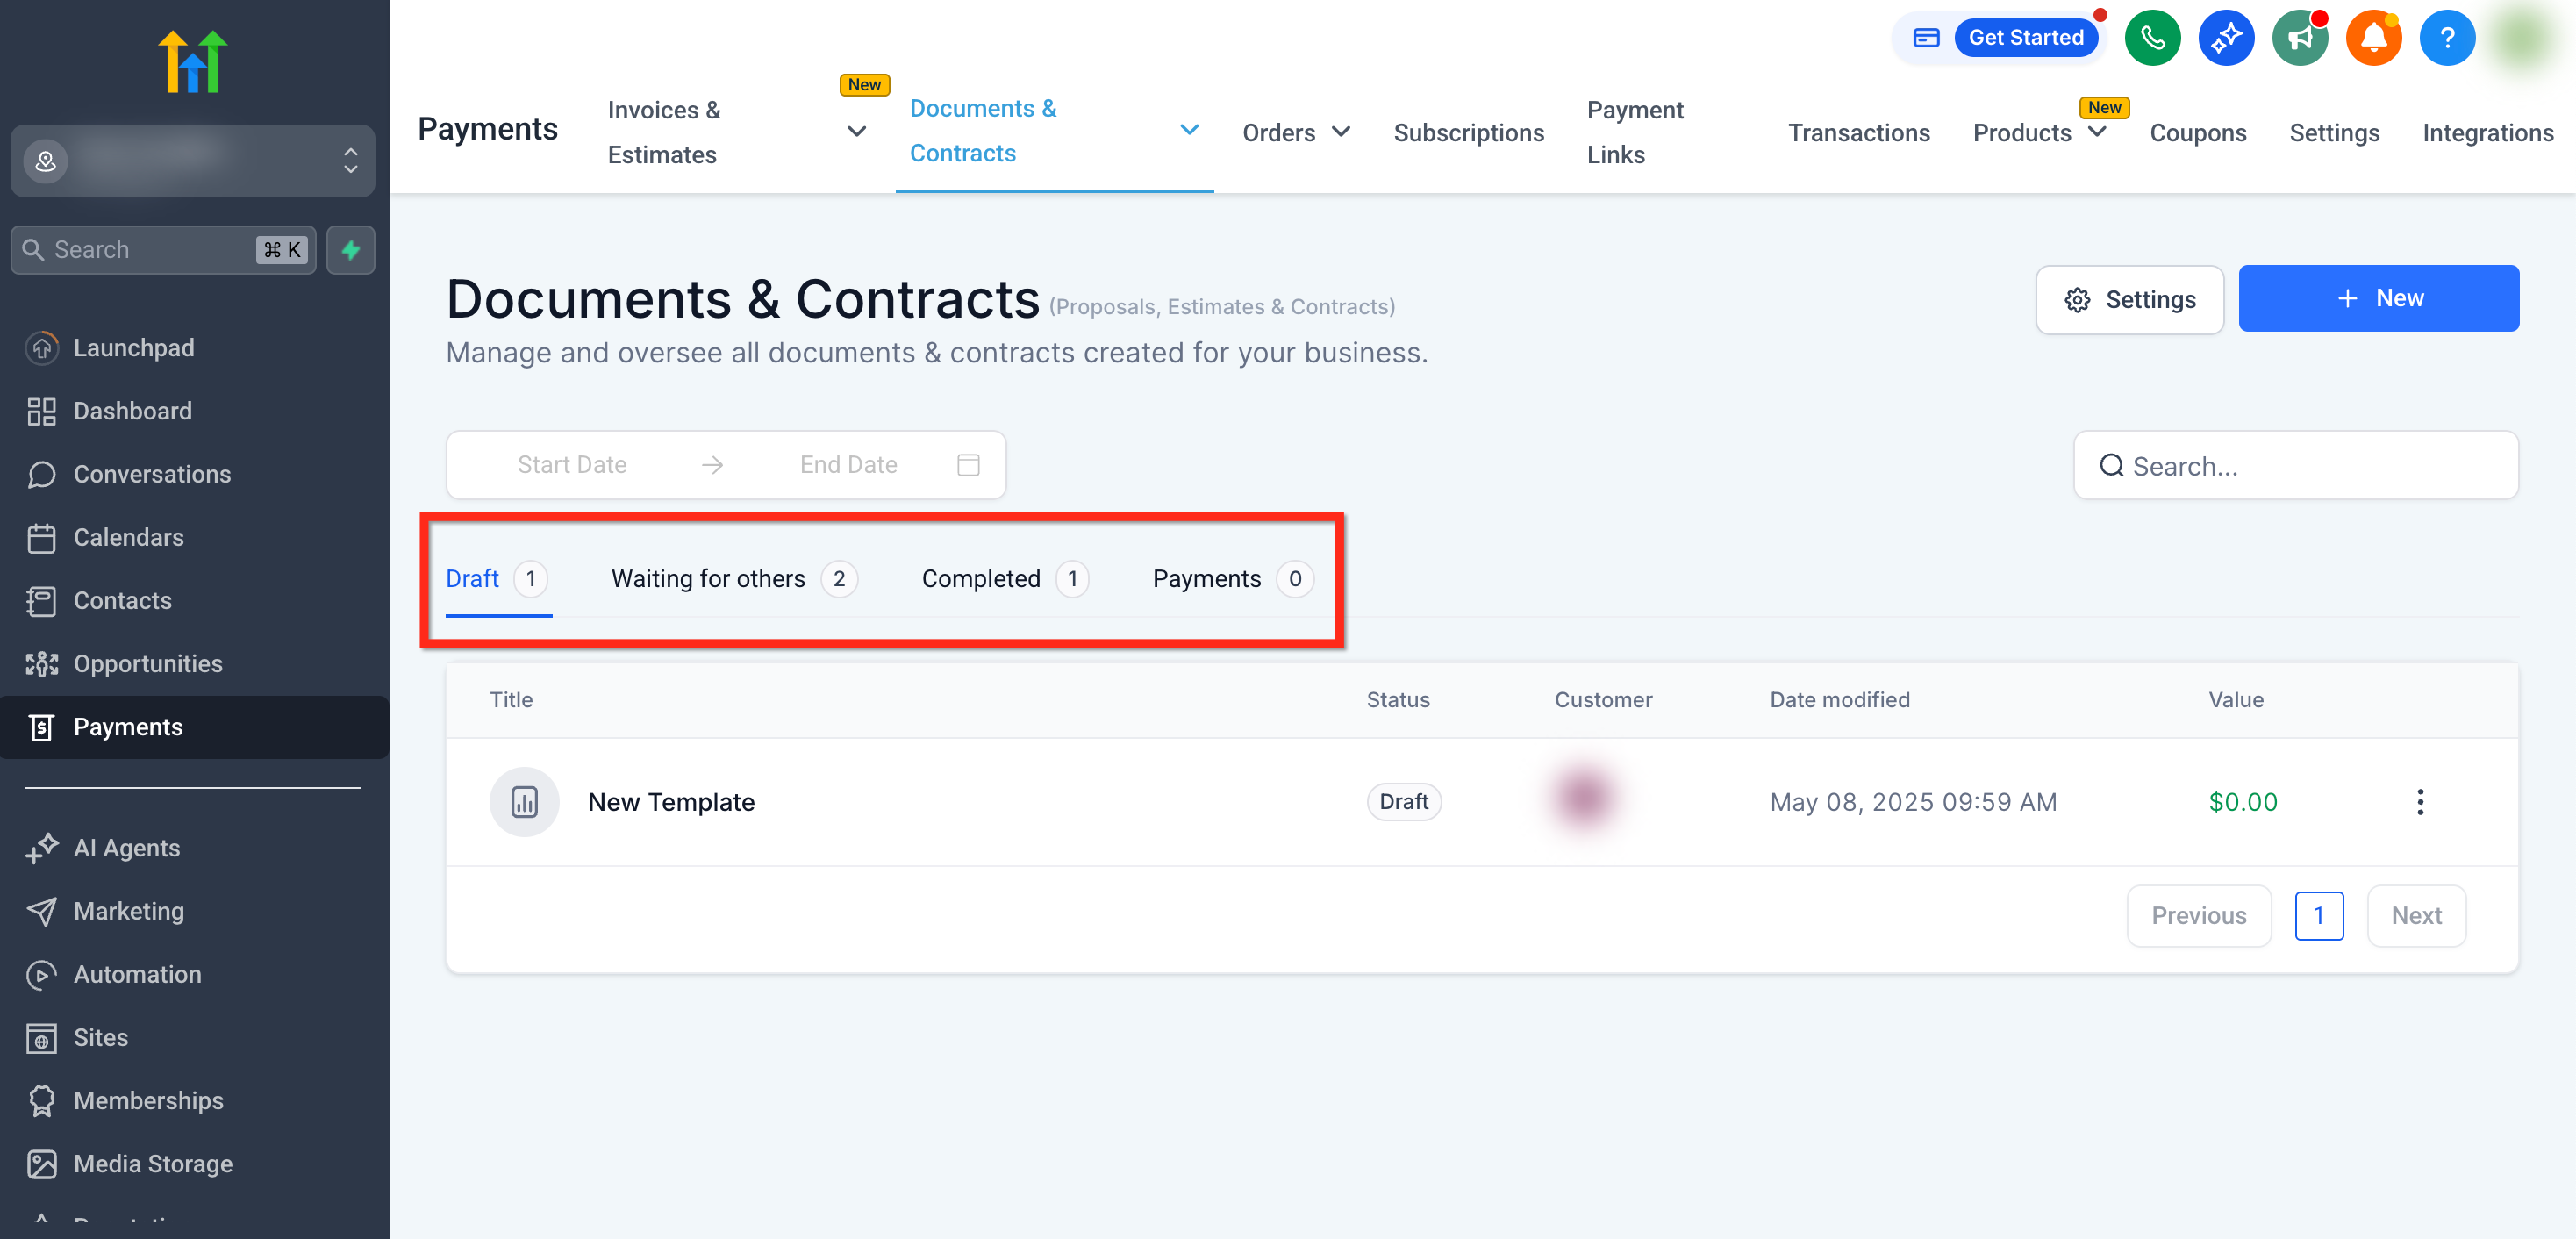
You can monitor whether a document is in draft, sent, viewed, or completed — all from the Documents & Contracts dashboard.
Go to Payments > Documents & Contracts > All Documents and Contracts.
Use the tabs at the top to filter by:
Drafts
Waiting for Others
Completed
Payments
Frequently Asked Questions
Q: Can I edit a document after it’s sent?
Only if you selected “Create as Draft.” If sent directly, the document becomes locked and cannot be edited.
Q: What happens if the contact doesn’t sign?
The document remains in “Waiting for Others.” You can resend or manually follow up with the contact.
Q: Can I send documents to more than one person?
Yes, use Multiple Recipient Support to assign signature elements to multiple people in a single document.
Q: Can I collect payment when someone signs?
Yes. If your template includes a product list with pricing, you can enable payment collection using Stripe or another payment integration.
Q: Are signed documents legally binding?
Yes, SourCherry’s e-signature process complies with major digital signature regulations for legality and auditability.
Q: Can recipients sign documents on mobile?
Yes — documents are mobile-friendly and can be signed directly from their phone’s browser.
Q: Can I preview the document before it’s sent?
Yes. Choose Create as Draft mode during setup to preview and manually send after final review.
Q: What happens if I try to send a contract via SMS but the contact has no email?
The contract will be created but will remain in Drafts. You’ll need to add an email to the contact before the contract can be successfully sent.
Q: Why does SMS delivery still require an email address?
We currently use the contact’s email as a required identifier for tracking, version history, and contract lifecycle management. Even if the contract is delivered by SMS, an email must exist in the contact profile to maintain system integrity.